My FAMLI+ Employer User Guide — Getting Started

Your Portal To Manage Your My FAMLI+ Employer Account
My FAMLI+ Employer is a secure system providing employers online access to manage the primary tasks of Colorado’s Paid Family and Medical Leave Insurance (FAMLI) program – including reporting quarterly wage data, remitting premium payments, and uploading opt out notification letters.
Access your account by visiting the FAMLI+ Employer portal. The Welcome page is where you will log in or begin to create your account. Note: You can select English or Spanish language in the upper right corner.
If you are registering for the first time, you will select the purple Create An Account text underneath the main Sign in with Login.gov button. After your account is created, you will select Sign in with Login.gov. In the future, you need to sign into My FAMLI+ Employer.
In order to safeguard your My FAMLI+ Employer account, you will need to sign in with Login.gov, which provides multi-factor authentication to the login process. Multi-factor authentication simply means the use of more than one method to verify that a user is who they claim to be and adds an additional layer of security.
Register Your Business
To ensure your account information is kept private and secure, each user account is required to register through Login.gov. This technology protects the data that is captured and displayed in the application.
Registering for your My FAMLI+ Employer account is done in multiple steps, so that we can verify that the person registering is the person responsible for accessing the account online. This verification is completed when you successfully pair an email link sent during the registration process.
There are five types of employer accounts available:
- Employer/Company Administrator
- Third Party Administrator (TPA)
- Local Government Employer
- Self-Employed Individual
- Employees of an Opted-Out Local Government.
The administrator of each account can add multiple users and they can limit what information or functions those users can access. For instance, you could give a secondary user access to file wage reports and make payments, but not give them access to add or remove other users. Administrators can also grant access to other users to view and manage claims data via the HR Benefits Dashboard.
Important: self employed individuals and employees of opted out local governments who choose to elect coverage through FAMLI are required to opt in for three years.
The person completing the registration process for your My FAMLI+ Employer account will be the primary account administrator. They will have access to all information available for the account. The account administrator will be able to view information, make changes, complete transactions, and enable online access to other users of the account allowing a unique login for each user. The person chosen to register your online account should be trusted to handle sensitive and confidential information. Only employers with a current and active My FAMLI+ Employer account with the state of Colorado may use the My FAMLI+ Employer portal.
If you are registering for the first time, you will select the Create an Account text located below the large Sign in with Login.gov button.
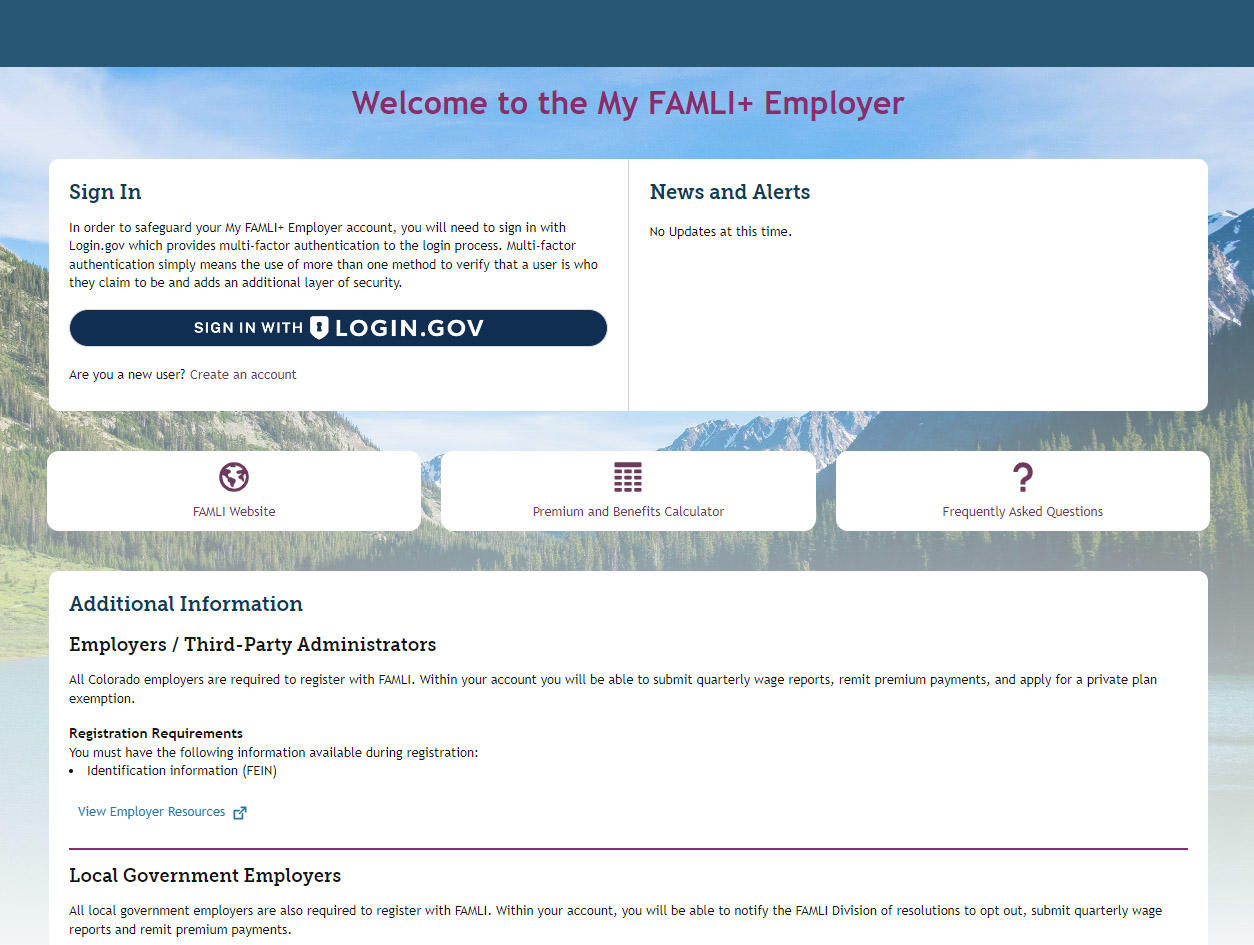
If you have already registered, you will need to update your account and link it to Login.gov. You will enter your current login credentials and select Sign in. This will prompt you to link your current account with Login.gov.
Once you have selected Login.gov, you will be taken to the My FAMLI+ Employer login page. Select Create an Account.
From the Create your Account page, enter the email address you wish to use and set your language preference. Check the box to indicate that you have read Login.gov’s rules of use before selecting Submit.
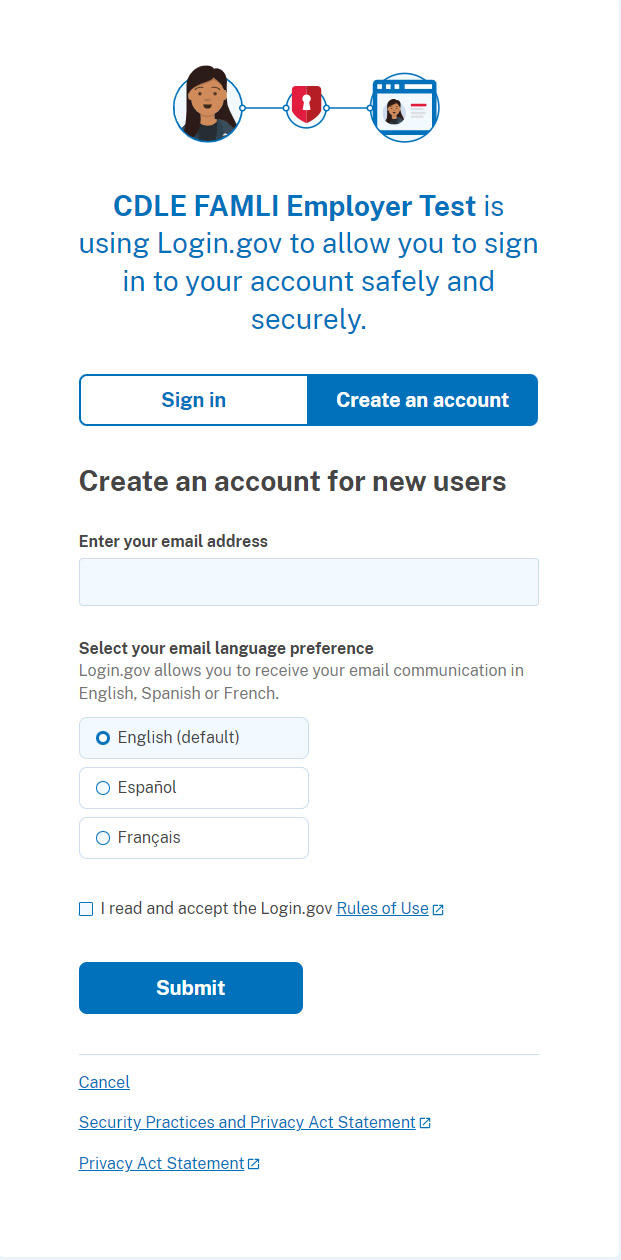
Note: Language settings in Login.gov do not change the language in the My FAMLI+ Employer Portal. This setting only affects the language used in system e-mails generated by Login.gov.
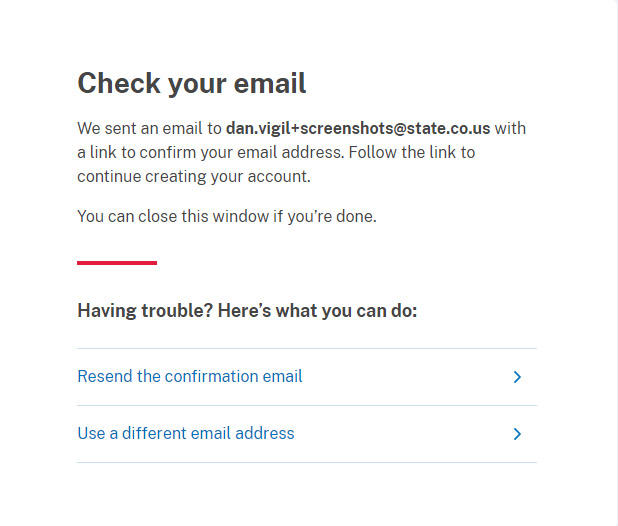
Once you have selected Submit, you will receive an email from Login.gov to confirm your email. Select Confirm Email Address. You will be returned to Login.gov to create your password.
Once you have created your password and selected Continue, Login.gov will prompt you to set up an authentication method. Select your preferred method and select Continue.
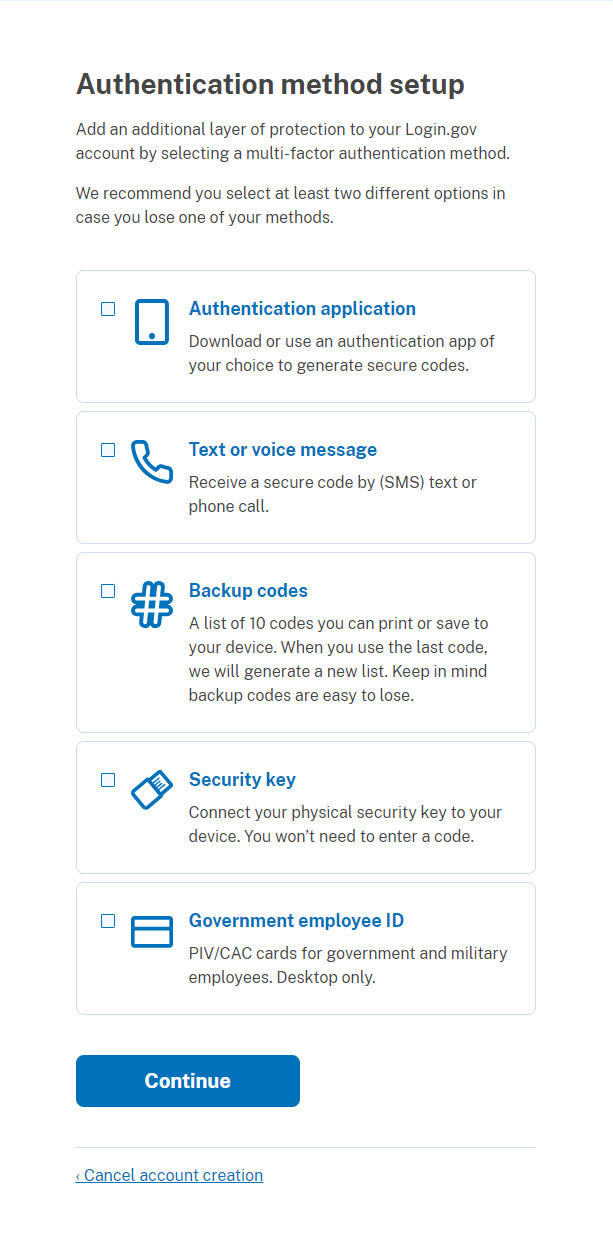
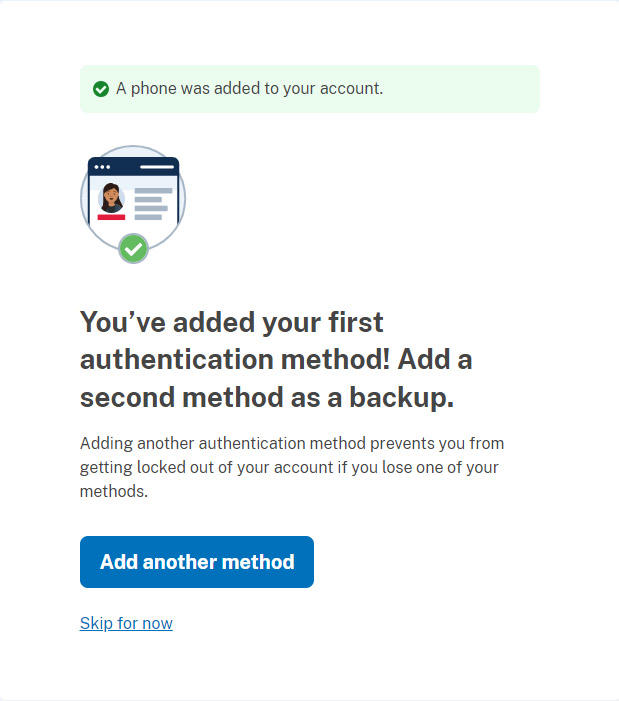
You will be notified by Login.gov when you have successfully authenticated your account. You have the option of adding a second authentication method here, or you can proceed to your MY FAMLI+ Employer Account to complete your registration.
After you have created an account in Login.gov, you will need to complete your user profile by adding your first and last name and phone number.
Take a moment to ensure this information is correct before selecting Save. Once you have completed this step, you can register your organization.
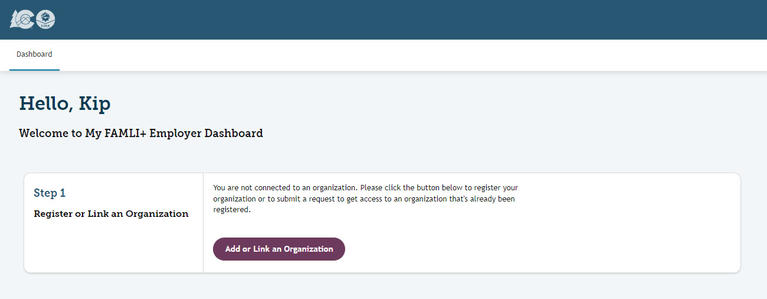
Note: If you are already connected to a business, you will skip this workflow. To add additional organizations, use Add or Link an Account under Manage My Accounts. If your new My FAMLI+ Employer account is not yet tied to any businesses, select Add or Link an Account from your dashboard.
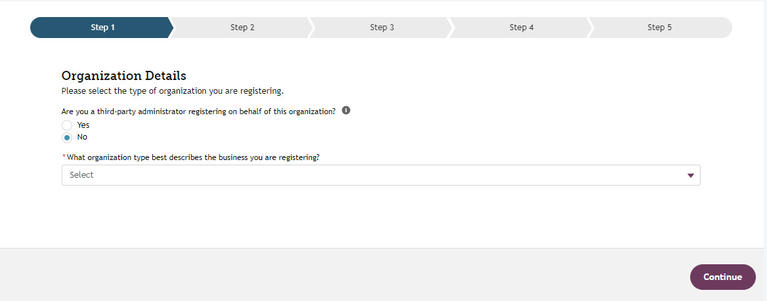
Step 1: When asked Are you a third-party administrator registering on behalf of this organization?, select No. Select a business type from the dropdown. Select Continue.
Note: If you are registering as a self-employed individual, you will be asked to upload a tax transcript and or a W2. Next you’ll be asked to verify your identity.
Local Governments: Employees of opted-out local governments will register with the option Employee of an Opted-Out Local Government, then select Continue. A pop up will appear asking if you want to continue, select Yes, I want to continue.
Step 2: Enter additional organization information. If your FEIN has already been registered, proceed to the Previously Registered Business section. If your FEIN has not been registered, enter the requested information and select Continue.
Step 3: Finish entering the information and select Continue.
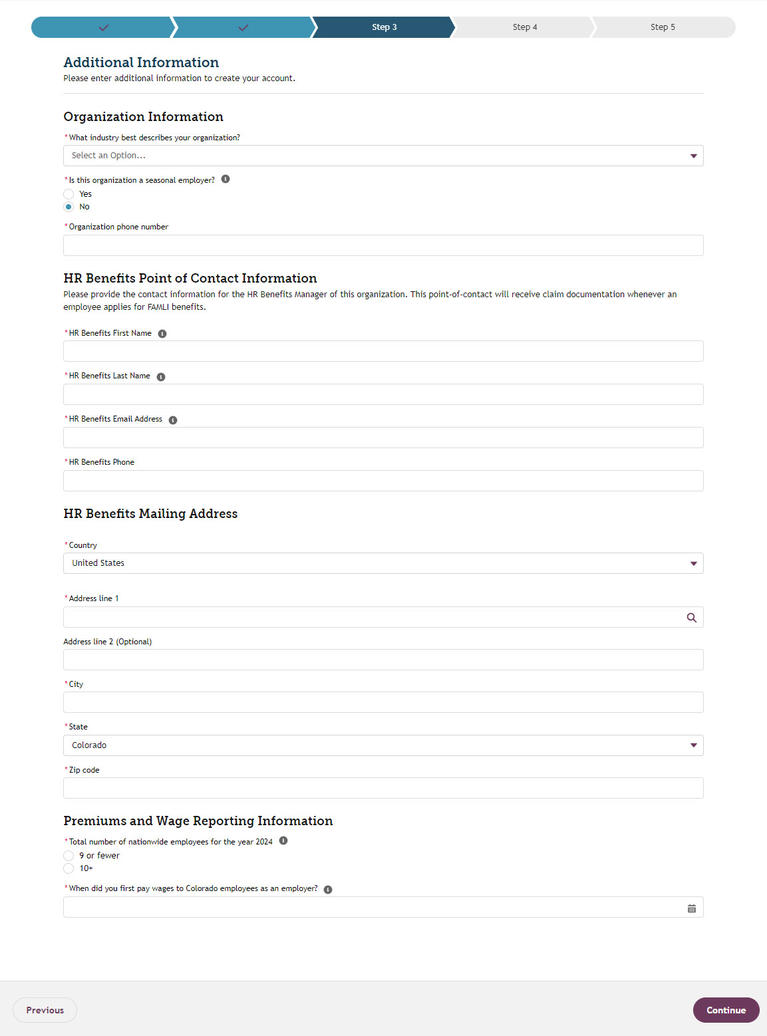
Now add the point of contact information for your organization's HR benefit manager. This designated contact will receive documentation when employees apply for FAMLI leave. If an employer does not have a designated HR benefits point of contact in My FAMLI+ Employer, employee benefit documentation will be sent to the main mailing address listed on the account.
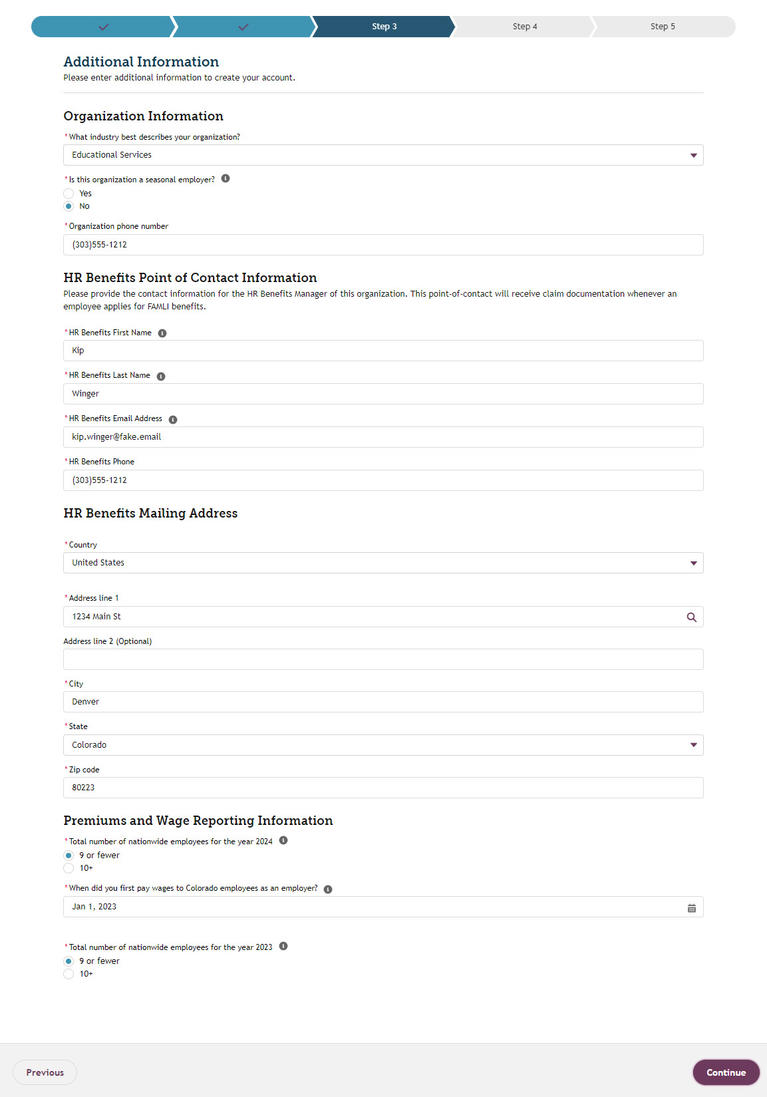
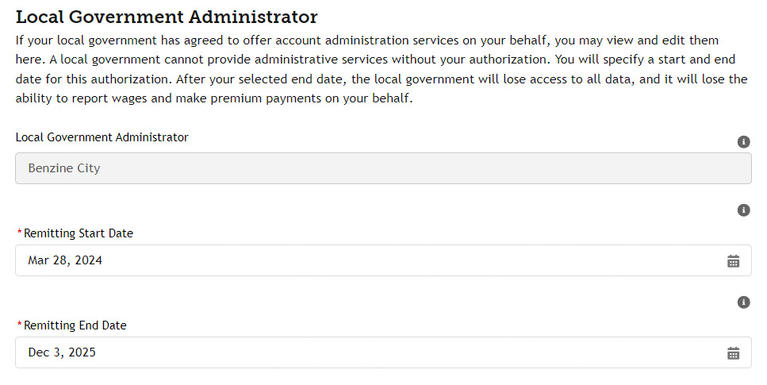
Employees of local government who have opted out: Fill in all required fields. When you reach the Premiums and Wages Reporting Information, you will need to select whether the coverage start date should begin in the past. If Yes is selected, you will enter the quarter and year the plan started. In order for a local government to remit wages for an employee, you will need to elect for them to start remitting wages and when the remitting will end. Employees will select Yes when asked if they would like help with managing their account, select the date the local government will start remitting wages, and when that assistance will end.
Note: When entering the total number of employees for your organization, base that number on the previous year’s headcount, including employees that were employed for at least 20 weeks. For more information on counting your employees, please visit our Employers page and select Determining Your Employee Headcount.
Note: Annual Total Employees workflow: Once a year, employers must update the total number of employees. The Premiums Calculator will use that record to charge the correct premium percentage. If employers have not reported their previous year’s Annual Total Employee (ATE) count, My FAMLI+ Employer will prevent wage reporting for past payroll periods. This workflow will appear upon login and can’t be bypassed. Companies managed by a TPA will not see this update; it will only appear on the employer's account. The screen lists all applicable accounts for which the employer must verify and update the total number of employees. All accounts must be completed in one session. The account will display the previous year employee account selection.
Note: If you are registering as an employee of an opted-out local government, you will be directed to assign your local government as an administrator on your account. This will allow your local government to remit wages, make amendments, and make payments on your behalf for each remitting period. You will elect for your account to be administered and then enter the remitting period.
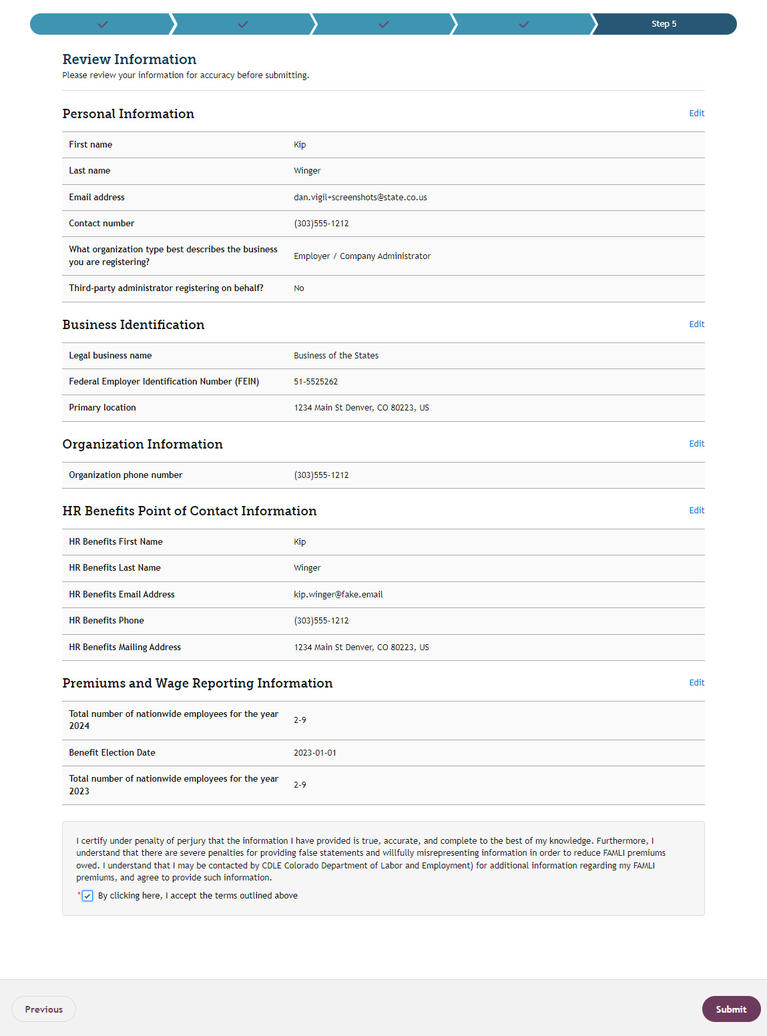
Step 4: If other users in your organization will be accessing the system, you can add additional users during the registration process and set their permission level.
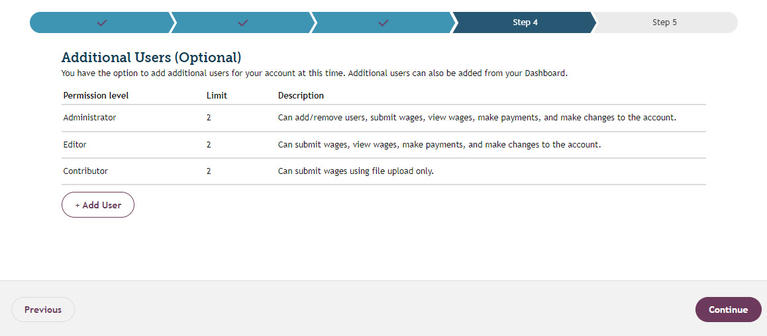
Step 5: Review Business Information: Check the attestation box and select Submit.
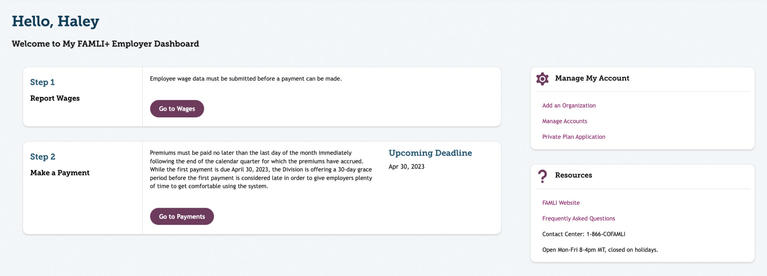
The system will display a Thank You! page indicating that you have successfully completed the first step of the registration. Select View Dashboard to be taken to your dashboard. Your dashboard will now allow you to manage information for the account that you registered.

Note: If you have additional organizations to register and you want to manage them from the same login, view the right-hand section labeled Manage My Account and select Add an Account. Proceed through the same steps to register your additional organization(s).
If you search for your company’s FEIN and find that your organization has already registered, you can request to be added as a user for that account. Select Continue.
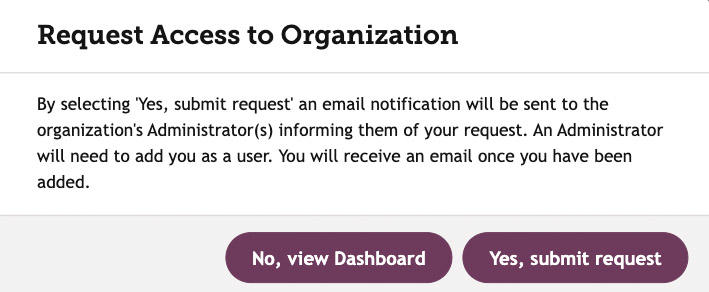
You will see a pop-up message confirming that you wish to request access to that account. Select Yes, submit request.
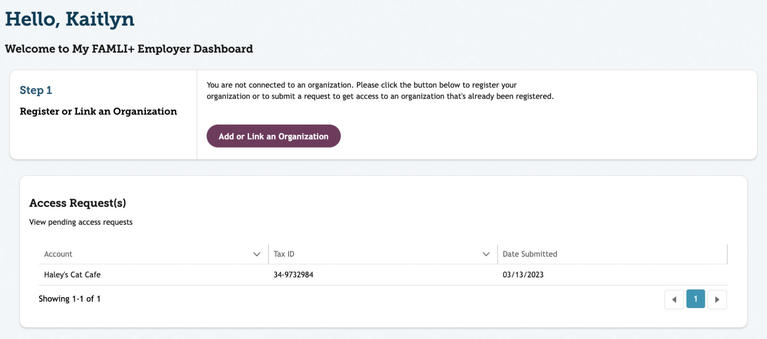
Once submitted, you will now see an Access Request(s) section on your dashboard. There, you will see the name of the account that you requested access for.
The administrator for that account will receive an email notification for your request. They will also see your name on their dashboard under Access Request(s).
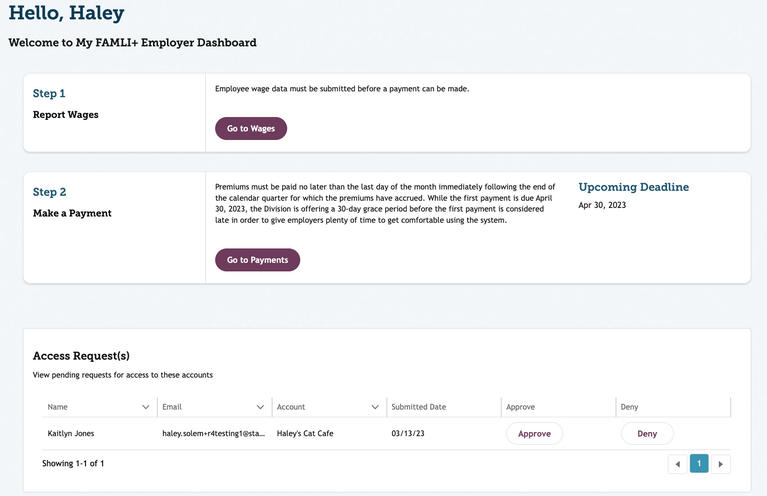
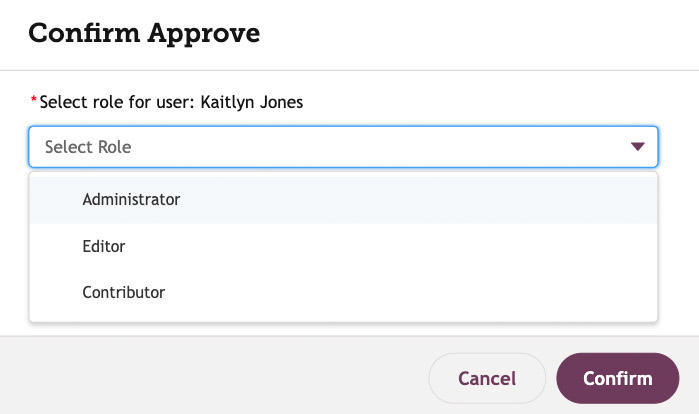
There, they can select Approve or Deny. After selecting Approve, the administrator will select the level of access for this user. They will then select Confirm.
If denying, the administrator will select Deny and then Confirm.

The administrator will receive both a portal notification and a Success pop-up message.
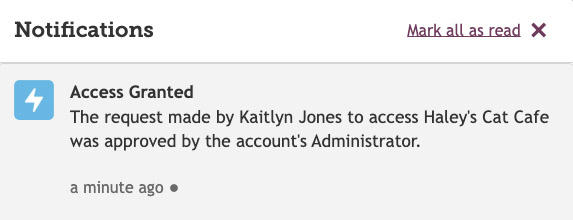
The requestor’s name will also disappear from the Access Request(s) section on the dashboard. The person who requested access will receive an email as well as a portal notification, whether approved or denied. If approved, the requestor will now have access to the account from their dashboard.
Note: These requests are also accessible from the Manage Accounts page. Select the account, and go to the Users section.
If you are a third party payroll company with Colorado employees you will need to register your company as an employer in addition to being registered as a TPA. Instructions on registering as an employer can be found in this user guide.
Registering TPA & Employer Accounts with Two Unique Emails/Logins (Recommended)
As a best practice, we recommend that TPAs use a second, unique email address for their employer account to mitigate the risks associated with peer wages being visible to the user who is managing client wage information in the FAMLI system. If your organization has different people responsible for managing FAMLI program compliance for your own TPA business versus managing clients, they should have two separate logins. If you are responsible for both, skip to the section for one email/login.
Registering TPA & Employer Accounts with One Email/Login
If you are the person who manages your TPA clients and your TPA business, you can do this by registering with a single email. We recommend that the user setup the employer account first, and their TPA account second.
With the employer account set up, navigate to your dashboard. Select Add an Organization in the Manage My Account section.

From Step 1, the Personal Information page, select Employer/Company Administrator and the correct role or title. Select No under I am registering on behalf of another business and select Continue.
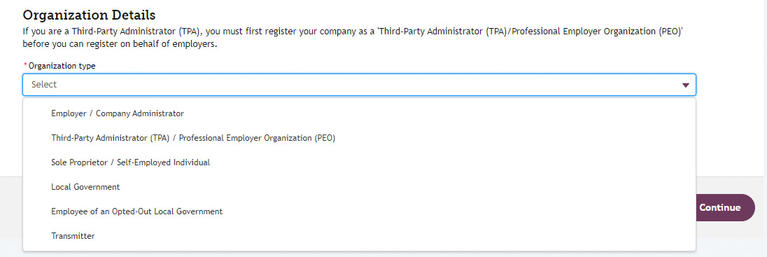
Search the same FEIN used to register the employer account. Because of how TPA FEIN’s are set up in the FAMLI database, the FEIN will NOT show up as a previously registered employer.
Complete the remainder of the registration process. This is the same process as an employer would go through. You will have the opportunity to review the business information at Step 5 before selecting Submit.
When you have completed the registration process for the employer account, return to the dashboard and select Manage Accounts. You can view account overview information for both the TPA account and the employer account. Each will have its own unique FAMLI Account ID.
Log in to My FAMLI+ Employer
After you have registered, you can log in and access your account from the Welcome page by selecting the My FAMLI+ Employer button on our website.
Bookmark the My FAMLI+ Employer Login page to find it easily in the future. You can also find it on this website.
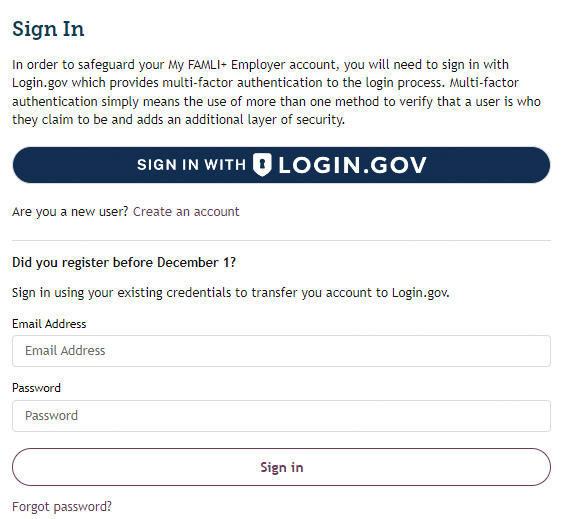
Select Sign in with Login.gov. You will be taken to Login.gov.
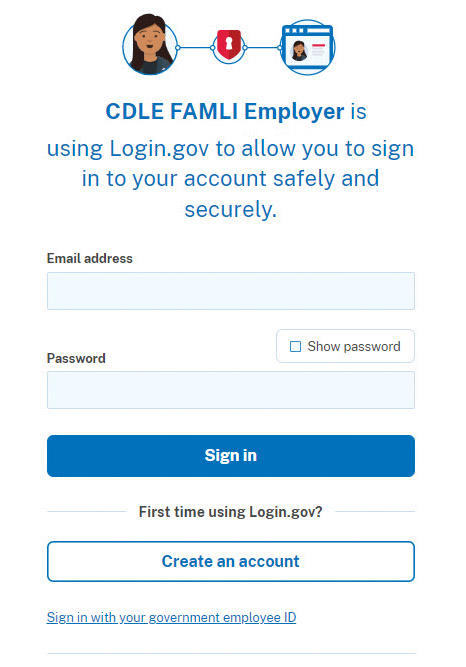
You will be prompted to authenticate your login. This will be the preferred authentication method you set when you registered through Login.gov, or when you connected your My FAMLI+ Employer account to Login.gov.
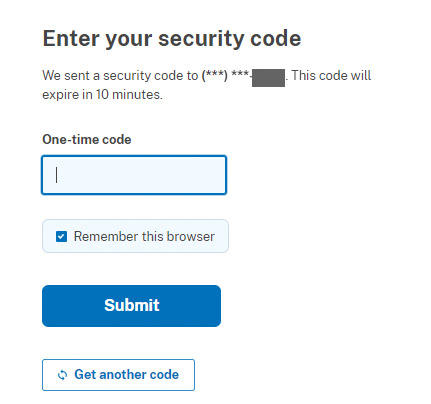
- Once you’ve successfully logged in, you will be taken to your employer dashboard.
Note: If you are having trouble with Login.gov, view the Login.gov user guides for frequently asked questions or contact Login.gov for help via email or phone.
Once you’ve created your user account, log in to your My FAMLI+ Employer account. You will be taken to the dashboard. From here, you will need to either register an organization or link to an organization that’s already been registered.

Note: If your user account is already linked to a business, you will skip this. To add additional organizations, use Add or Link an Account under Manage My Accounts.
Once linked to an organization, you can manage your accounts, add organizations and new users, make payments, and report wages.
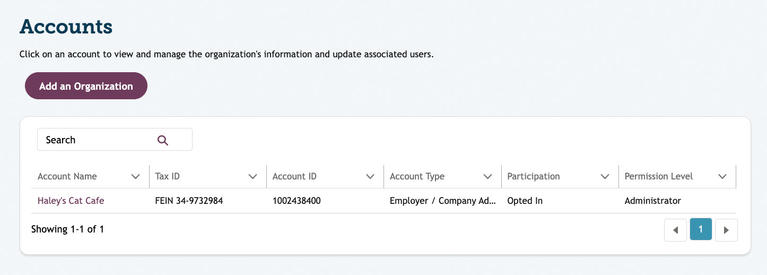
If you upload documents in the portal, you have the ability to view and download those documents later. From your dashboard, under Manage My Accounts, select Manage Accounts.
Search for and select your account from the list shown.
Scroll down to the Files section. Select the relevant file name to view and download it.

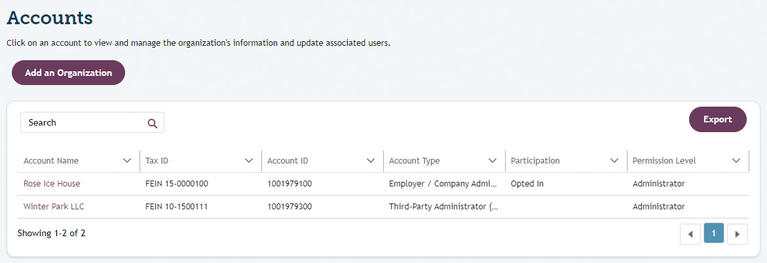
Employer and Third Party Administrator Users can export account data from their Accounts page. Selecting Export will immediately download that data into an Excel file. Data that can be exported includes Account Name, Account Type, FAMLI ID, FEIN, Total Employees, Plan Type, and Plan Start Date. The system will export up to 2,500 accounts into an Excel spreadsheet.
In addition to the Employer Dashboard, you will have access to a Wages & Payments dashboard. You can access this dashboard by selecting the “Wages & Payments” link in the upper left hand corner of your dashboard. From here you can view quarterly status of reported wages, payments, and upcoming deadlines. You will also be able to review your payment history, find resources and help.
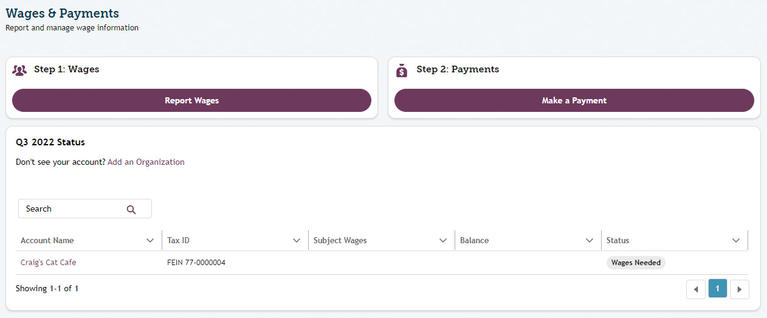
There are a number of status indicators that you’ll see associated with your wage reports. Wage & Payment statuses include the following titles:
- Wages Needed: No wages reported for current quarter.
- Wages Processing: Wages for the current quarter have been submitted but are processing.
- Wages Error: Wages for current quarter have been processed, but there is an error.
- Payment Needed: Wages for the current quarter have been processed and there is an outstanding current quarterly balance.
- No Payment Needed: $0 wages reported.
- Paid: Wages have been processed and there is no outstanding current quarterly balance.
- Payment Error: There has been an error while processing the payment for the current quarter.
- Late Payment: FAMLI has not received the payment by the Quarterly Report Due Date and the Premiums amount owed is greater than $0.

By selecting the account name link in the quarterly status box, you will be able to view wage reports by quarter. Here you can check your balance and payment status for that specific account. This page also includes a statement of your current total balance.

Details of the additional sections in Wages & Payments as well as available functions are discussed in the next page of this guide.
Note: A self employed individual or employee of an opted out local government cannot report wages and pay premiums for a period of time prior to their registration date. The system will only recognize the registration date as the start date for coverage, you cannot backdate the start of your coverage.
In the employer dashboard, the menu My Tasks takes you to the self-service area to complete outstanding tasks. Upon logging into your My FAMLI+ Employer account you will be prompted to complete outstanding tasks. Certain tasks are required and must be completed before the user can resume wage reporting. Critical tasks will be displayed with an orange banner throughout the portal until they are completed.
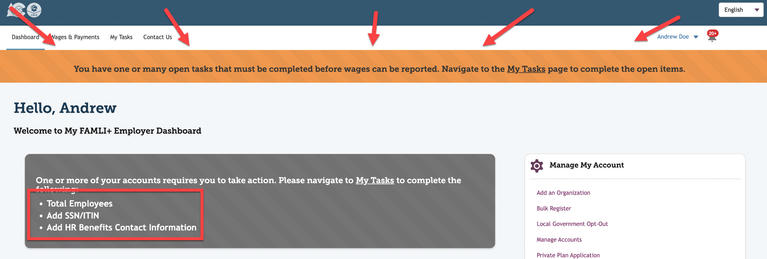
- Annual Total Employees (ATE) Task: Employers will need to complete ATE Task from My Tasks. ATE is a critical task and must be completed before wages can be reported.
- Add SSN/ITIN Task: If there are missing SSN/ITIN numbers for employees, the system will create this task as a critical task so employee registration can be completed before wages are reported.
- Add HR Benefits Contact Task: This task will be displayed if no HR contact has been added. This task is not required. Users will be able to report wages without adding an HR Benefits Contact, however, we strongly encourage adding an HR Benefits Contact to streamline the ability to keep track of your employees’ FAMLI claims.
- Verify Identity Task: Email template notifies self employed users about their open Verify Identity tasks. The My FAMLI+ Employer portal now has a Verify Identity page. Users can upload their required ID documents there. Acceptable documents include:
- State issued driver’s license
- State issued ID
- Passport
- Visa
- Matrícula Consular
- Permanent resident card
- Military ID
- Past Due Accounts: Employers will receive notice when one or more of their accounts are past due on premiums payments. The system includes a feature that determines the overall past due amount instantly. This ensures accurate calculation of the past due amounts. The balance includes outstanding premiums, interest, penalties, and fees. The calculations regularly update to provide users with the most current information.
- Installment Payment Agreement Attestation: If an employer would like to enter into an Installment Payment Agreement (IPA), they will need to contact the Division. This task will only appear after an employer requests an installment payment agreement and the terms of the repayment plan have been approved by FAMLI. More information about the Installment Payment Agreement can be found under the Payment section.
- Full Legal Name: Self-employed individuals are required to provide full legal names and confirm that they understand the rights and responsibilities of the coverage they have chosen as an individual and not a business entity.
Self-employed individuals (and employees of opted-out local governments) will see a tab, table, and page called Annual Tax Transcript and W-2 under My Tasks that allow them to provide required documentation to continue participation in the FAMLI program.
If you do not already have your most recent record of account transcript, please go to IRS Document Link to download a copy or request one be mailed to you. For more information on Transcript Types, please go to IRS Transcript Types Link. In the My Tasks page, a new tab titled Annual Tax Transcript and W-2 will display if the logged-in user has an Admin or Editor ACR role, or an active TPAR, to a Self Employed Account with an open Annual Tax Transcript and W-2 Employer Task.
The logged-in user will see the orange banner alert run across the top of their screen throughout the portal if they have an open Annual Tax Transcript and W-2 Employer Task.
Upon clicking into the Annual Tax Transcript and W-2 tab, the page displayed is titled Annual Self-Employment Wage Verification. It includes a table listing all accounts where the logged-in user holds an Admin or Editor ACR role, or has an active TPAR, that have open Annual Tax Transcript and W-2 tasks.
By clicking the Upload Documentation hyperlink, the user is taken to a page where they can upload the necessary documents to complete the task. The upload component can accept a maximum of 10 document files. Each file cannot exceed 2 gigabytes. Only PDF, Doc, and Docx file formats are accepted. If the user has more than 10 document files, they need to combine additional files into one document file, so that they can upload all required documents and not go over the 10-document file limit. Once a document has been uploaded, it cannot be removed. If the user needs to remove a document before submitting wages, they need to cancel the transaction and start over.
Upon successfully submitting, the user will be directed to the confirmation page, where they will be able to navigate either back to the My Tasks page or to Report Wages. The user can also leave the confirmation page by selecting any tab or option in the main navigation menu.
The user will be able to view the documents they uploaded via the Files component under the Manage Account page for that specific account. The system will categorize the file under the File Type column to clearly indicate its content, as the original file name may not accurately describe what the file contains.
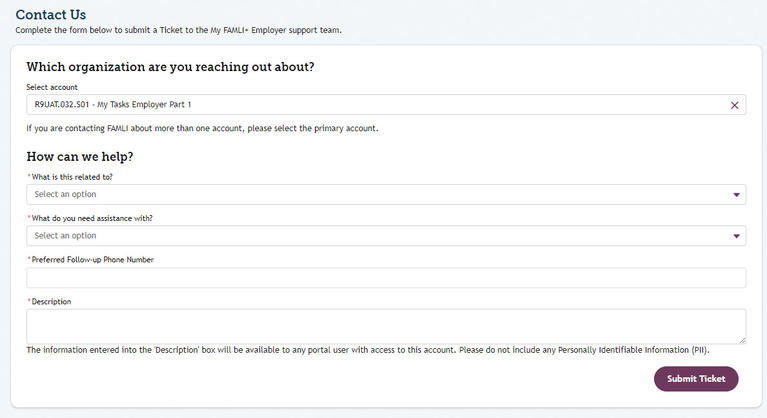
In the employer dashboard, the menu Contact Us takes you to the self-service area to create a support ticket.
Use the Contact Us feature to ask non-urgent questions. Ensure your organization name is listed in the Select Account field. If there is more than one account, begin typing your organization name, the name will display as you type. Include other details in the Description such as your FAMLI ID or FEIN, along with the reason for contacting FAMLI.
What do you need assistance with? will vary based on what the user selects in the What is this related to? field.
When you select Submit Ticket, a Ticket Created Successfully page will display a support ticket number for your records.
Local Governments: Opting Out of FAMLI
Local government entities can opt out by uploading a letter detailing the outcome of their governing body’s vote. Only local government employers who have voted to opt out of FAMLI will need to follow this workflow. Local governments who will be participating in FAMLI do not need to vote and can ignore this feature. These local government employers will use My FAMLI+ Employer in the same way as all other employers and can skip to the Wage Reporting section of this guide.
For Local Government Employers
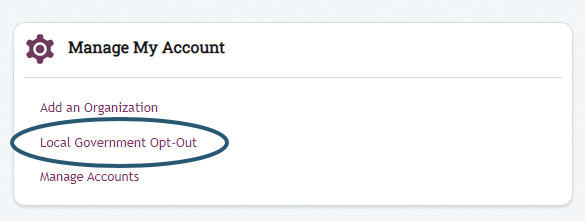
If your organization has voted to opt out, from the dashboard, select Local Government Opt-Out.
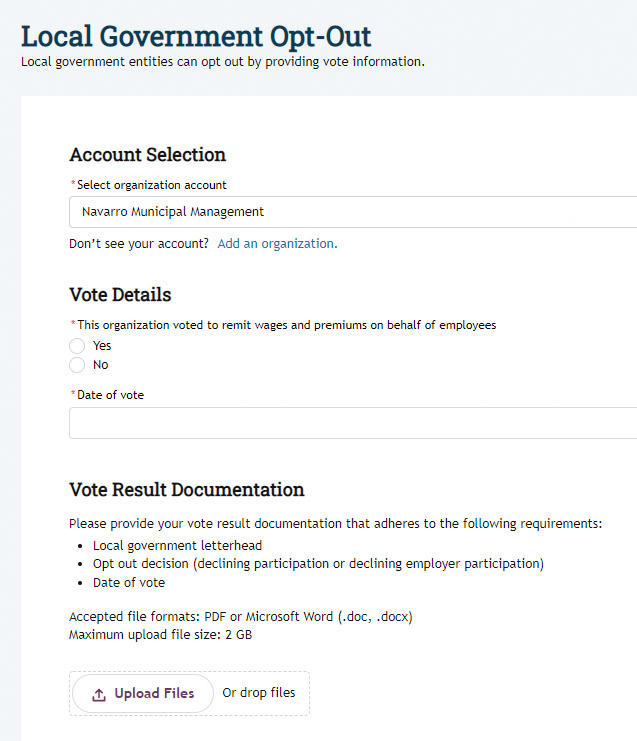
- Select your business (local government employer) account.
- Select whether or not you will remit wages and premiums, on behalf of employees who voluntarily wish to participate, by selecting Yes.
- Enter the date the vote was conducted.
- Upload vote result documentation and select Done.
- Confirm details and documentation and select Submit.
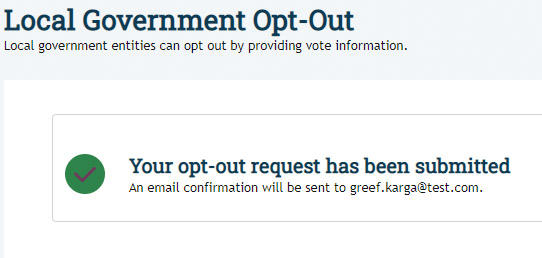
When you’ve completed the opt-out request, a verification message will appear letting you know the request was successfully submitted.
Viewing Your Opt-Out Document
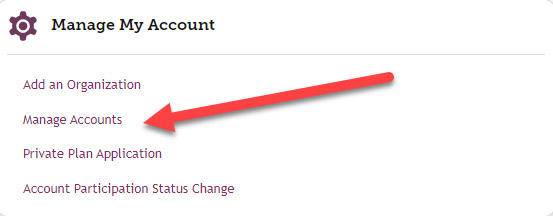
If you have submitted an opt-out vote document, you will be able to view that document in your dashboard. From your My FAMLI+ Employer dashboard, select Manage Accounts.
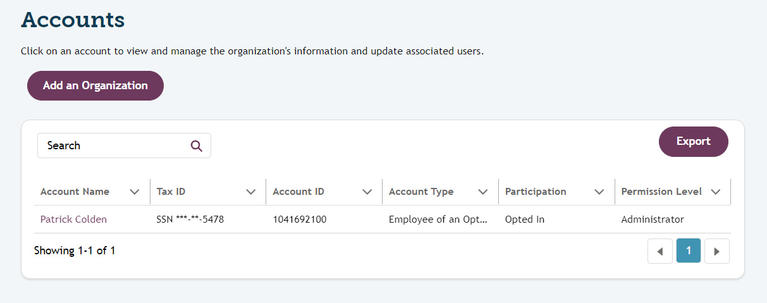
From the Accounts page, select the account you want to view.

When you arrive at that account’s page, scroll down to Files and select the link for your organization’s opt-out document.

A document viewer dialog box will appear allowing you to view your document.
Local Governments: Opt-Out Remitting Registration
Employees of an opted out local government can allow their local government employer to remit wages on their behalf. If the employee does not have an account with My FAMLI+ Employer, they will need to create an account. If the employee already has an account, and needs to allow the local government to remit on their behalf, they will need to update their account. To create a new account, follow the instructions in this guide, noting special instructions related to local governments.
Employees of opted-out local governments: Updating an already existing account
If you are an employee who already has an account with My FAMLI+ Employer, and you wish to have the organization start remitting wages or end remitting payment, you will need to log into your My FAMLI+ Employer account and select Manage my Account.
On the account page, select your name. Scroll down to Organization Information and select Edit.
From this page you will be able to edit your account. You can add a new remitting start date and end date if you request the organization begin remitting for you. In addition, you can elect to end remittance by updating the remitting end date.
Third Party Administrators: Registering Client Accounts
If you have not registered your TPA account, or are not connected to a TPA account, you cannot register on behalf of a business. You must first register the TPA or be connected to an existing TPA account.
Once your TPA account is complete, you can register your client accounts. Registering on behalf of your client can be done manually from your TPA dashboard, by bulk uploading a CSV or XML file, or by connecting your TPA organization via our API. Information about bulk upload and setting up the API are available on our TPA page.
Registering Client Accounts from your TPA Dashboard
From your TPA dashboard, select Add an Organization.

When registering on behalf of a client, your personal information will already be complete. In the Organization Details section, select the correct Organization Type, and select Company Administrator as your role/title.
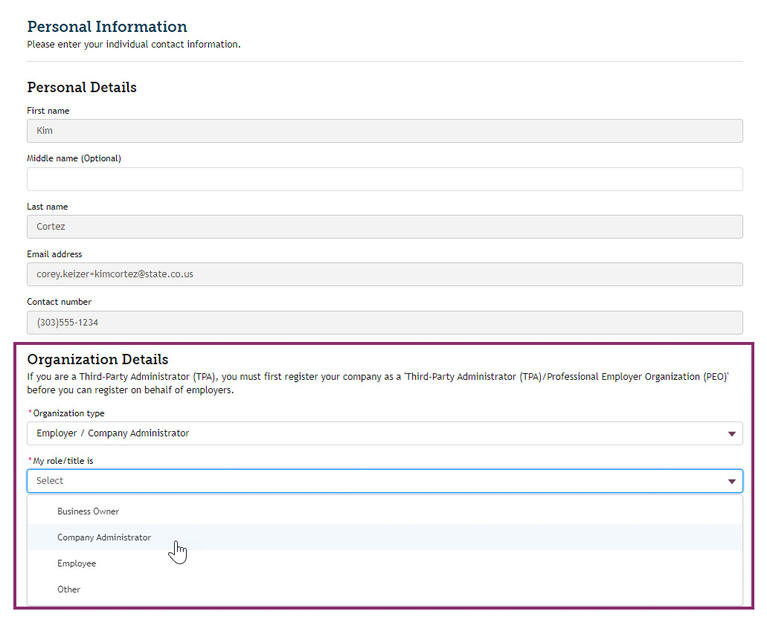
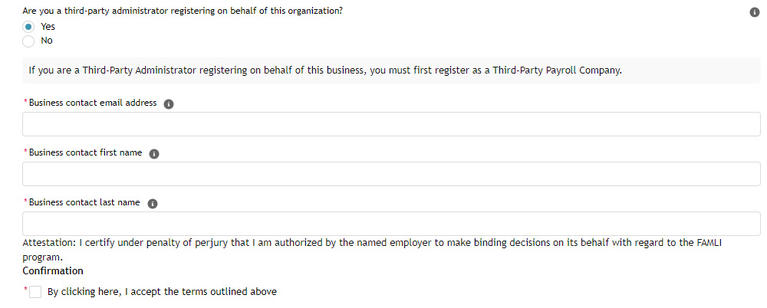
For the question: Are you a third-party administrator registering on behalf of this organization? select Yes.

Doing so will open additional fields to complete the business contact information for the client organization. Include their contact email, first name, and last name. Select the attestation statement below the new fields and select Continue.
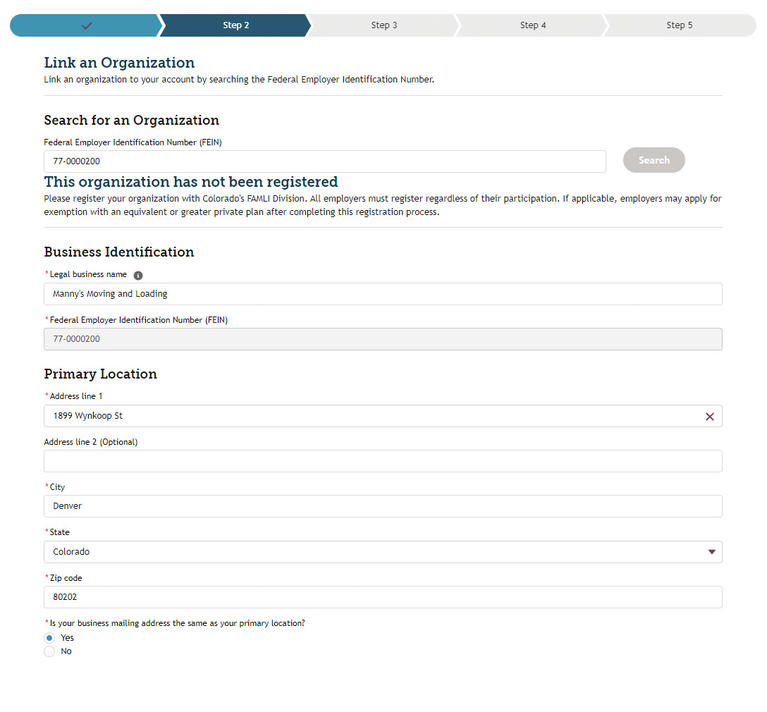
Find your client’s organization by entering their FEIN and selecting Search. If the client organization is unregistered, additional information fields will open and prompt you to complete the Business Identification section. Include the company’s legal business name and its primary location. If this company’s mailing address is different from its primary location, select No. This will open additional fields for you to complete the mailing address. Once you’ve completed these steps, select Continue.
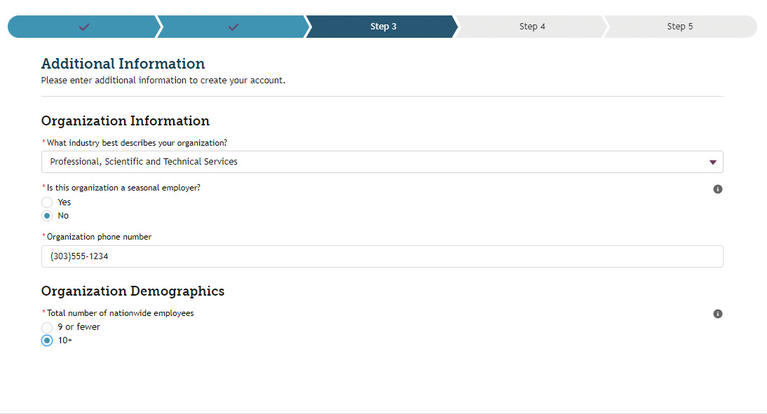
Complete the Additional Information section in Step 3 and select Continue.
If your client has additional users that they would like added, you can add those users at Step 4. Once you’ve added any additional users select Continue.

When you arrive at Step 5, take a moment to review the registration information to ensure its accuracy. Review the attestation statements at the bottom of the screen, check the boxes, and select Submit. You will receive a confirmation of your registration.

When you return to the TPA dashboard you will see the client account has been added to your Accounts page when you select Manage Accounts link. When you manually add a client account, your client will also receive an email inviting them to the portal.
Bulk Registering Client Accounts
If you are a TPA with a large number of clients, you may want to consider bulk registering your client accounts instead of manually entering each of them. You can find tools for TPAs, sample bulk registration documents (such as CSV and XML files) and file specification guidance on this website. We highly recommend including a valid business email address for each employer you serve in your bulk registration file. This will ensure each business you serve is notified that their TPA has registered on their behalf and allows businesses to self-serve and gain access to their My FAMLI+ Employer accounts from that email address, without needing support from the TPA. If you do not have an email address for your clients, please leave this field blank.
If you are planning to upload either a CSV or XML file to bulk register your clients, start at your TPA dashboard and select Bulk Register.

The Bulk Upload page includes links for CSV and XML file templates as well as the specification guide, which includes information on both file types.
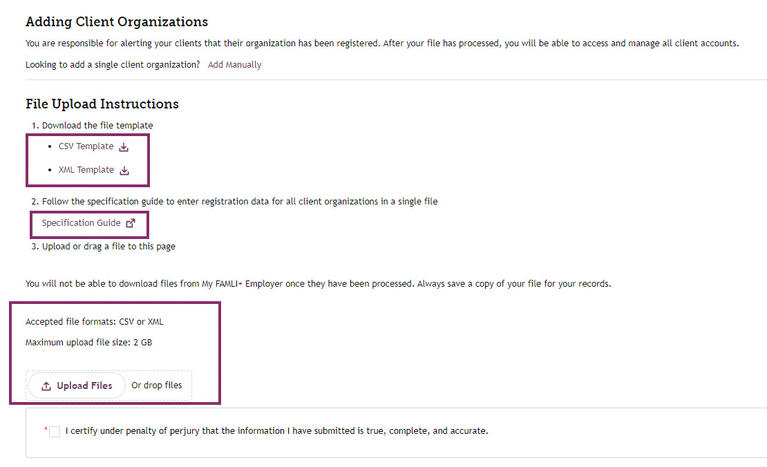
When your file is ready and formatted correctly, select Upload Files and select the file. An Upload Files dialog box will open showing the upload status. When the upload is complete, select Done in the dialog box, check the box to certify accuracy of your document, and select Submit.
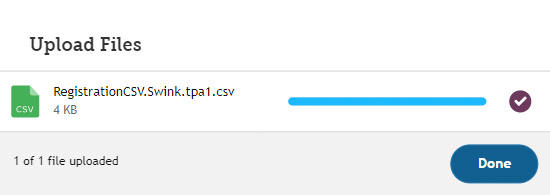
When the bulk registration upload is complete, you will receive a system notification. You will also receive an email notifying you that the upload was successful, or if there were errors.

The system will generate error messaging differently, depending on the file type used for your bulk registration. For a list of bulk registration and wage reporting error messages and what they mean, see the System Generated Error Messaging section of the appendix.
Once the file upload is complete, your accounts page will be updated to show the client accounts that were added from the bulk registration file. This example also shows the TPA account as well as their employer account as they are a Colorado-based TPA.
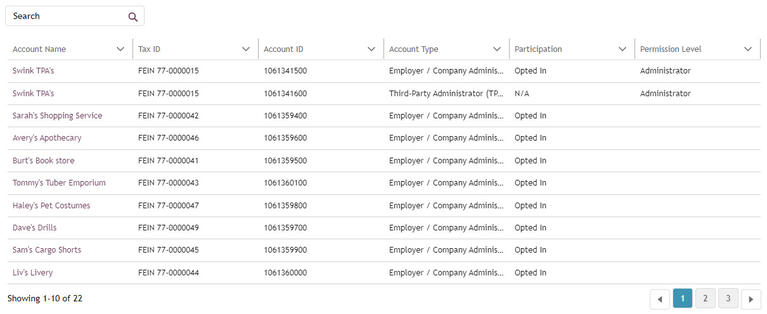
Note: If you connect to an existing employer account via bulk registration upload, the employer will be notified of the TPA relationship that was created. All new employers will also be notified that you registered on their behalf and invited to create a My FAMLI+ Employer user account with the email address provided in the bulk registration file. This will allow the employer to get access to their account without getting permission from the TPA.
The TPA who conducted this bulk registration also received an email with a copy of the registration results file that is generated by the system. If there were registration errors, those errors would show up in the results file.
