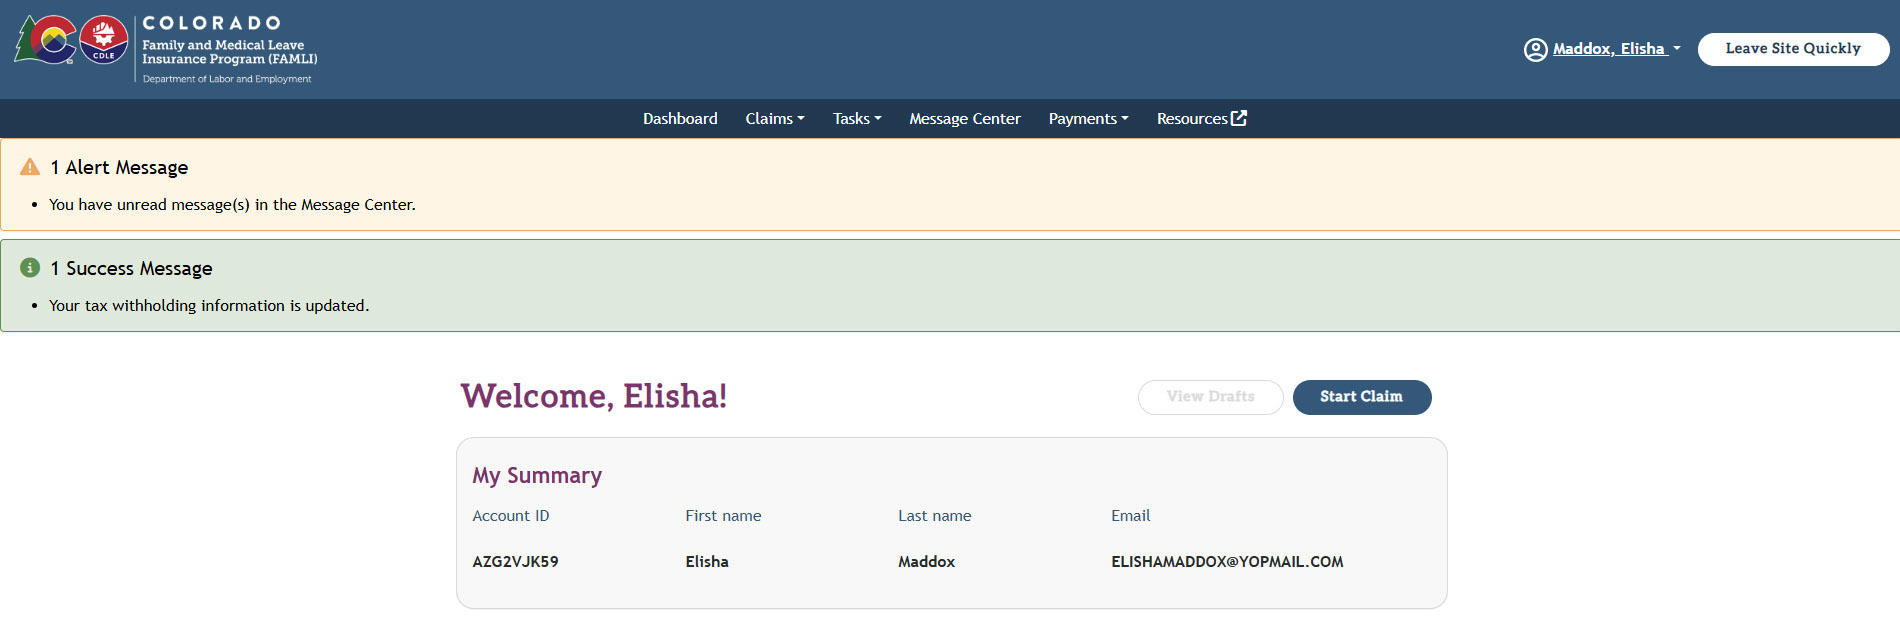
My FAMLI+ User Guide: Next Steps

Instructions for filing a claim for someone else as a Designated Representative:
You can file on behalf of a family member if they're medically incapacitated, and/or you can file as a Designated Representative if you can prove with documentation that you are in fact a Designated Representative for the individual.
- You will be asked if you are a filing a claim for someone else.
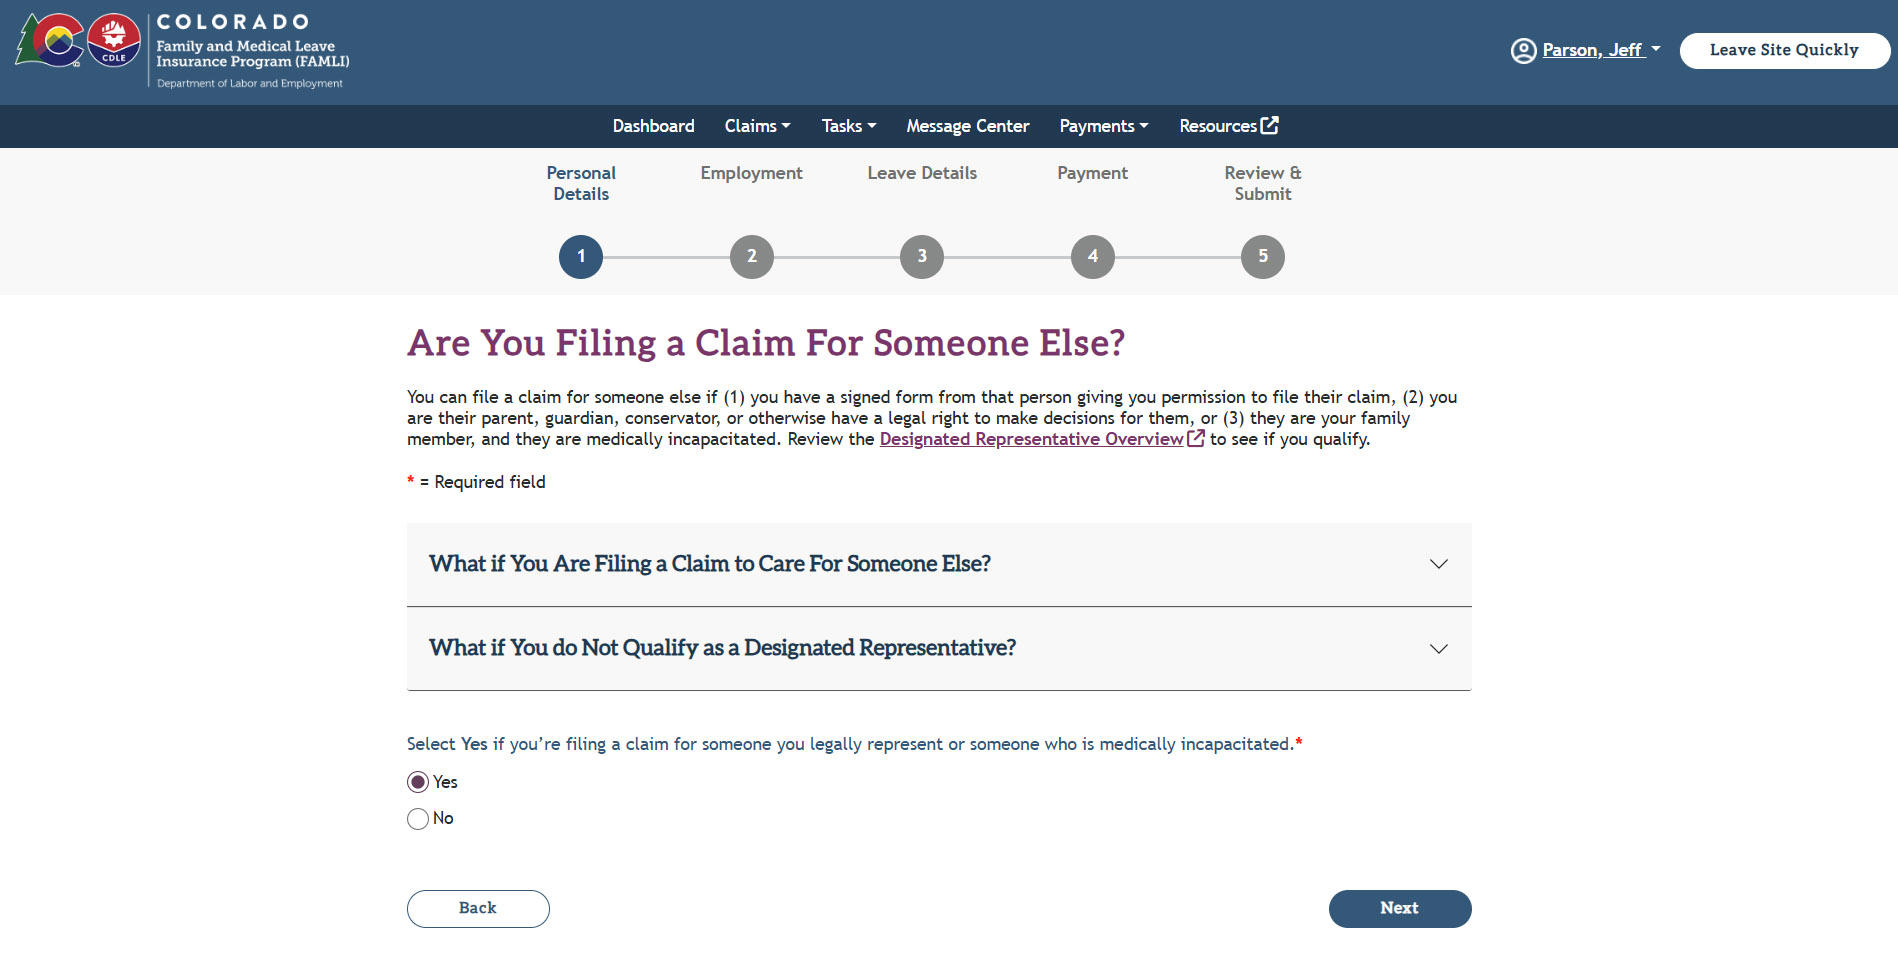
- If you are filing the claim on behalf of someone you legally represent or someone who is medically incapacitated, select Yes, and the system will display the Designated Representative Attestation page.

- As a Designated Representative, select the situation that applies to you. You may need to upload additional documents.
- Select the checkbox to confirm.
- You must also select your relationship to a claimant and enter the reason why you are filing a claim on their behalf. Select the Next button.
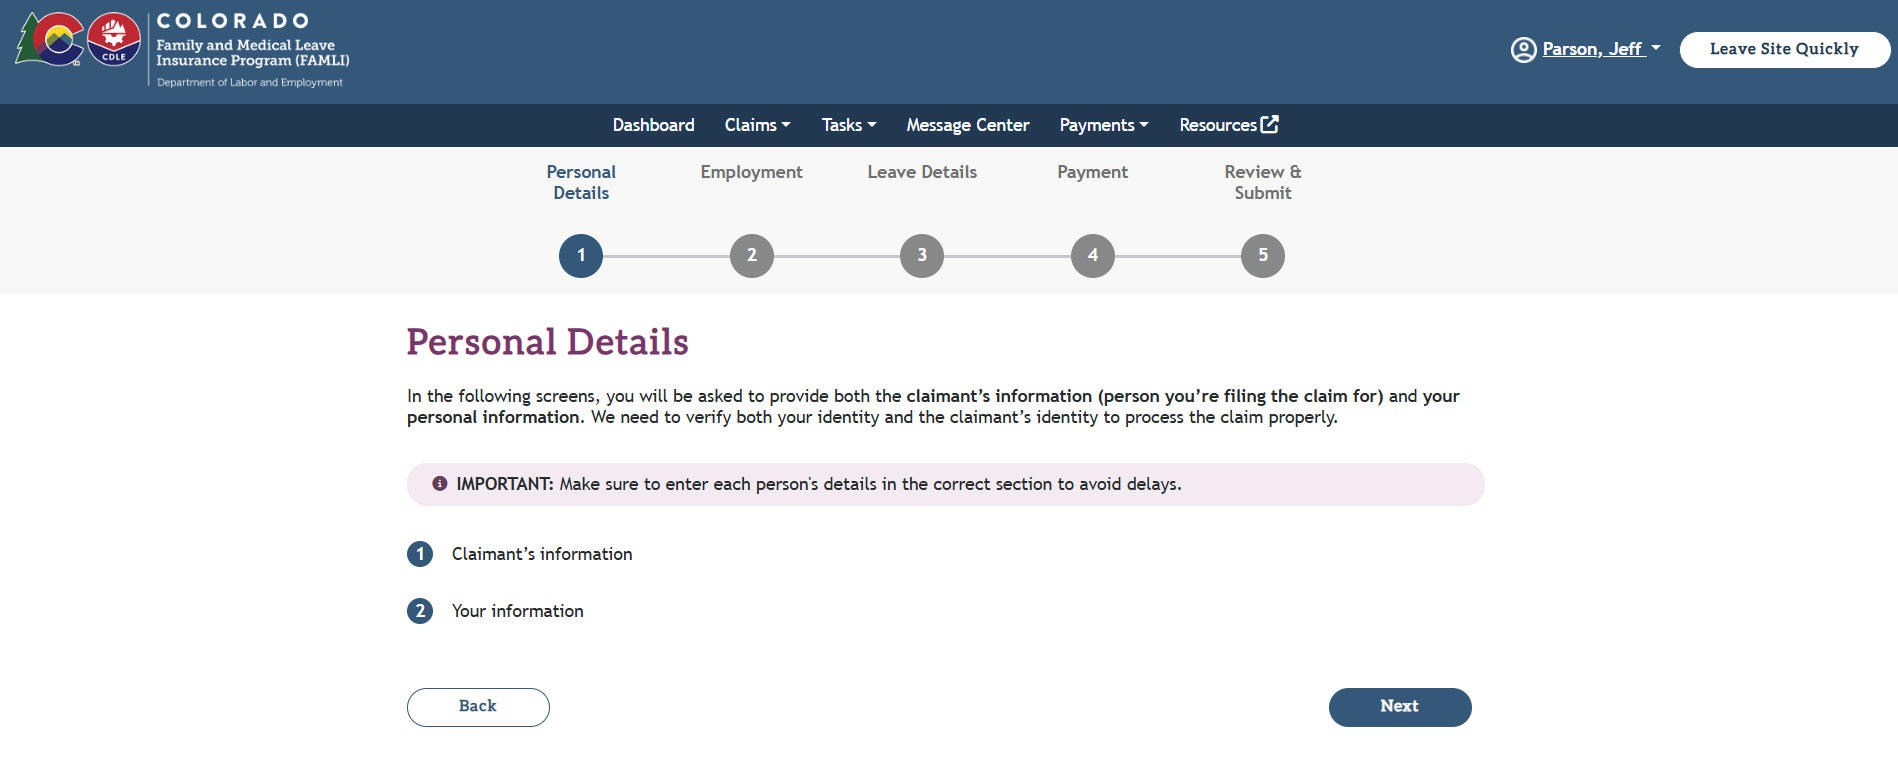
- The Personal Details page informs that you must provide both the claimant’s and your personal information on the following screens.
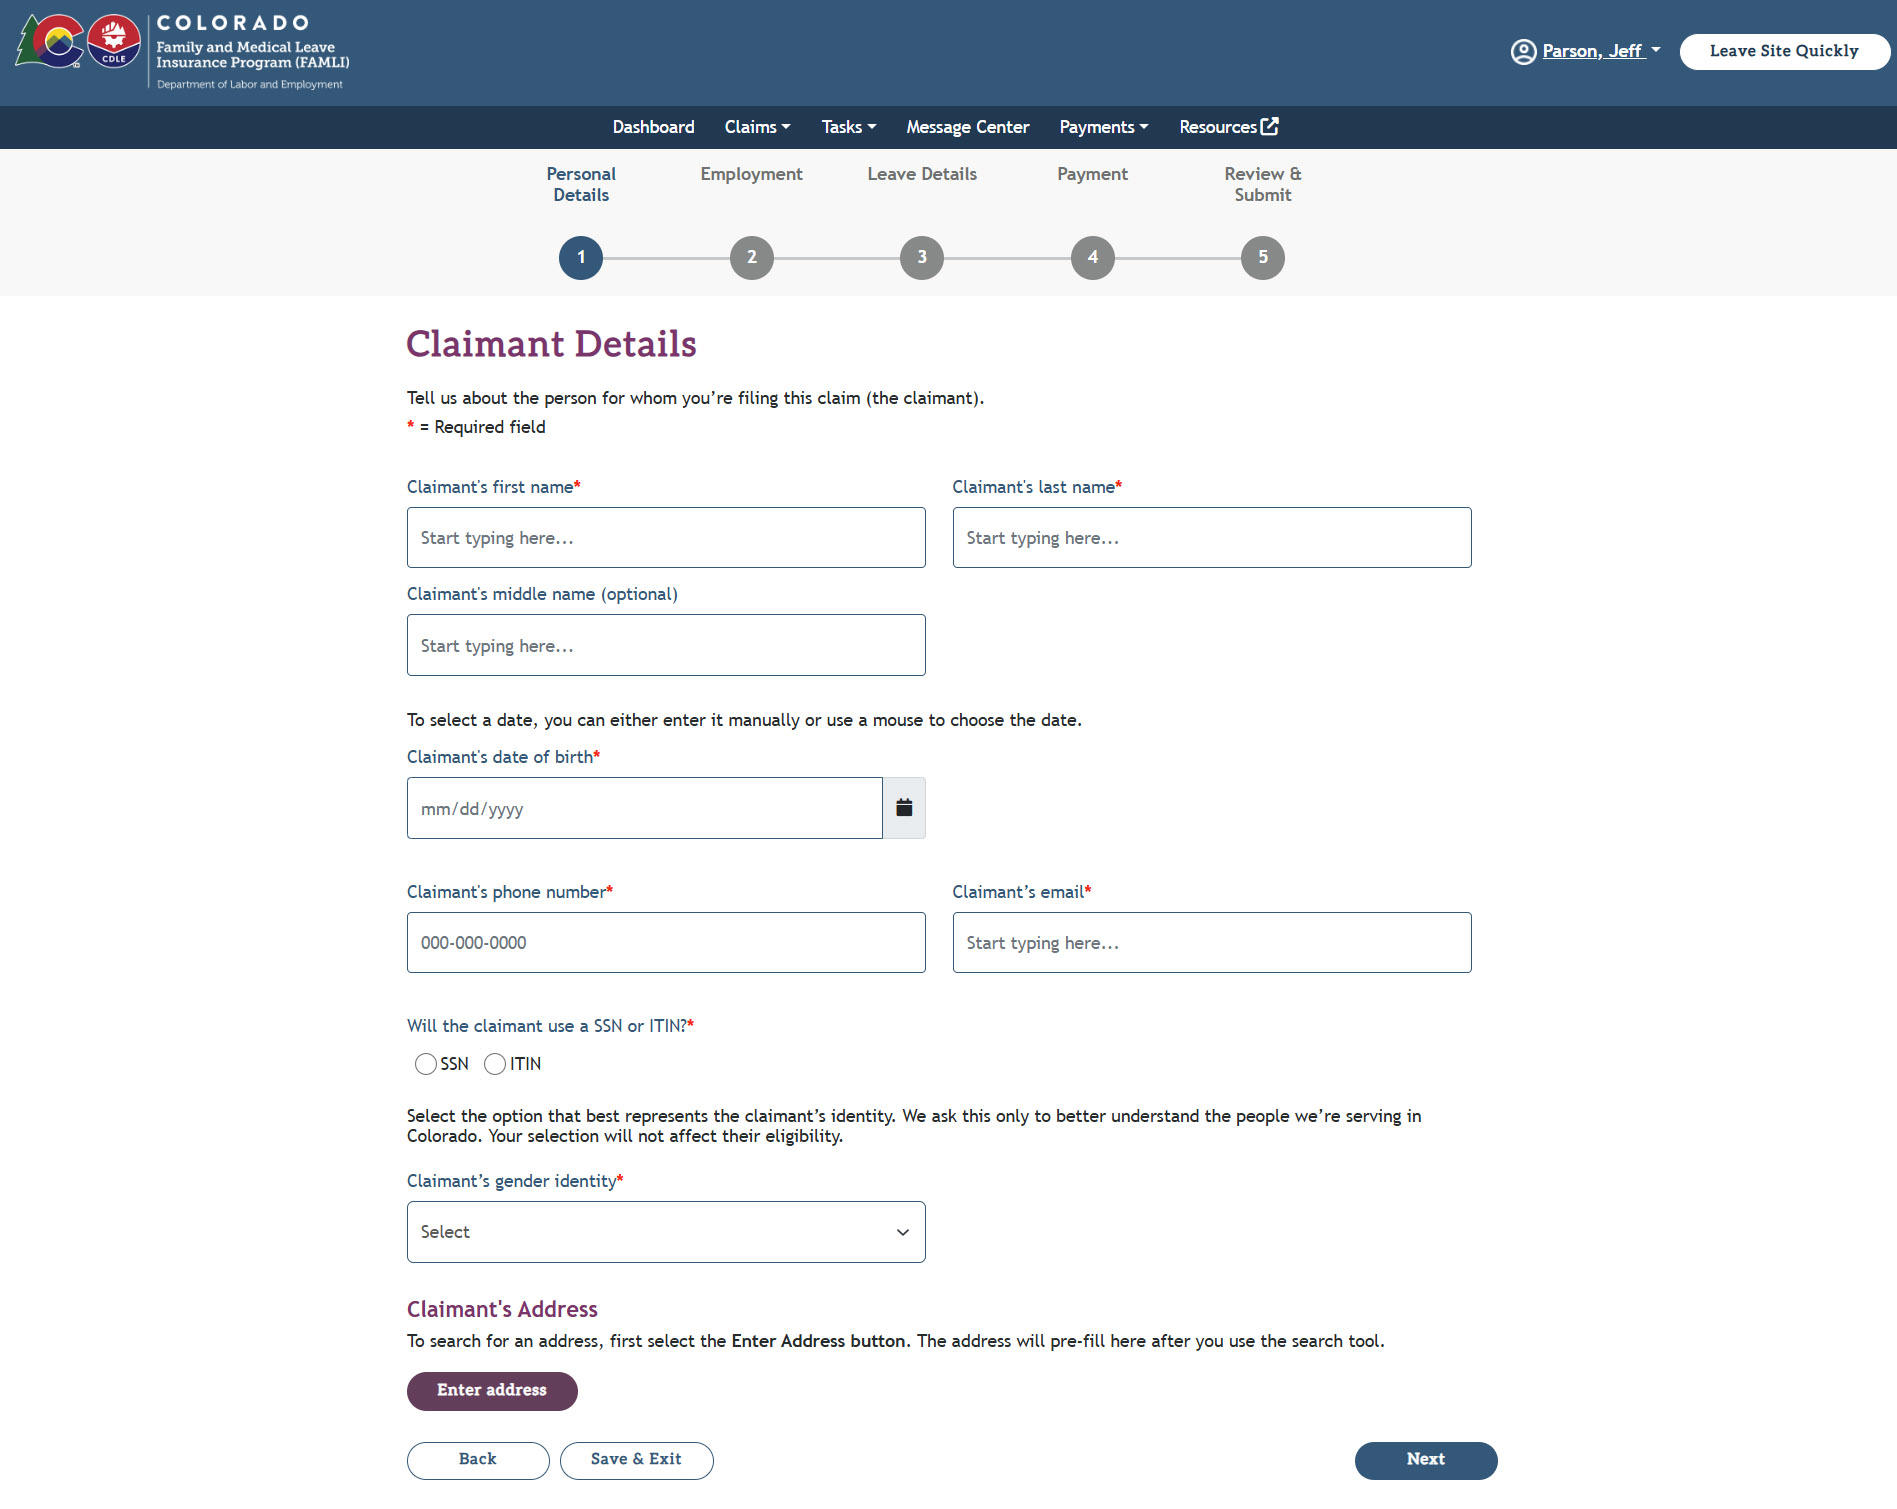
- Next, you will be prompted to fill in the claimant’s details.
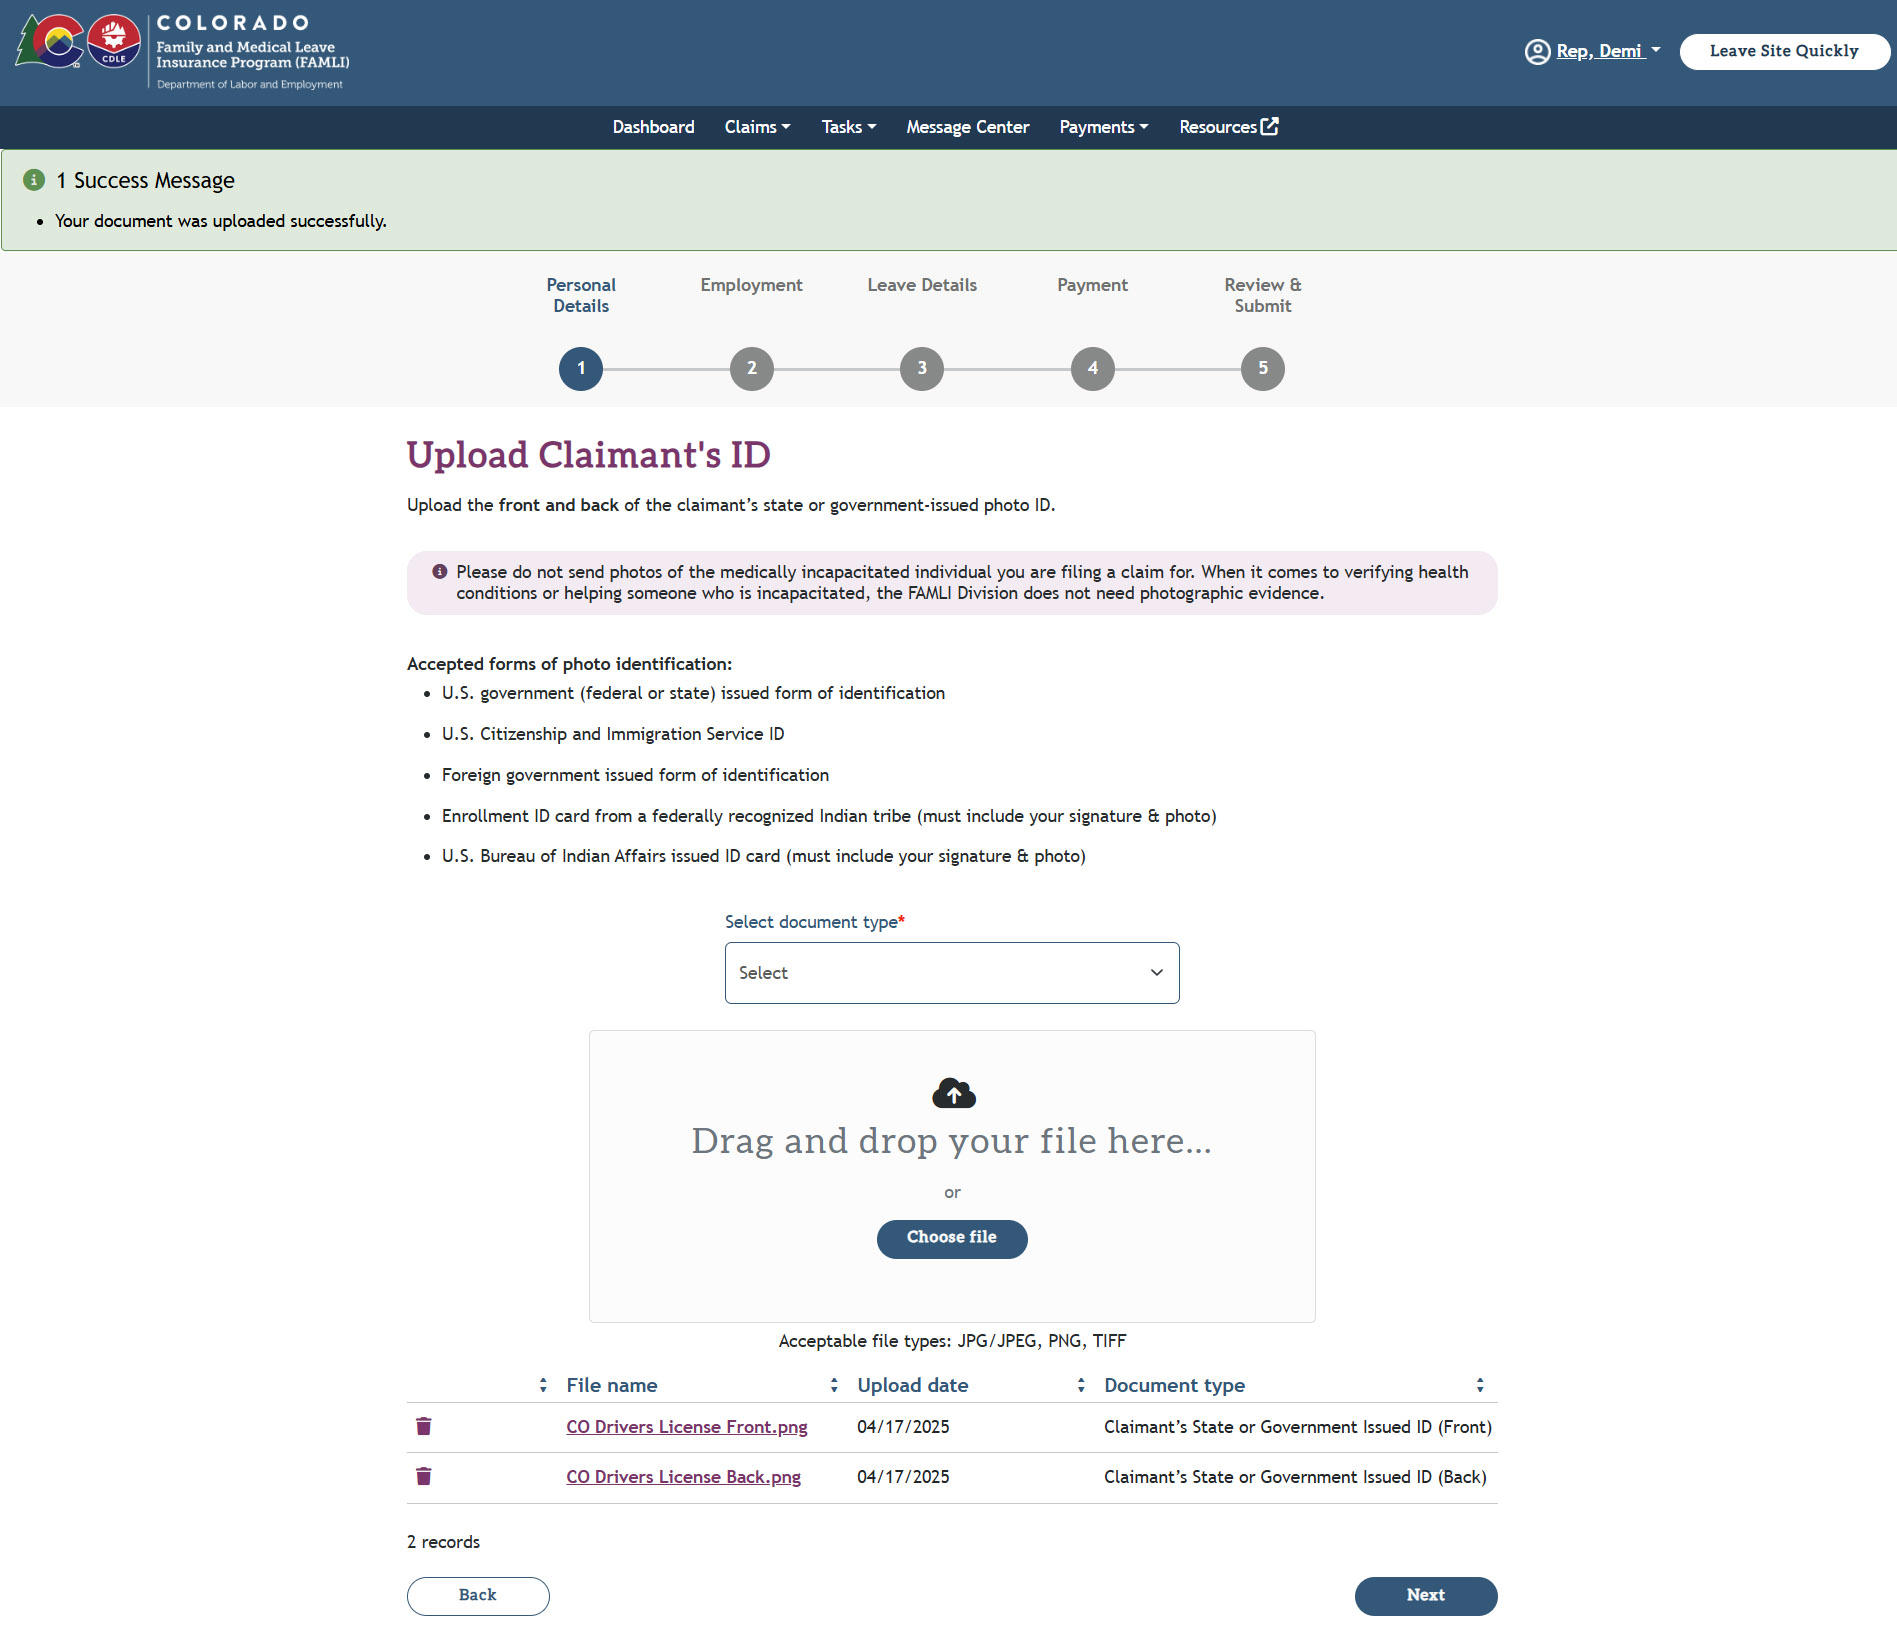
- On the Upload Claimant’s ID page, upload the front and back of the claimant’s state or government-issued photo ID.
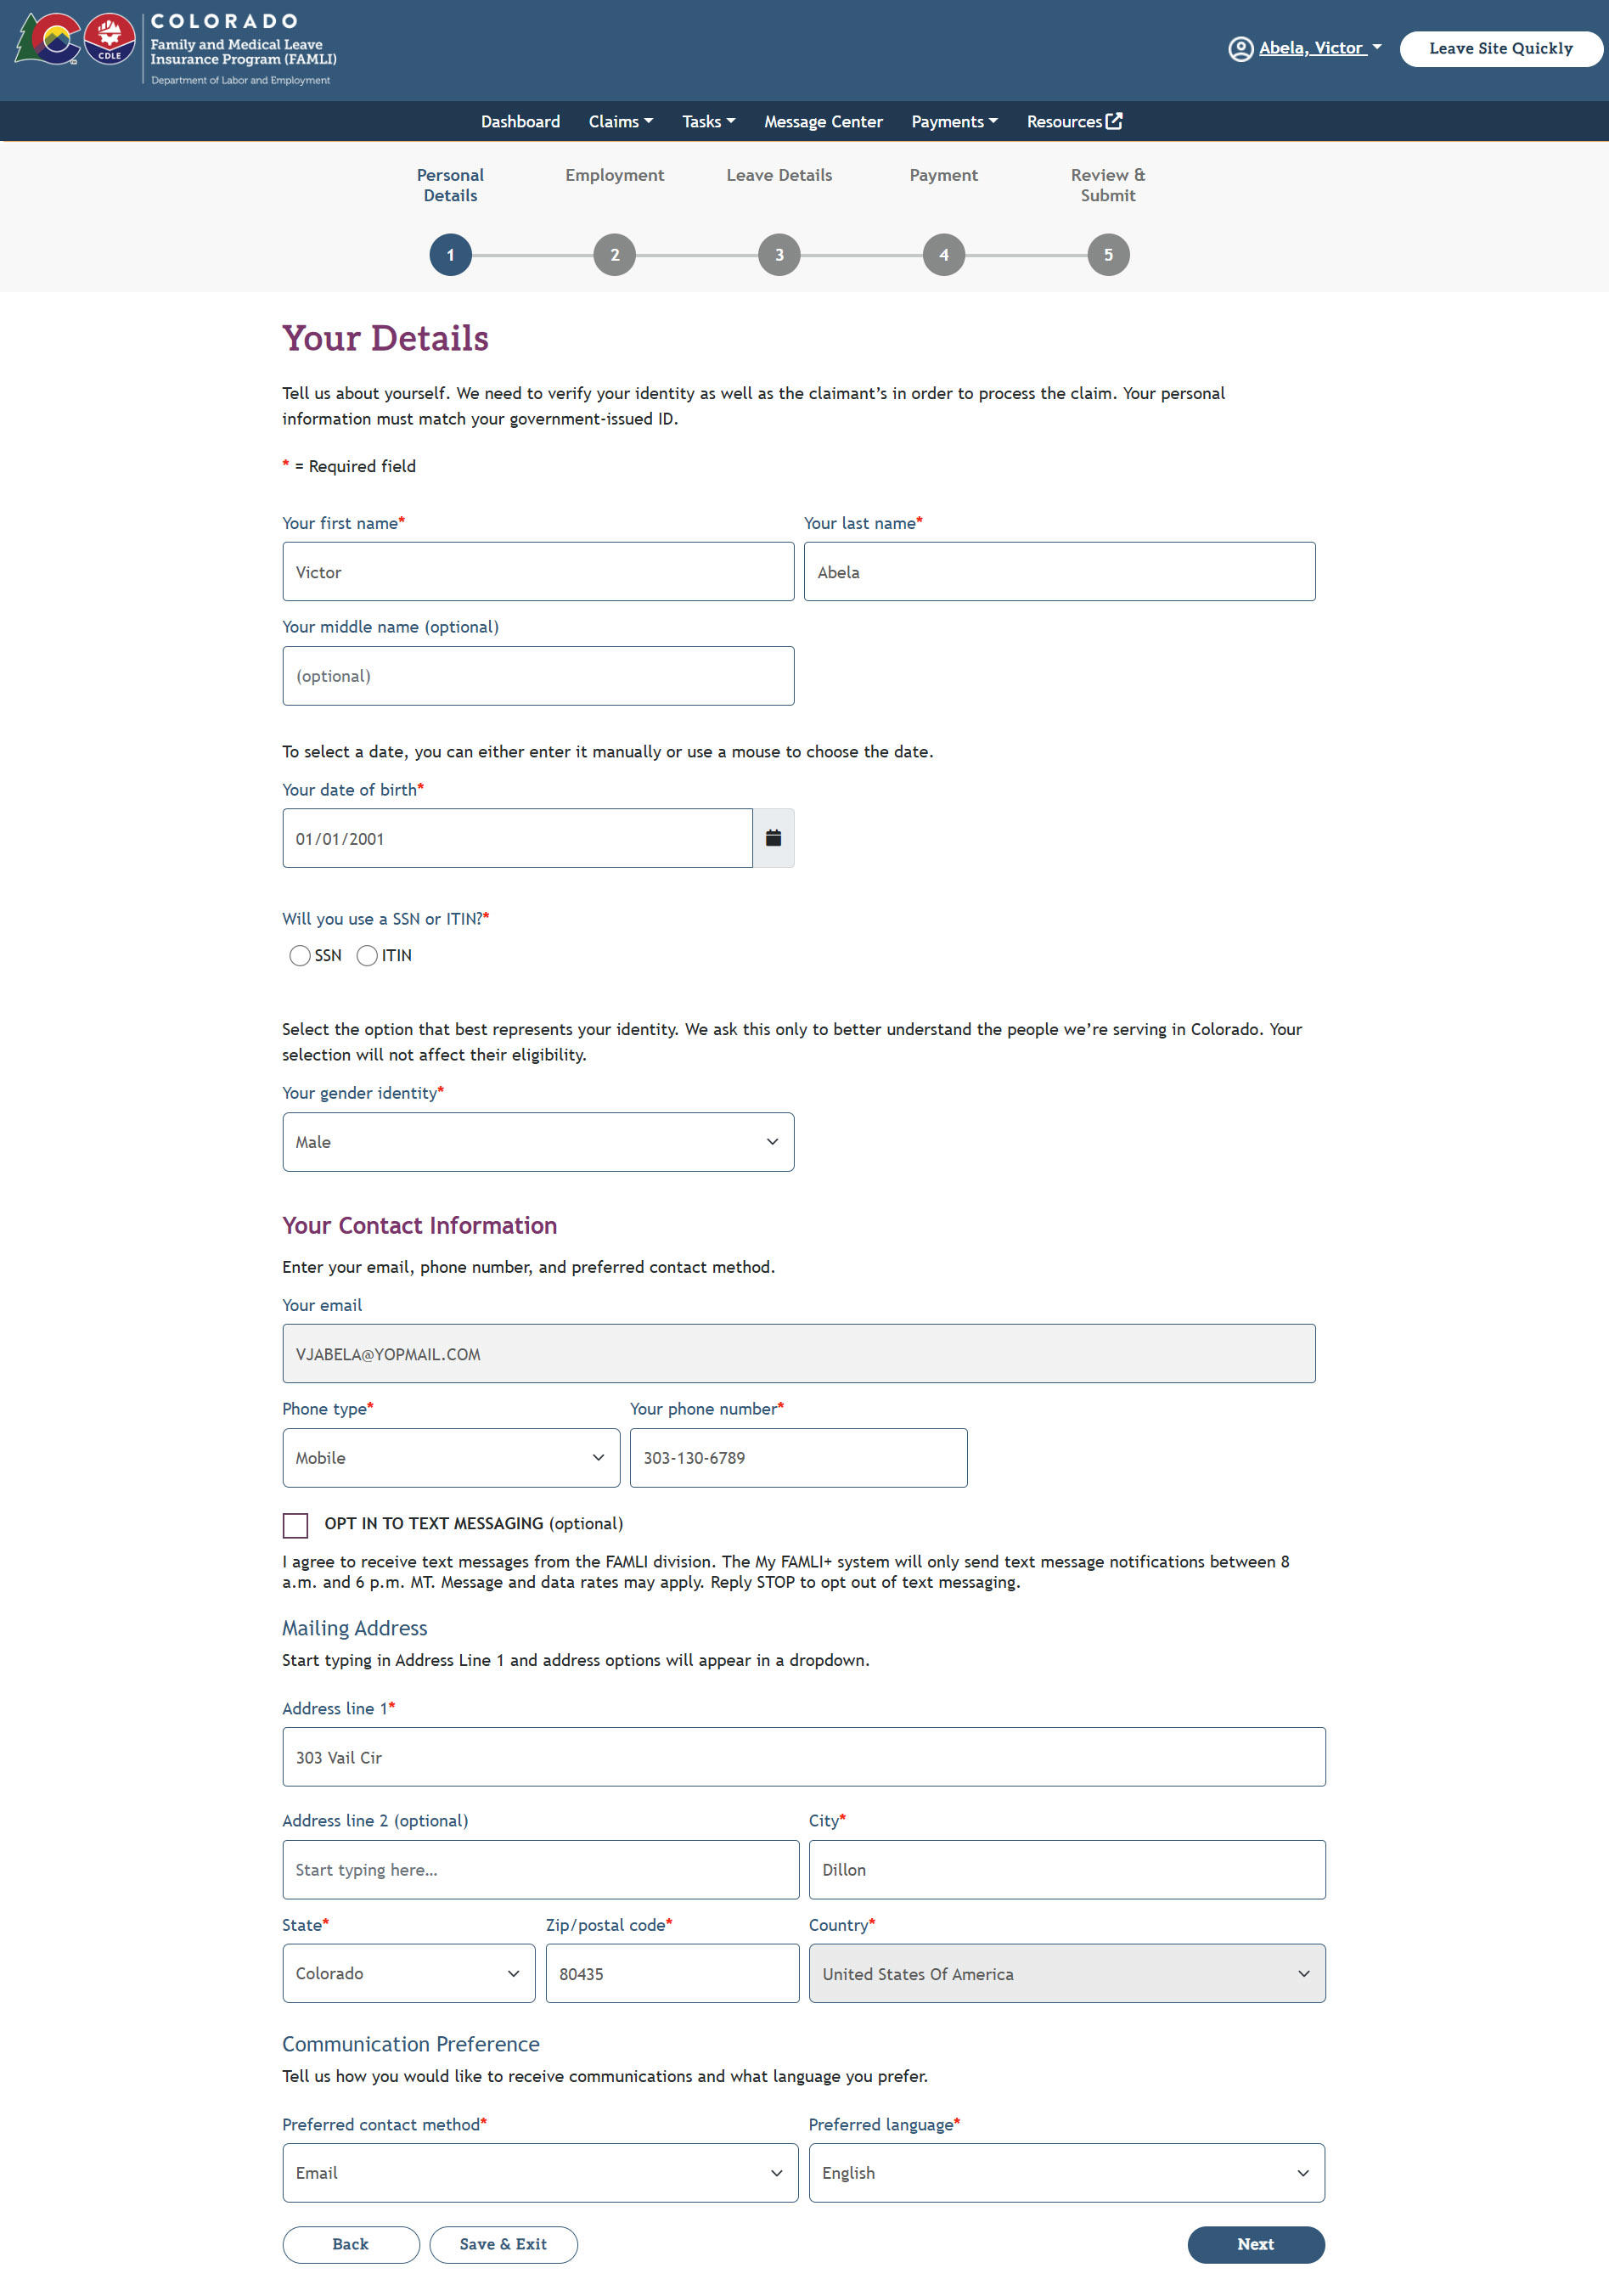
- On the Your Details page, enter your own personal details as a Designated Representative.
- Once you complete the Identity Verification page, a pop-up modal will display, reminding you to enter only claimant’s information. Starting from the Self-Employed or Local Government Employee screen, you will fill in all information as if you are the claimant.
Instructions for editing your claim details:
- Navigate to your dashboard and select the Claims tab.
- From the list, select the My Claims option. The Claim Details page will display.
- Select the Edit Claim button.
- On the Edit Claim page, you can modify your claim end date. Fill in the new end date in the provided field. You must also state the reason for changing the end date.

- Select the Save button to save your changes.
- A message will confirm that the claim was successfully updated.
- You can cancel your pending claim if you have filed the claim in error. To begin, select the checkbox under the Cancel Claim section. If you want to cancel an active claim that has already been approved and is paying out benefits, you must call the CDLE FAMLI staff at 1-866-CO-FAMLI (1-866-263-2654) for assistance.

- You must state the reason for canceling the claim.
- Select the Save button.
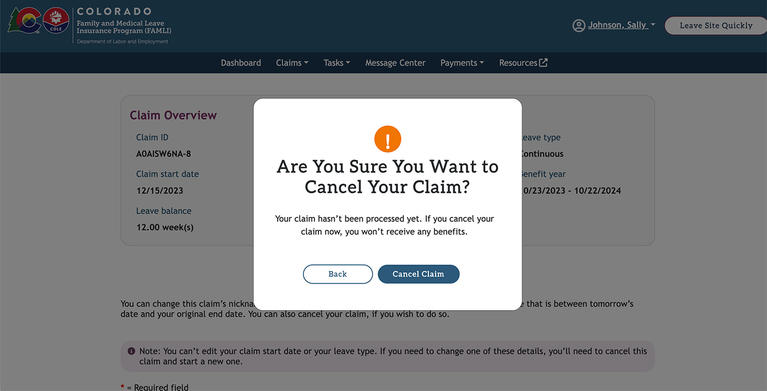
- A dialog box will appear asking you to confirm if you want to proceed with canceling the claim. Select the Cancel Claim button.
Once you’ve started the application process, you can log in to My FAMLI+ to check your eligibility for benefits and review the status of your claim(s). Instructions for viewing your eligibility information:
- Navigate to your dashboard and select the Claims tab.
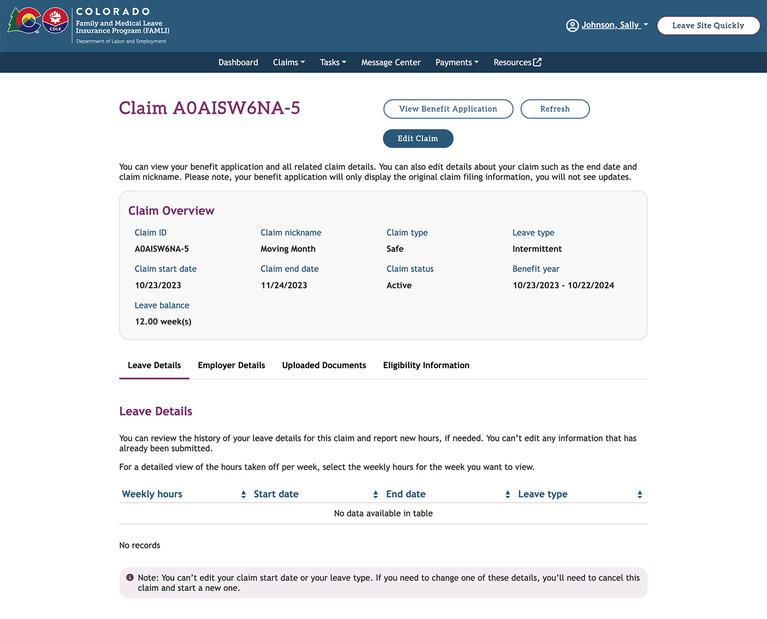
- From the list, select the My Claims option. Select the Claim ID hyperlink for the claim you wish to view and the Claim Details page will be displayed.
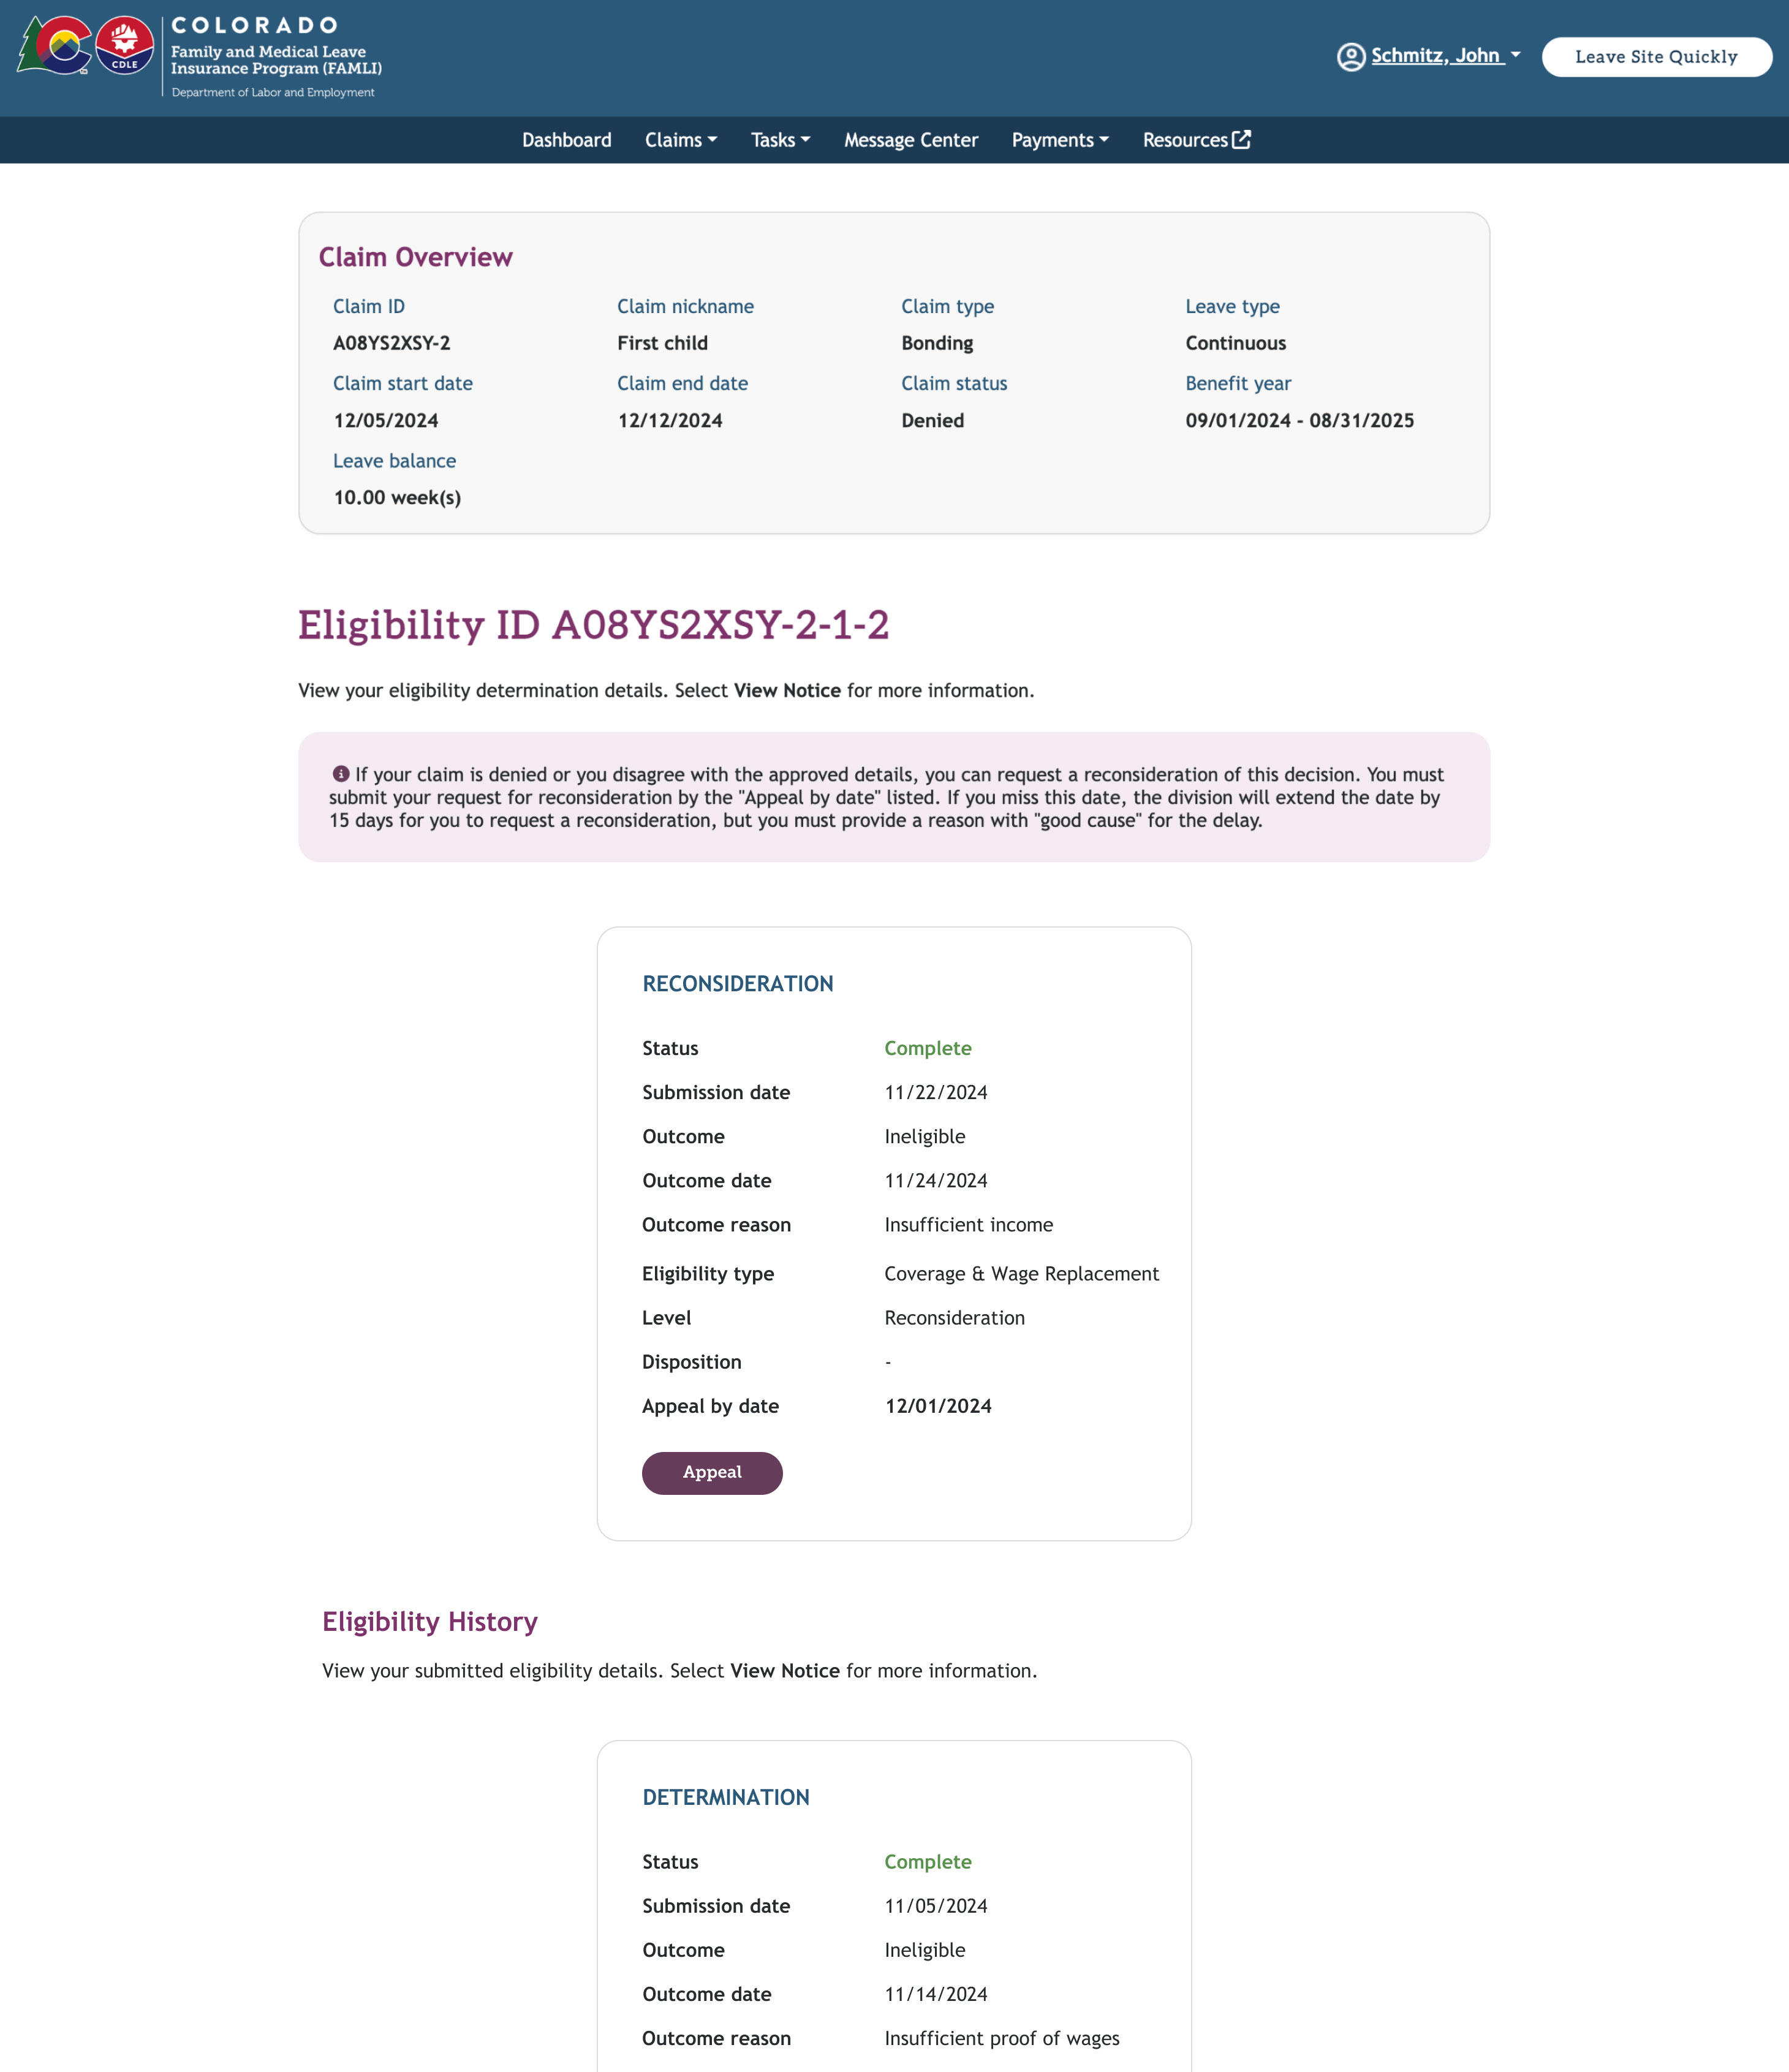
- Select the Eligibility Information tab.
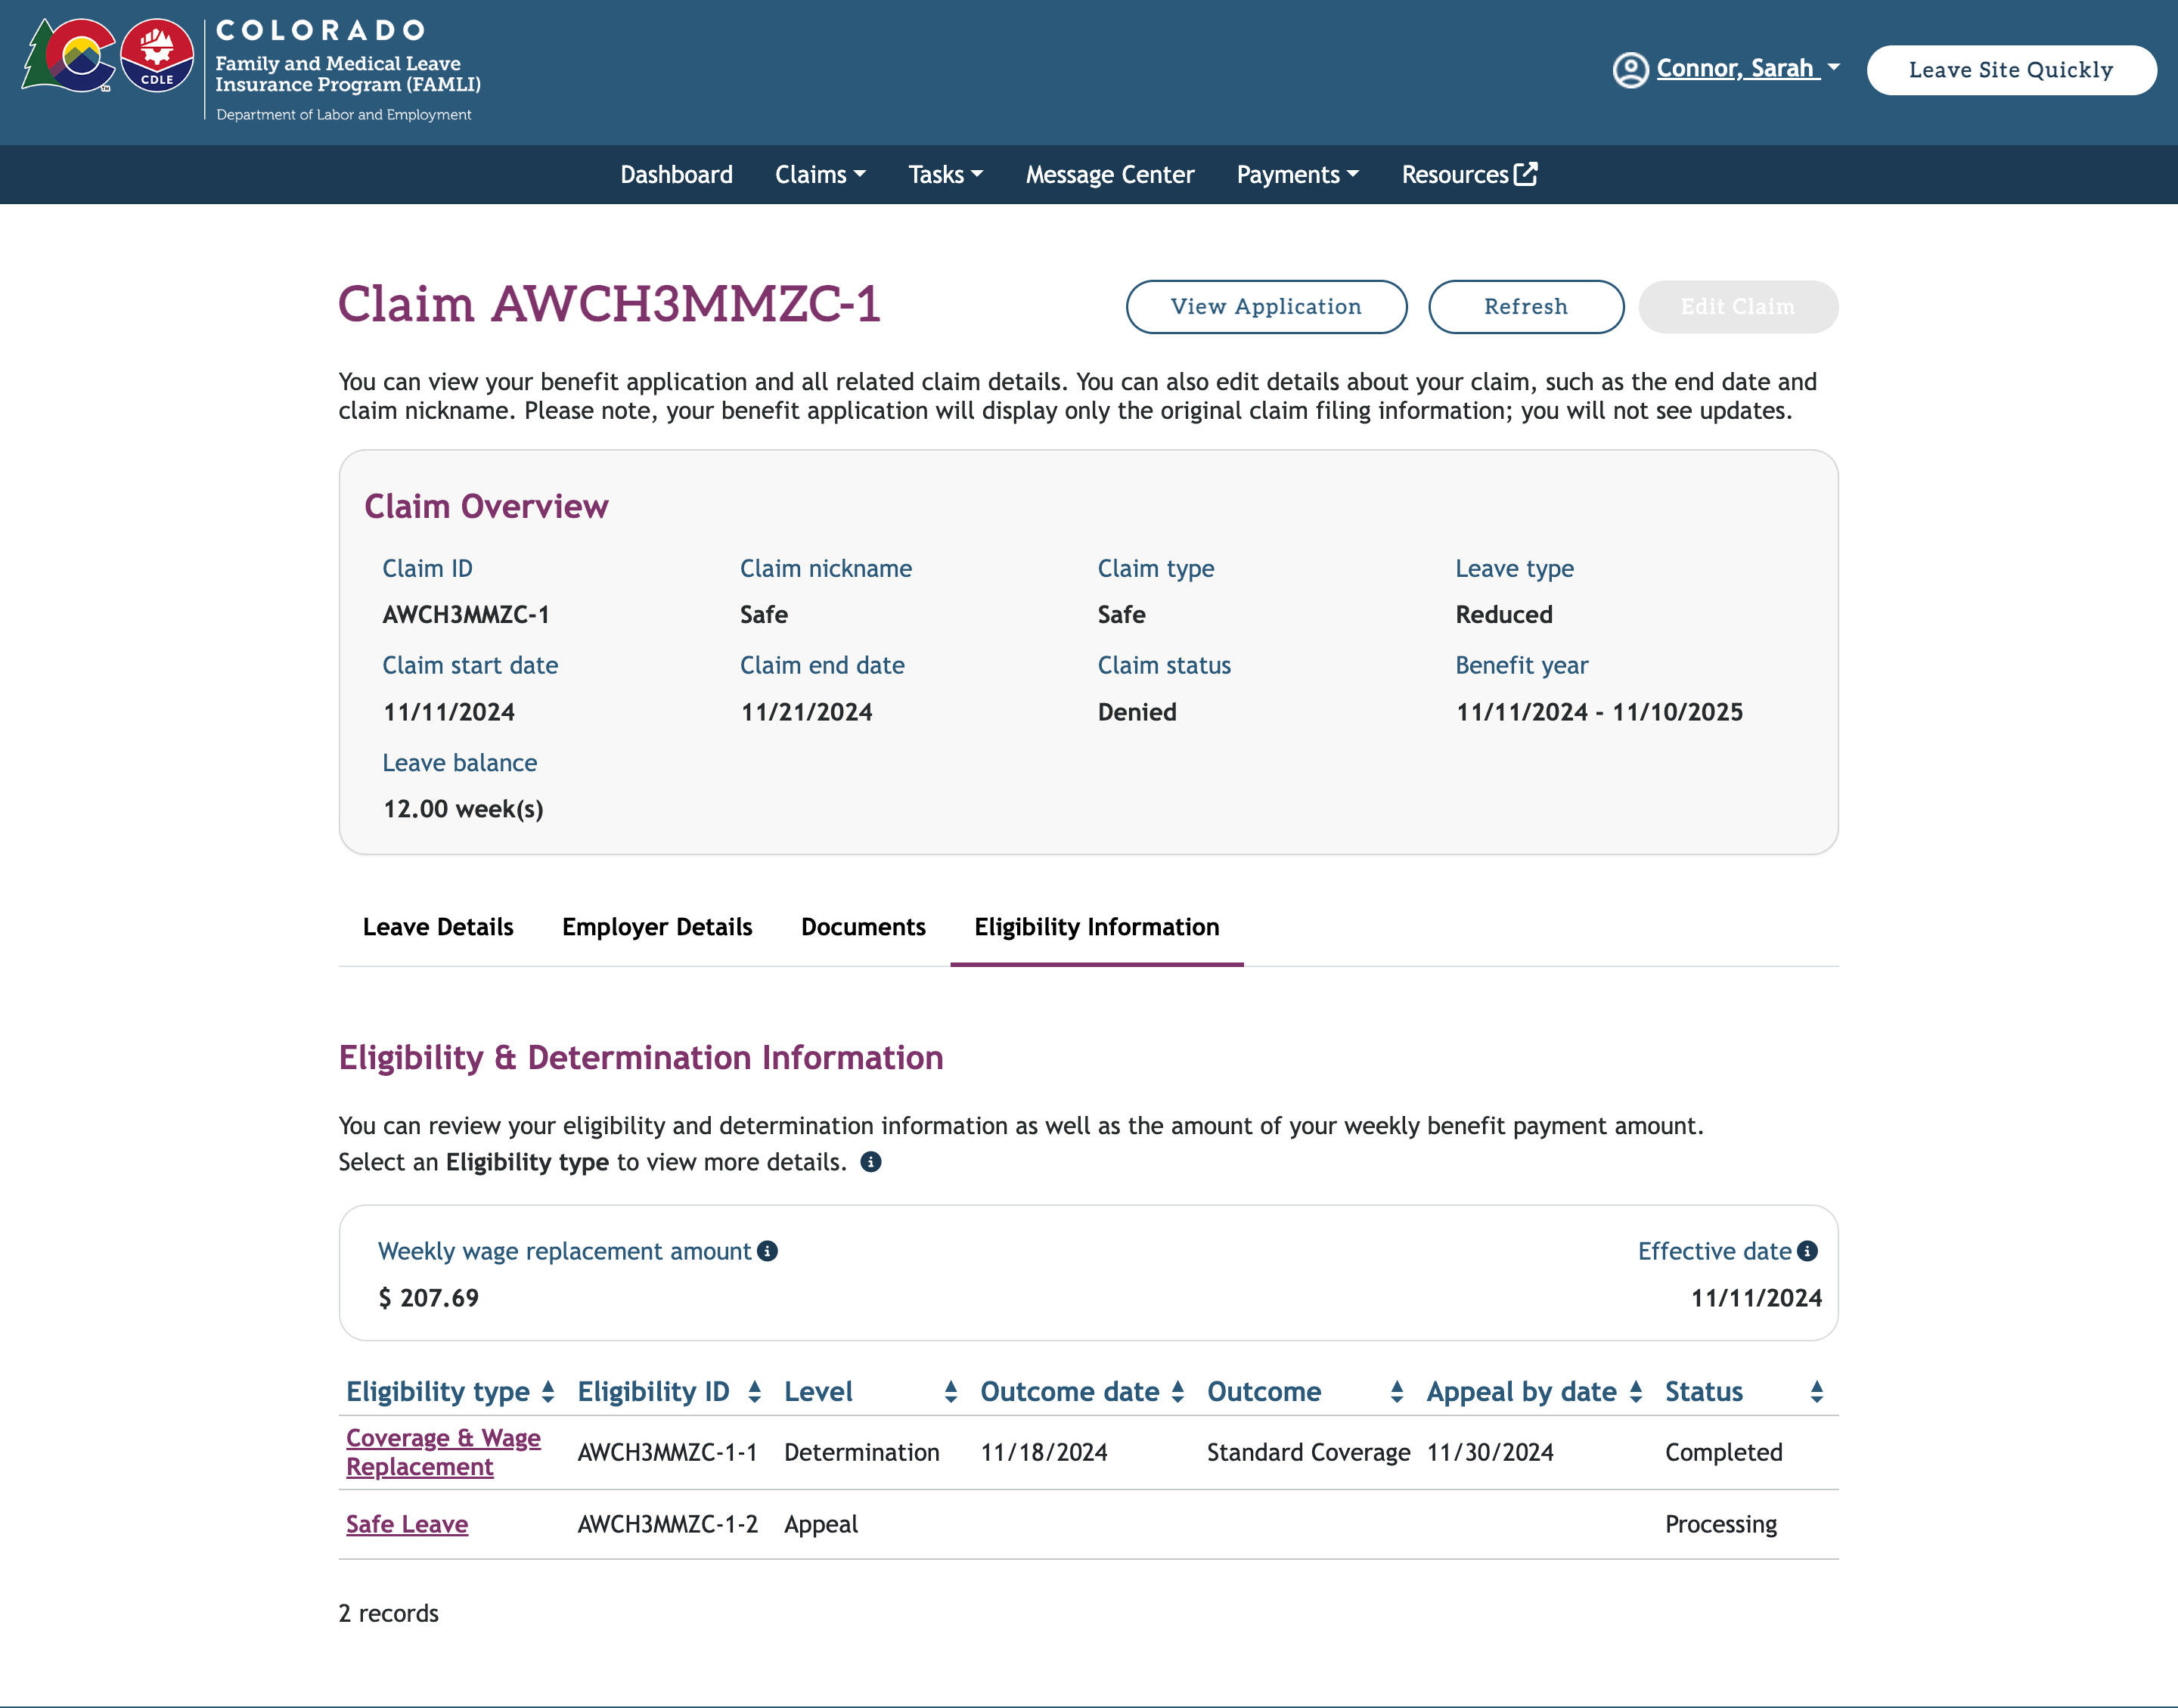
- Select the claim you want to review.
- You will be able to see your claim details along with the eligibility history.
The My FAMLI+ portal allows claimants to request a reconsideration if they disagree with the determination of their claim(s). Claimants can provide additional information and upload documents.
Instructions to request for reconsideration:
- Navigate to your dashboard and select the Claims tab.
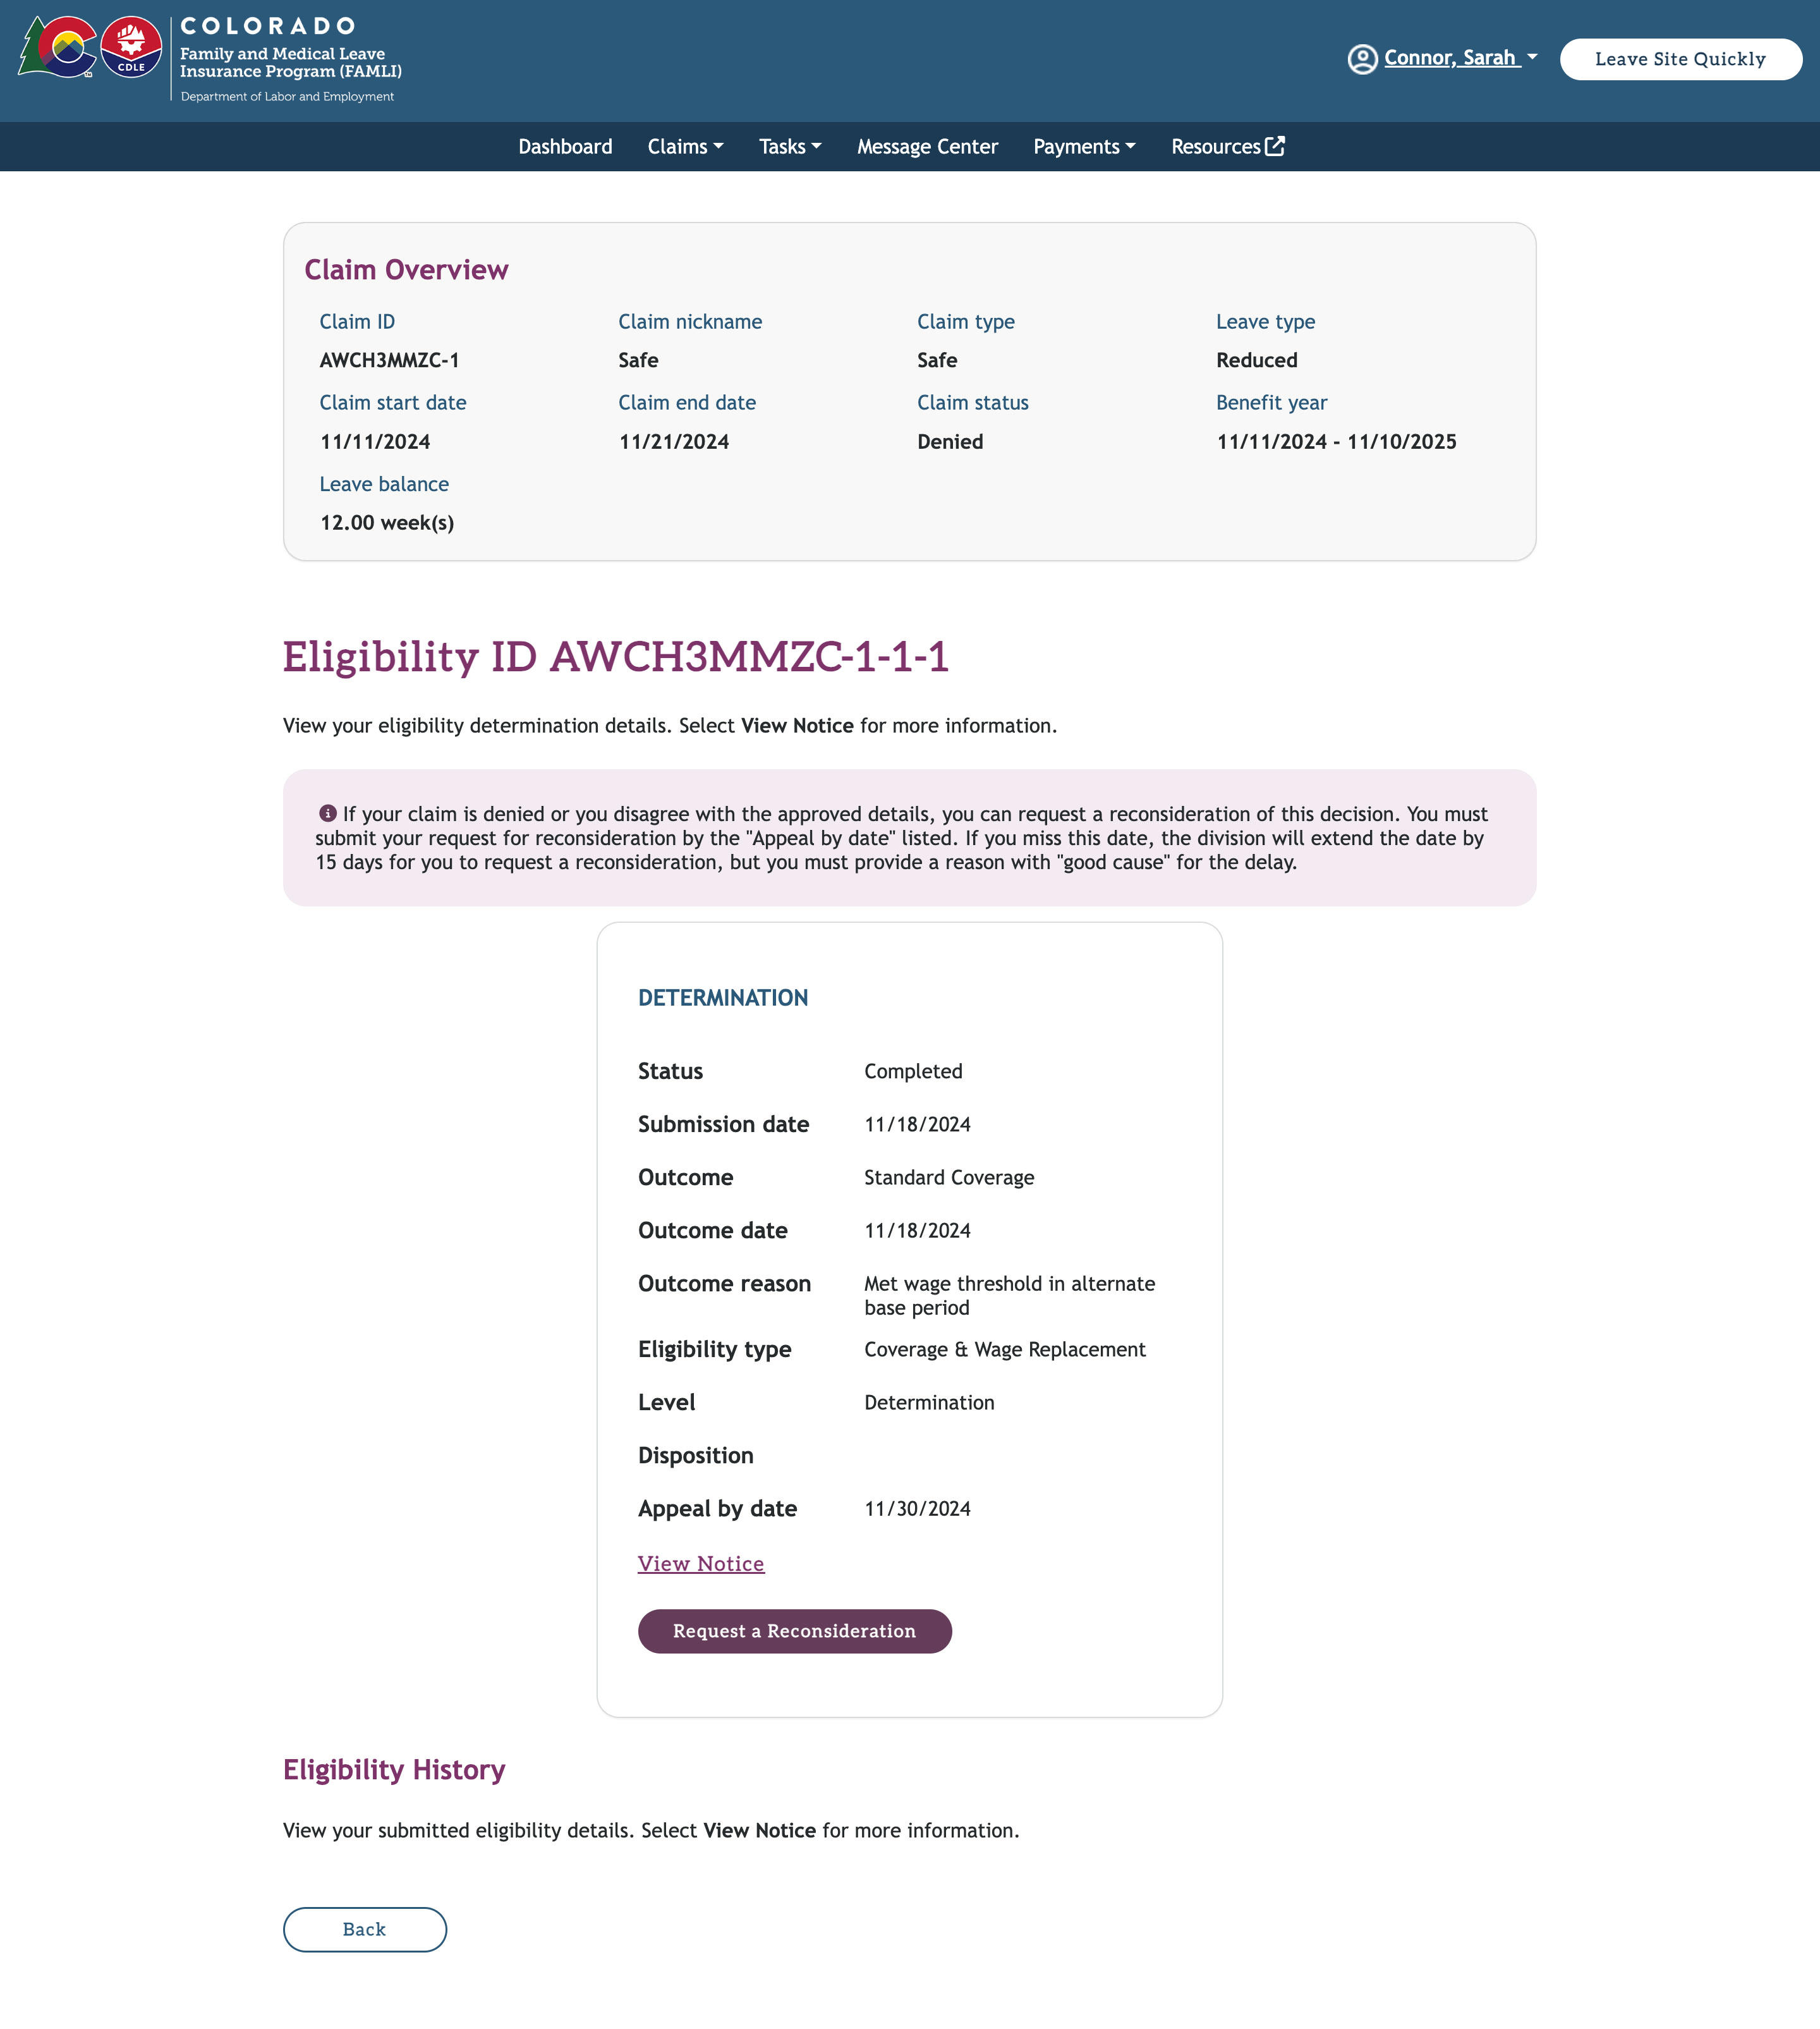
- From the list, select the My Claims option. Select the Claim ID hyperlink for the claim you wish to view and the Claim Details page will display.
- Select the Eligibility Information tab to view your determinations. Then, select the eligibility type you wish to request for reconsideration from the FAMLI Division.
- After choosing the eligibility type, you will see the determination status of your claim. Select the Request a Reconsideration button.
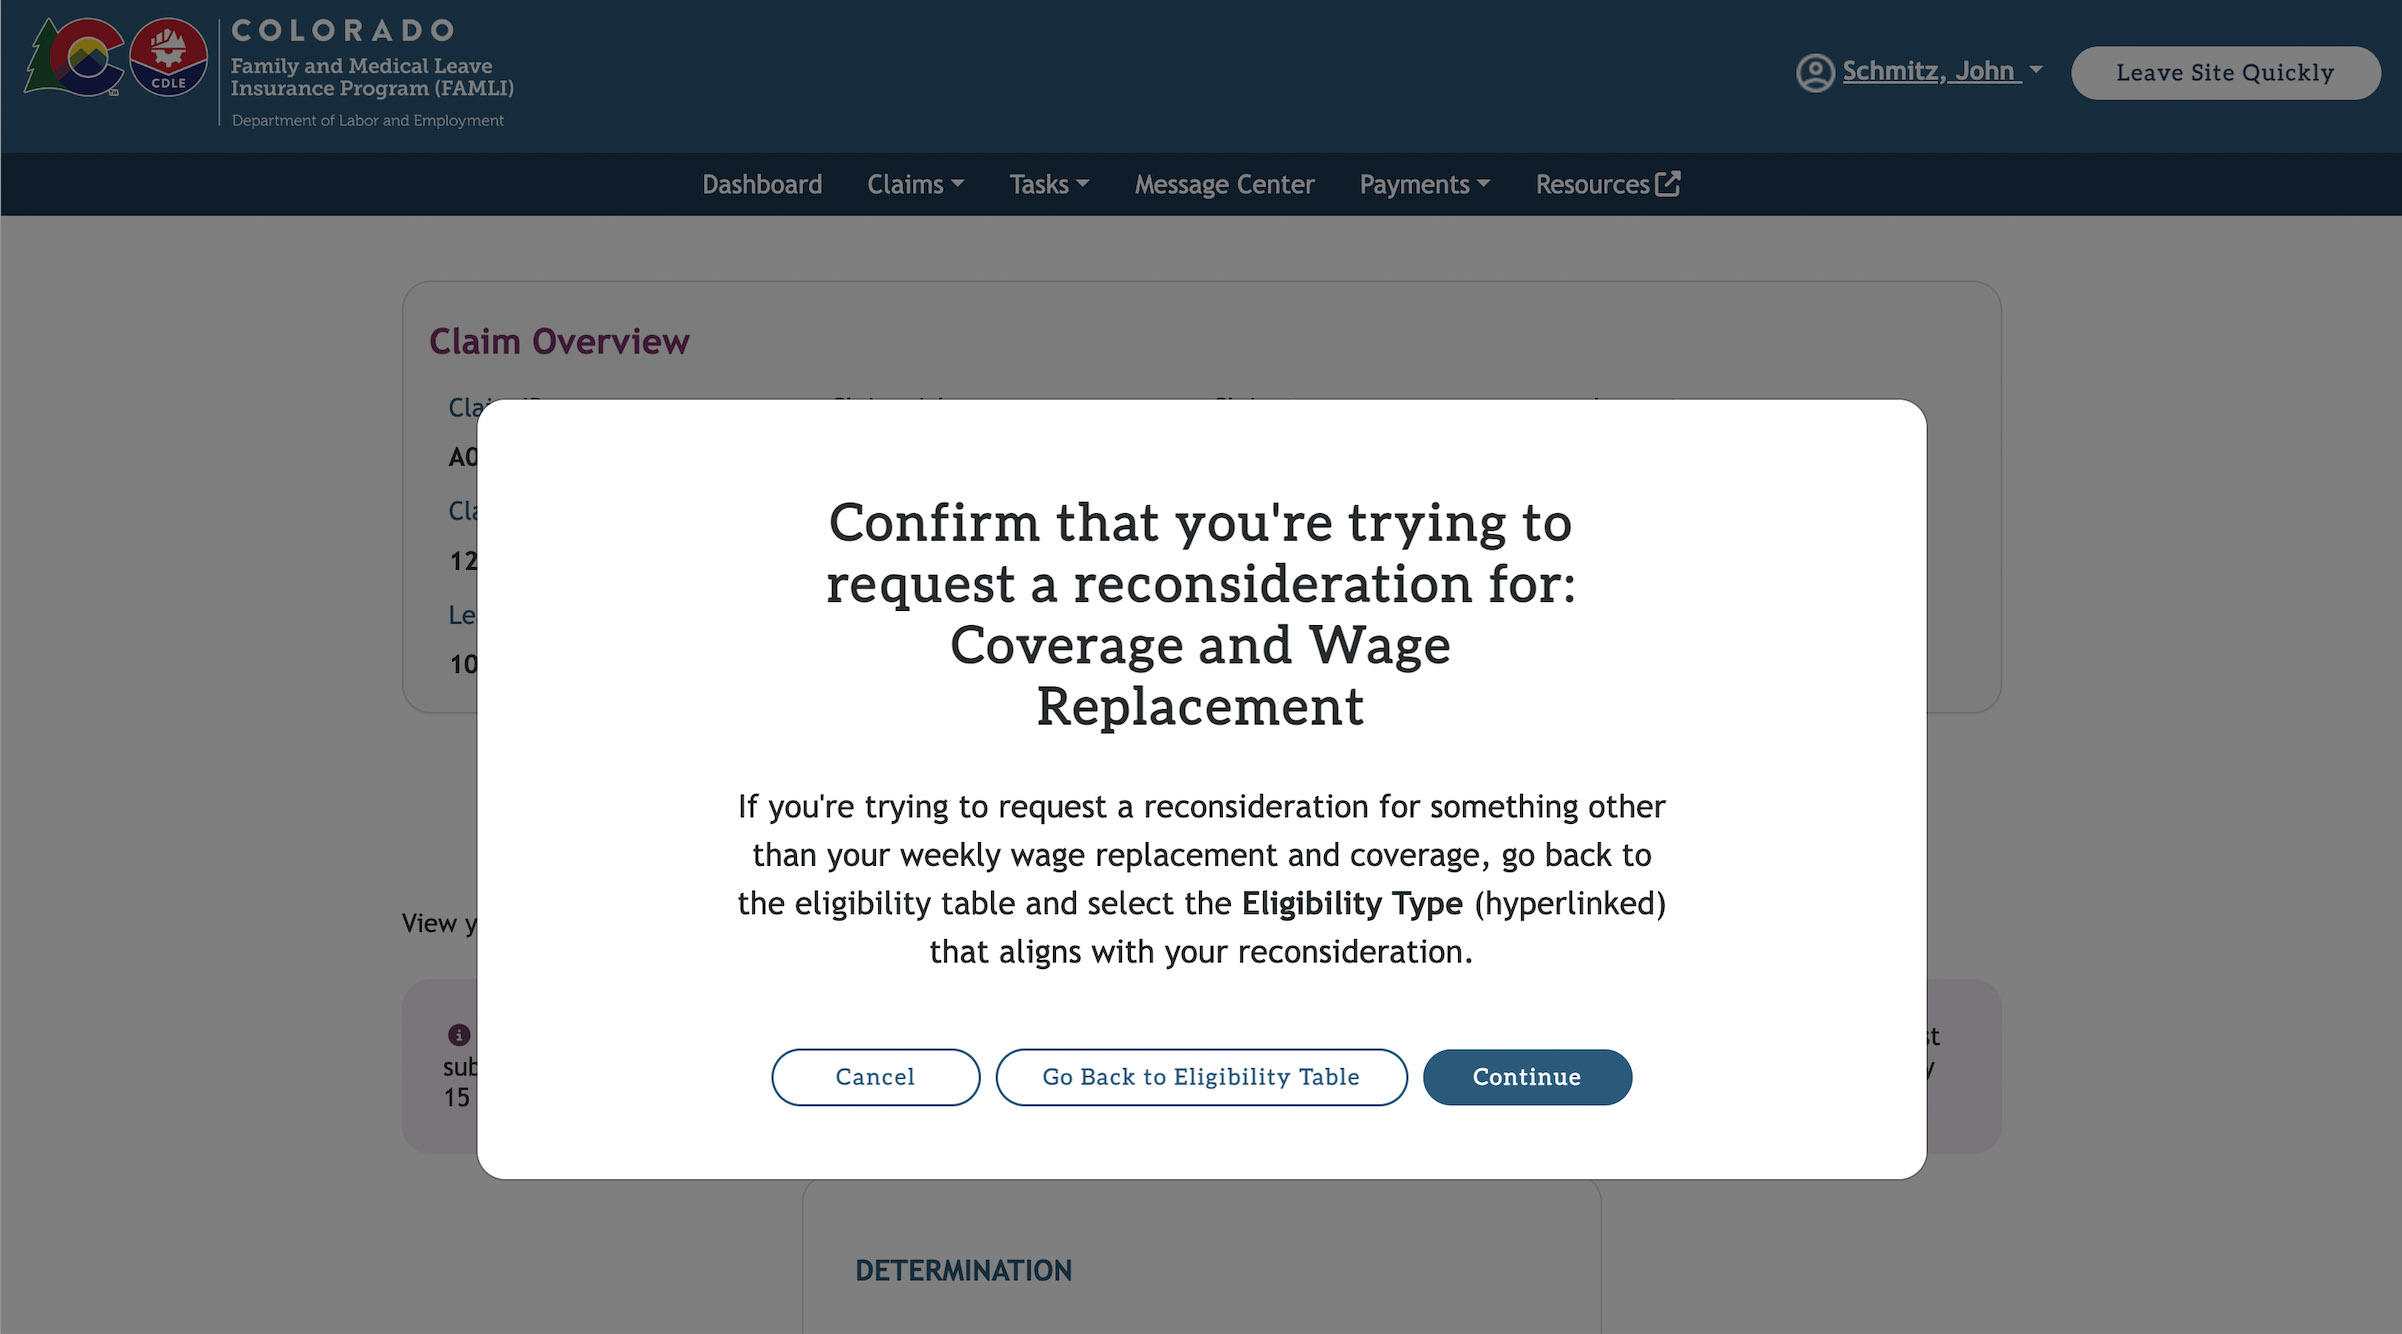
- A pop-up will appear asking you to confirm the eligibility type selected. If you did not choose the correct determination, select Go Back to Eligibility Table to make a different selection.
- On the Request a Reconsideration page, you must state the reason for your request for reconsideration.
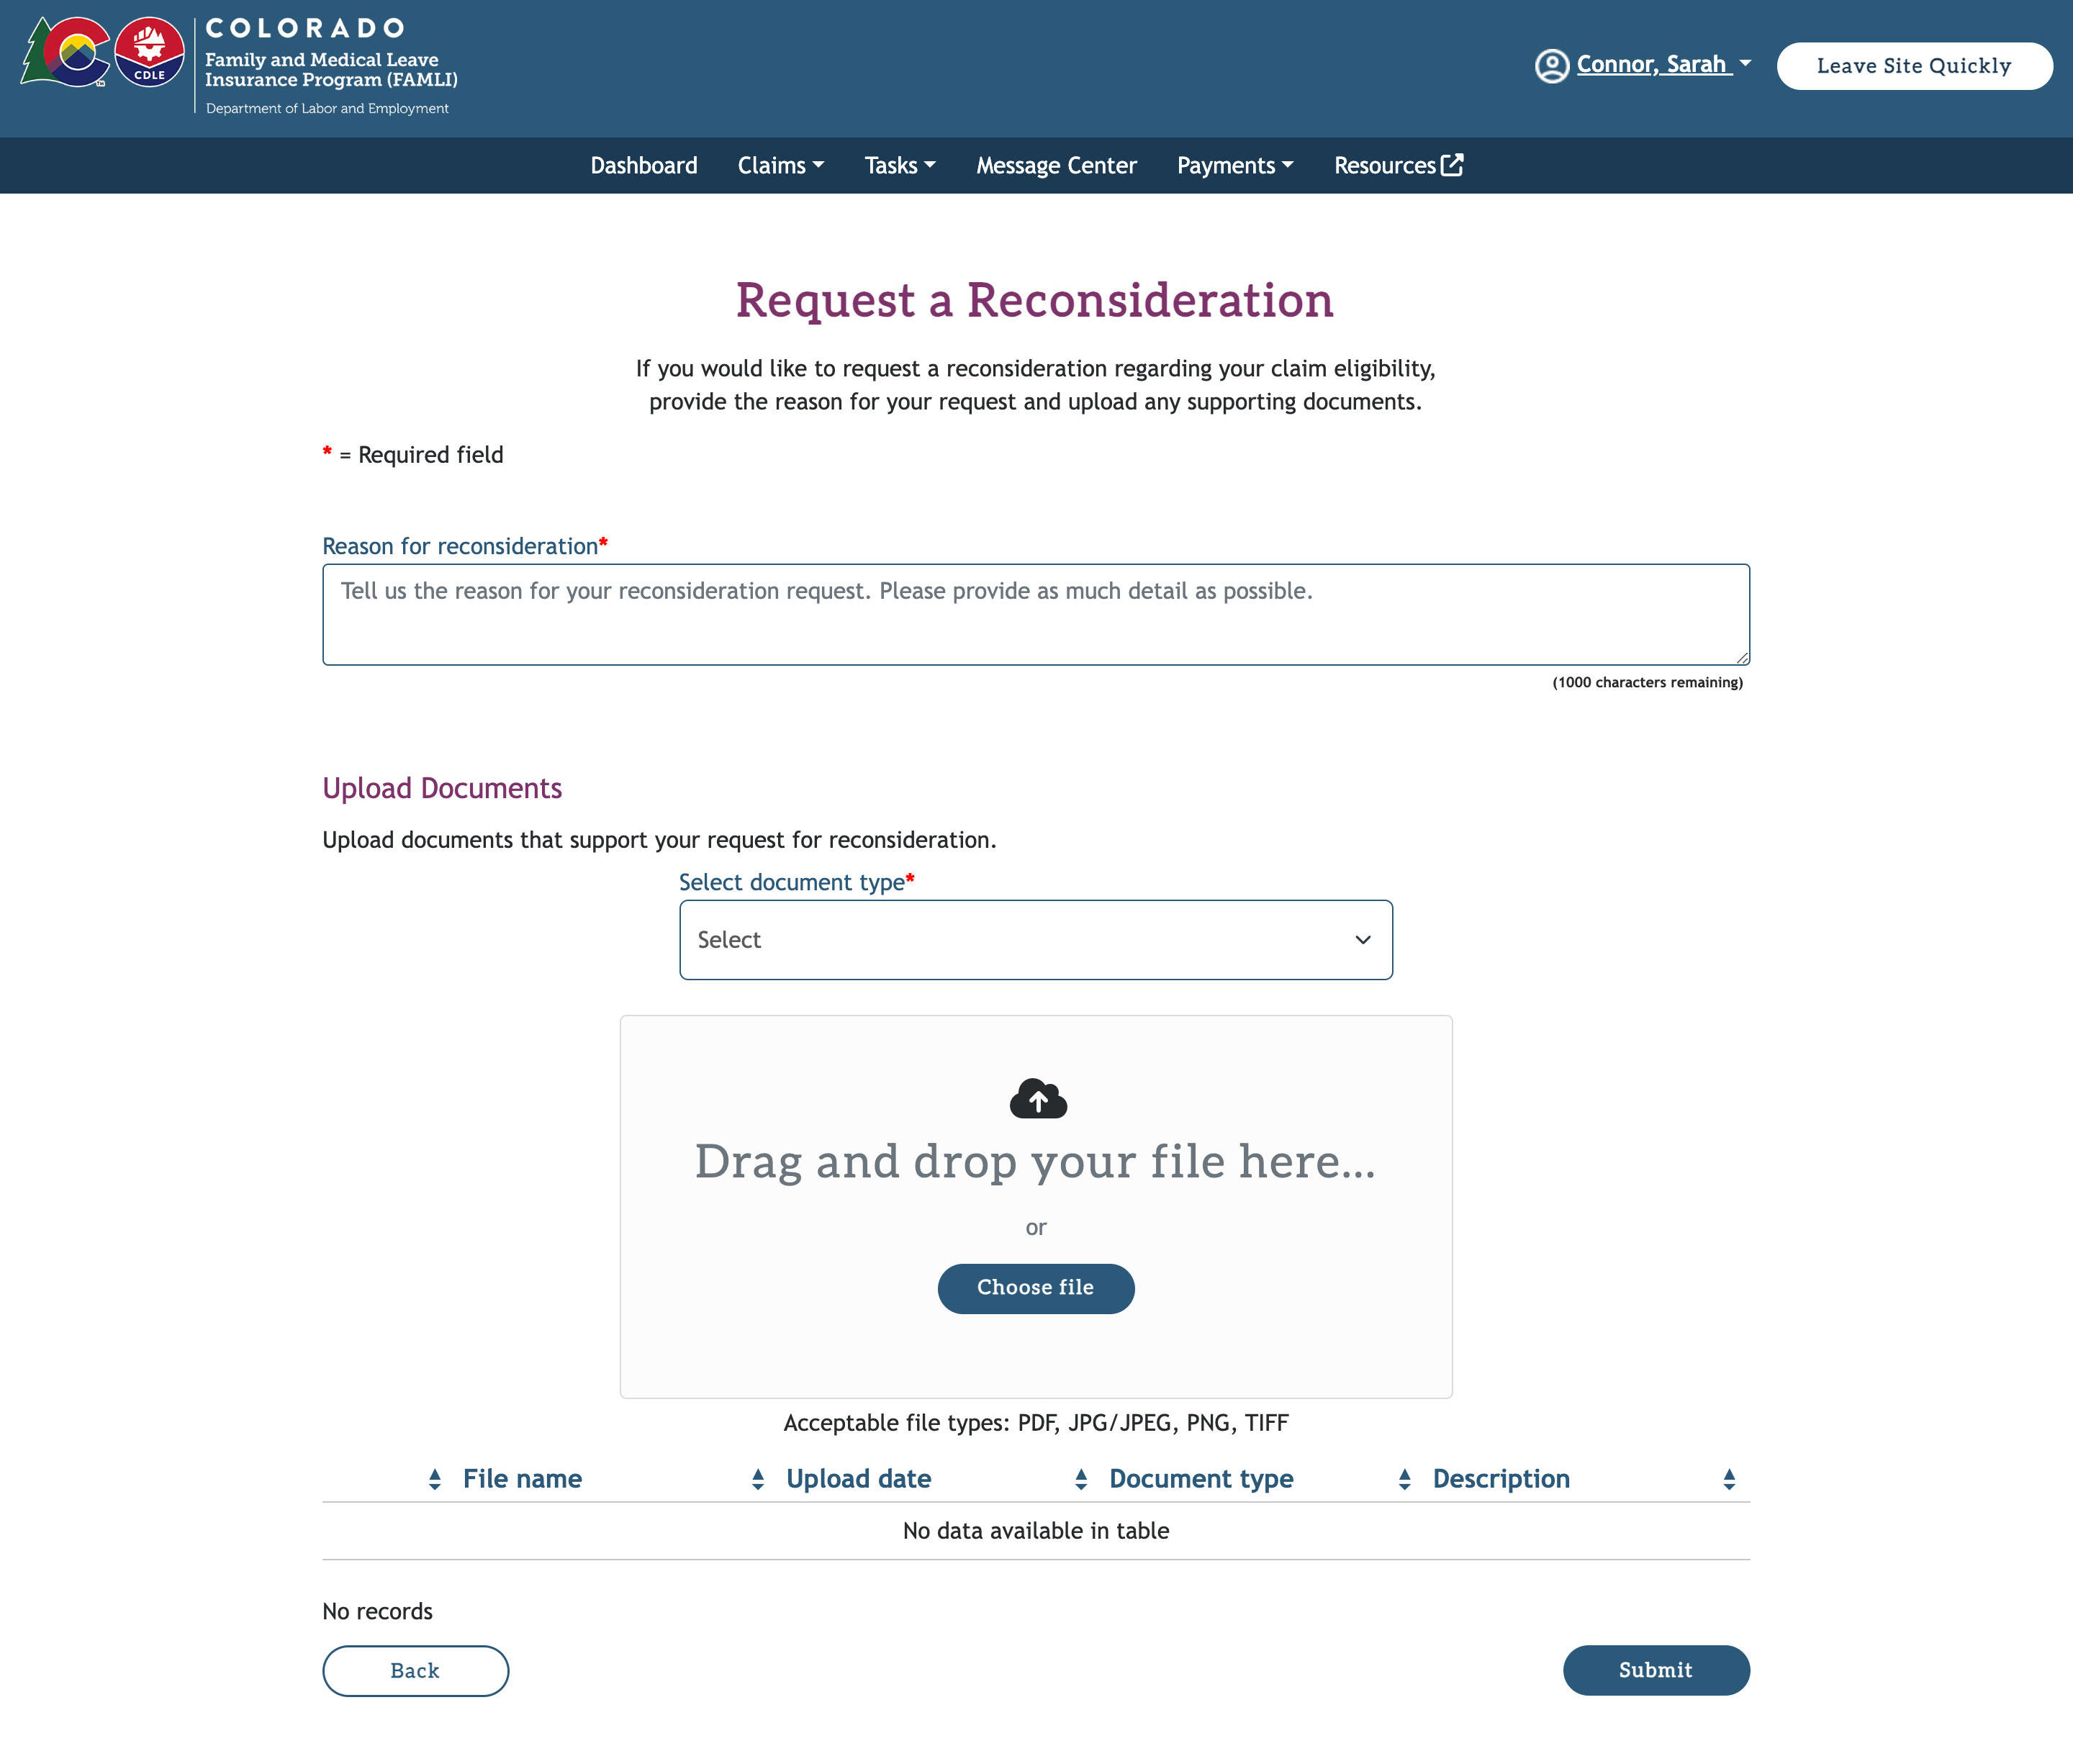
- Next, upload documents that support your request for reconsideration. The documents you have uploaded are listed at the bottom of the page.
- Once you have uploaded the documents, select the Submit button.
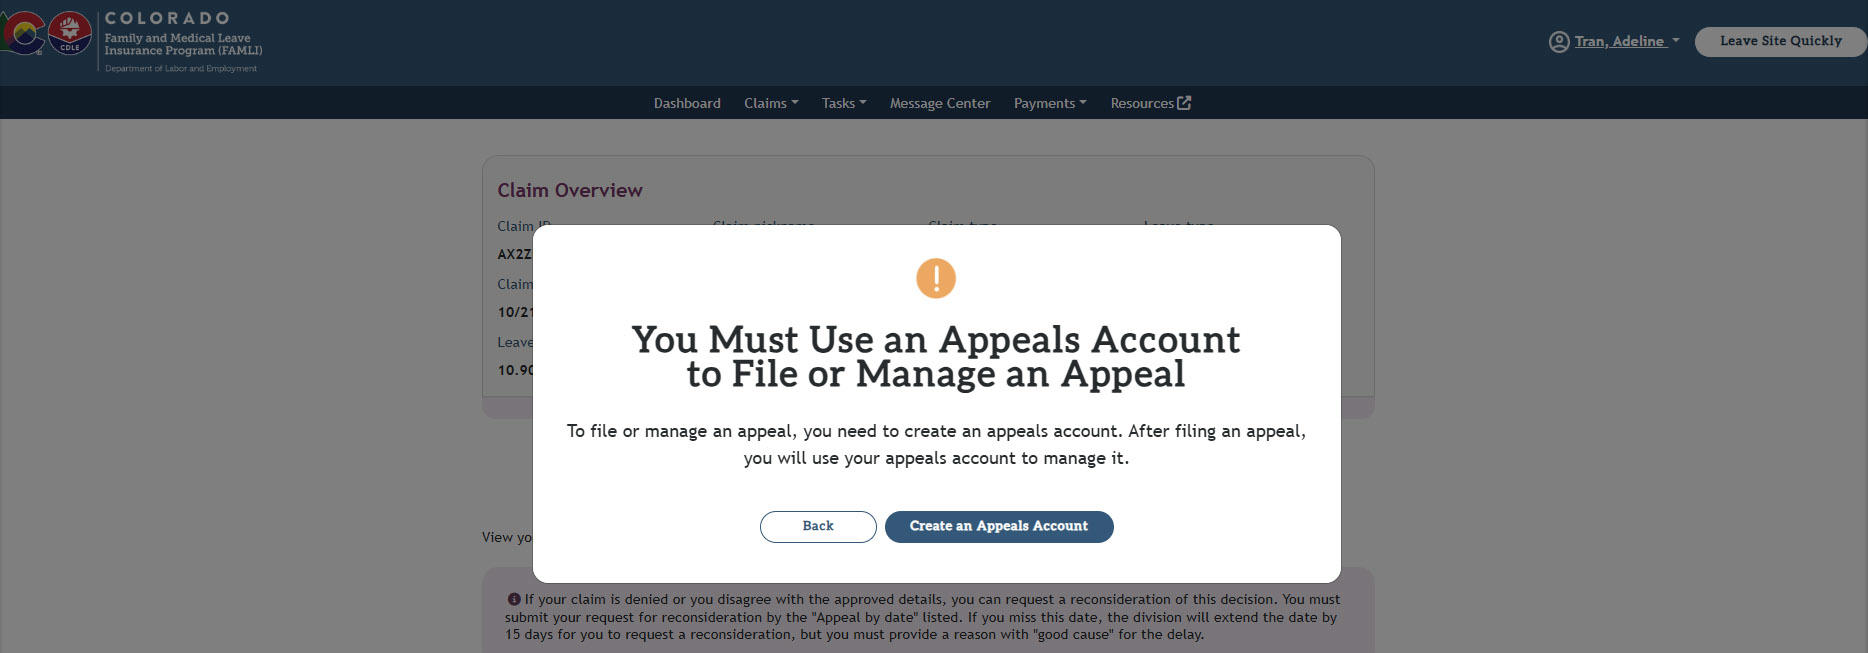
- Once the request for reconsideration is complete, the FAMLI Division will review your claim again. If you are still unhappy with the outcome, you can file an appeal. This can be done by following the same steps but choosing the Appeal button once it becomes available.
- When you select Appeal, a message will appear directing you to create an appeals account to file that appeal or go to your appeals account if you already have one. For step-by-step instructions on filing an appeal, please see the My FAMLI+ User Guide for Appeals.
You must submit a request for reconsideration within 49 days of the initial determination of your claim. In case of a delay, you must provide a valid reason for the delay.
Instructions for viewing your payment history:
- Navigate to your dashboard and select the Payments tab. The Payments page will display.

- Here, you can view all the payments that were made to you. You’ll also see other details such as the claim nickname, the start and end date of the claim, payment date, and the amount paid to you.
- As a Designated Representative, you can view the claims you have filed on behalf of someone else in the Managed Claims tab. You can review your personal claims in the My Claims tab.
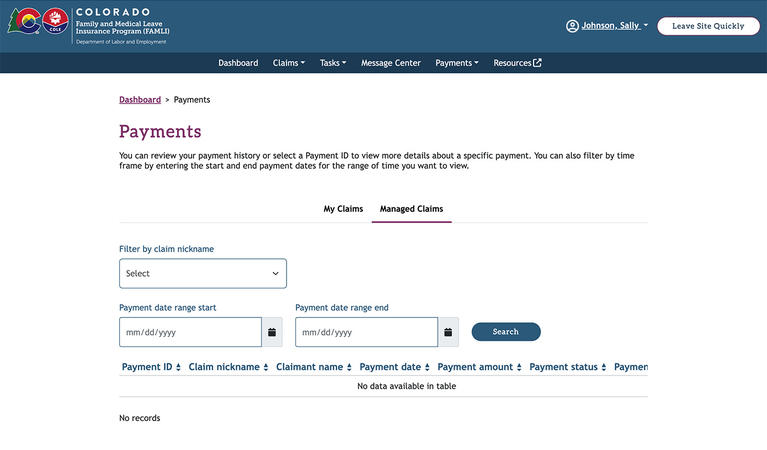
- You can also filter the payments using the provided fields.
Instructions for viewing your overpayments:
- Navigate to your Dashboard, and under the Payments tab, select the Overpayments option. The Overpayments page will display.
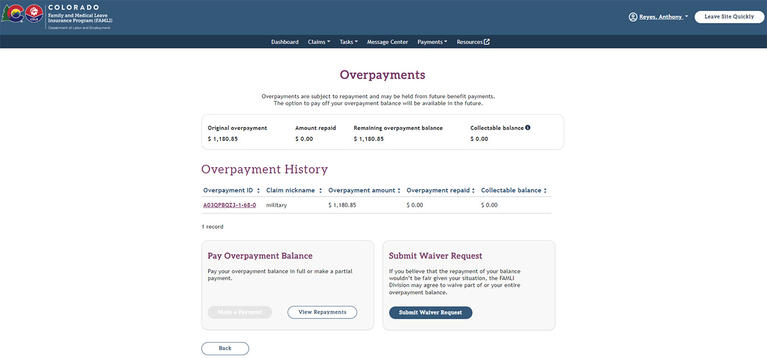
- Here, you can view all the overpayments made to you.
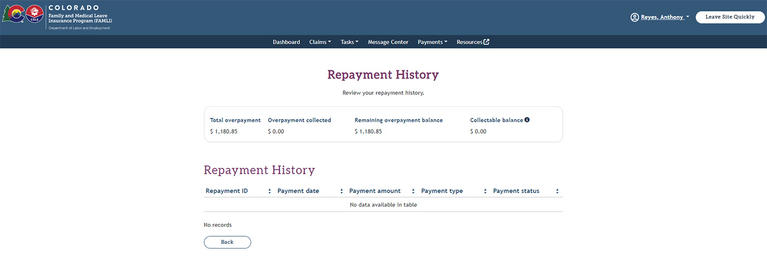
- You also see a summarized view of the amount you were overpaid, the amount repaid, and the balance amount you owe. To view Repayment History, select View Repayments.
- If you are not able to make the repayments, you can submit a waiver request. Select the Submit Waiver Request button.
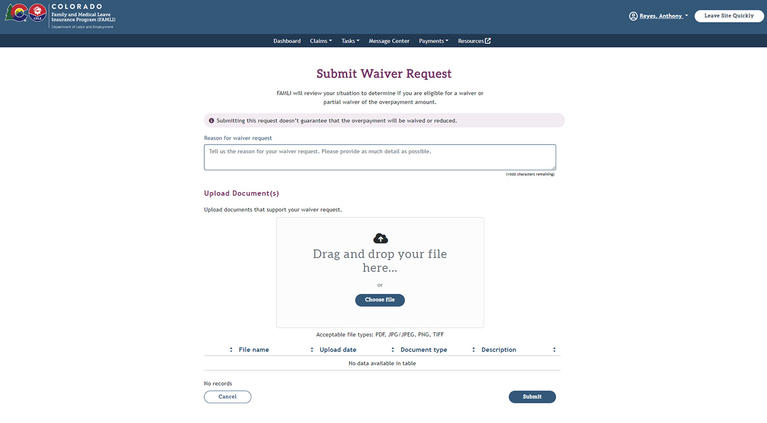
- Provide the details of your hardship.
- You must also upload any supporting documents. You won’t be able to submit your waiver request without uploading at least one supporting document.
- Select the Submit button. If your waiver request is accepted, the FAMLI Division may waive all or part of or your overpayment balance.
As a claimant or Designated Representative, you can update the Payment Type in the My FAMLI+ portal. You may be prompted to re-verify your identity prior to making a Payment Type update.
Instructions for updating payment type:
- Select the Update Payment Type option from the dropdown menu on the Payments tab on top of the Dashboard. The following screen will display.
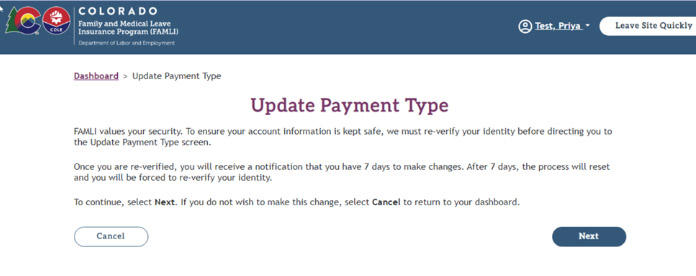
- Upon selecting the Next button, you will be prompted to re-verify your identity. Complete all the steps following the directions that display.
- When your identity is verified, you will be directed to the Update Payment Type screen where you can make any necessary changes and then select Submit.
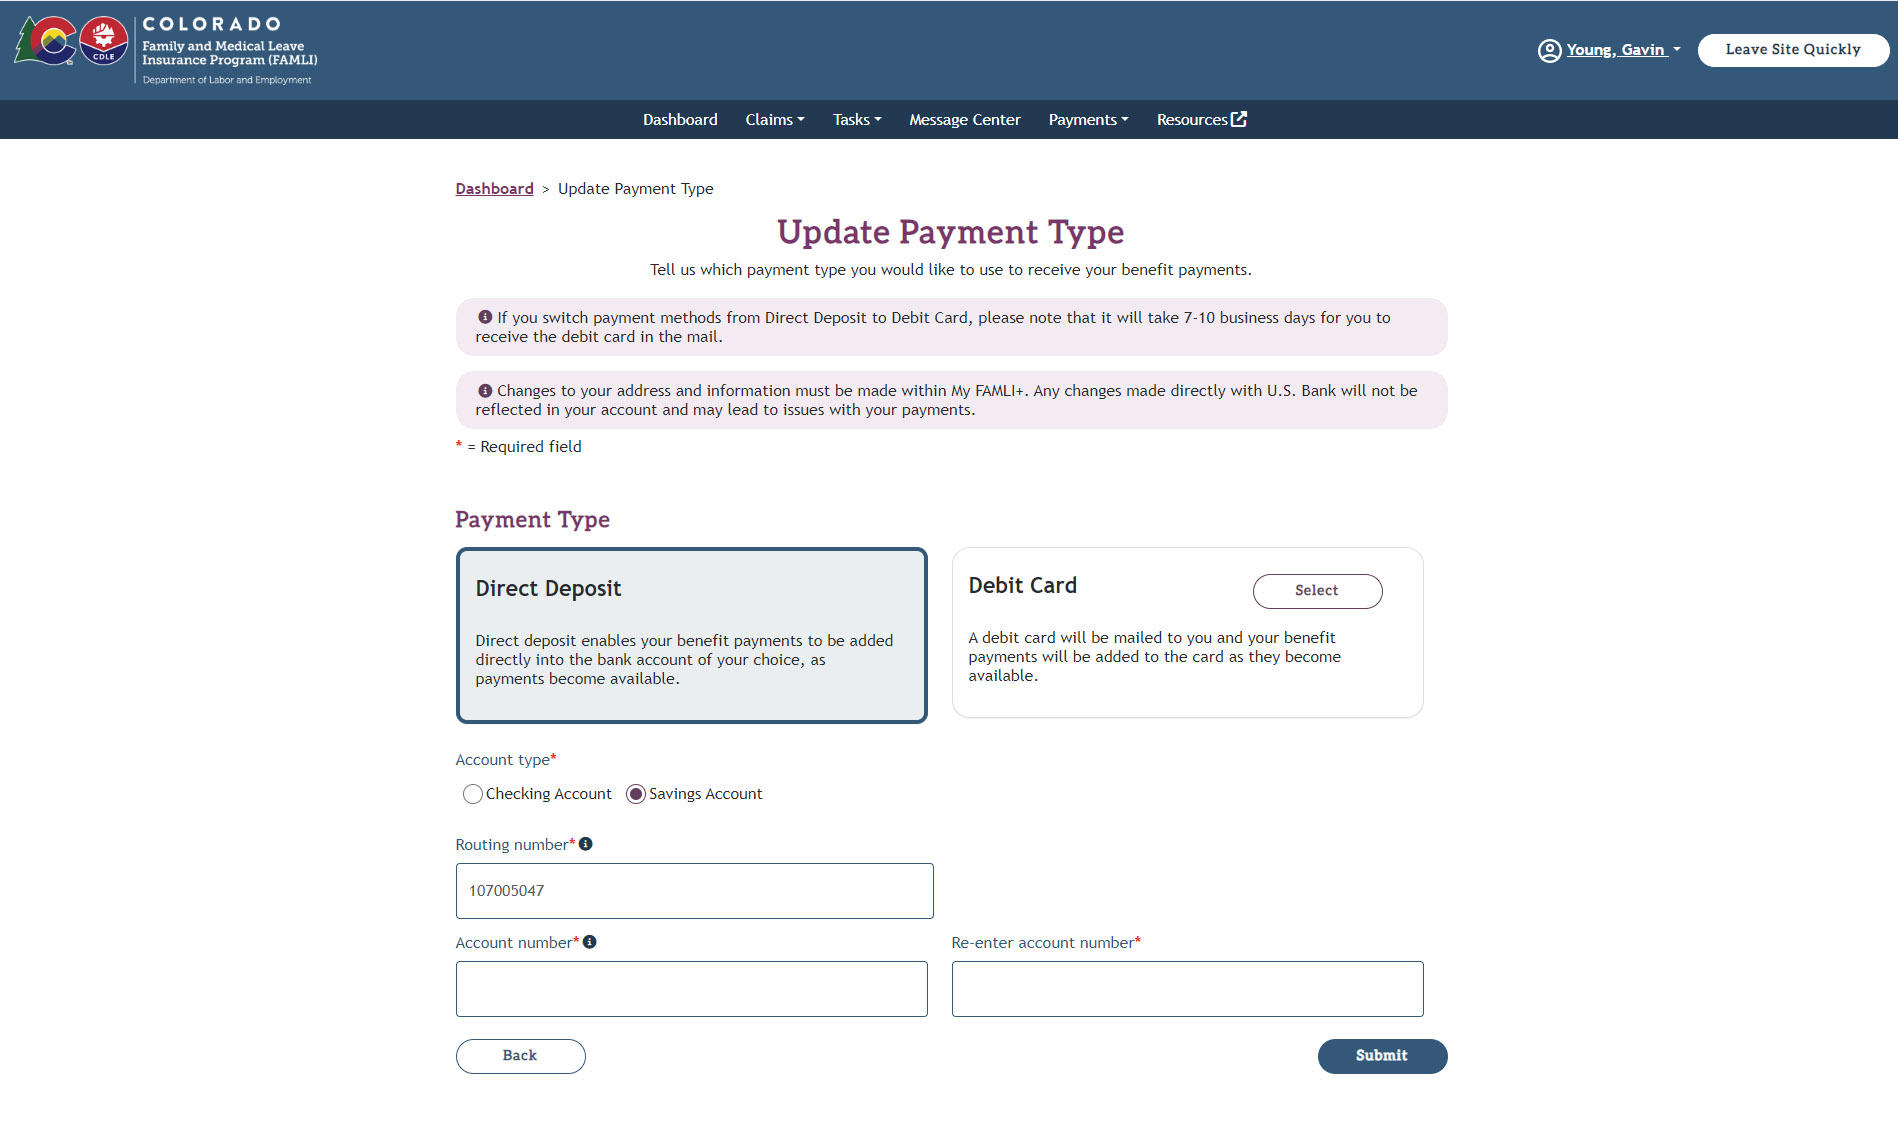
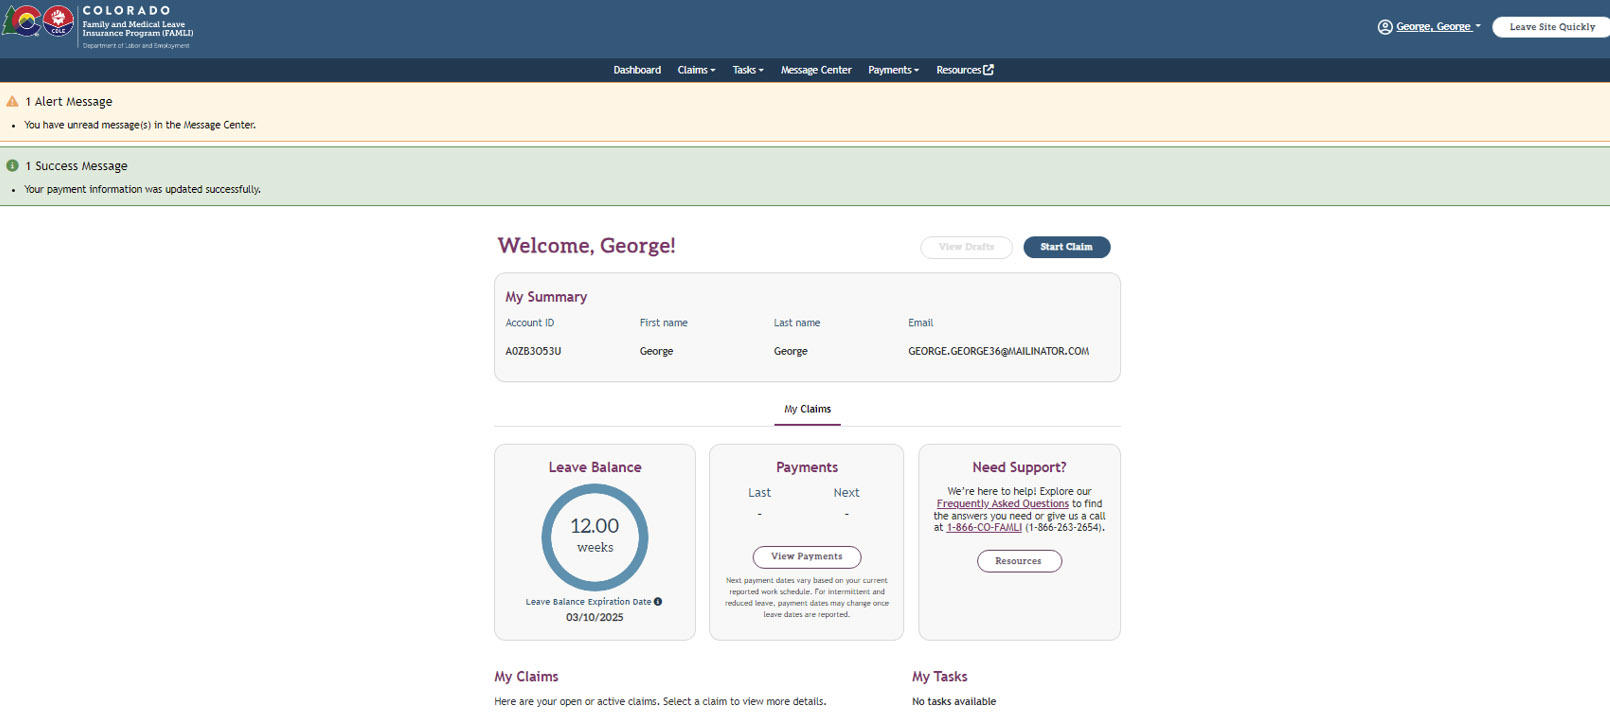
To update your Payment Type to Direct Deposit you will need to enter Account type, Routing number, and Account number details for the account you wish to use for the deposits, and then select Submit. If you select the Debit Card Payment Type, a message will display requiring you to open and read the ReliaCard Pre-Disposition Disclosures document. You must then select the "I have read and understand the ReliaCard Pre-Acquisition Disclosures" checkbox and select Confirm. You are then returned to the Update Payment Type screen, where you must select Submit. Your Payment Type will be updated and the Success Message “Your payment information was updated successfully” will display on the top of the screen.
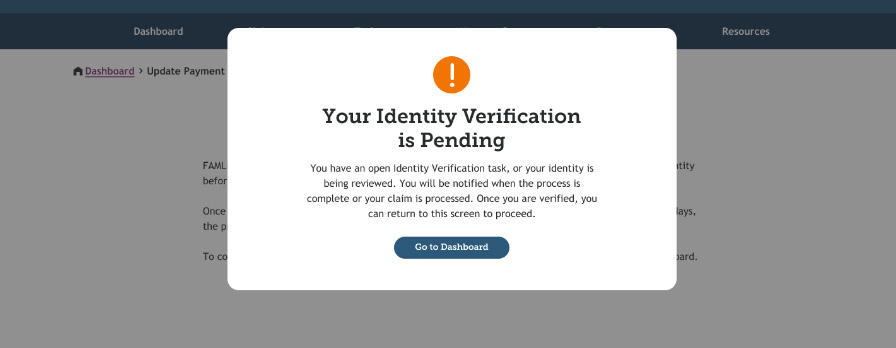
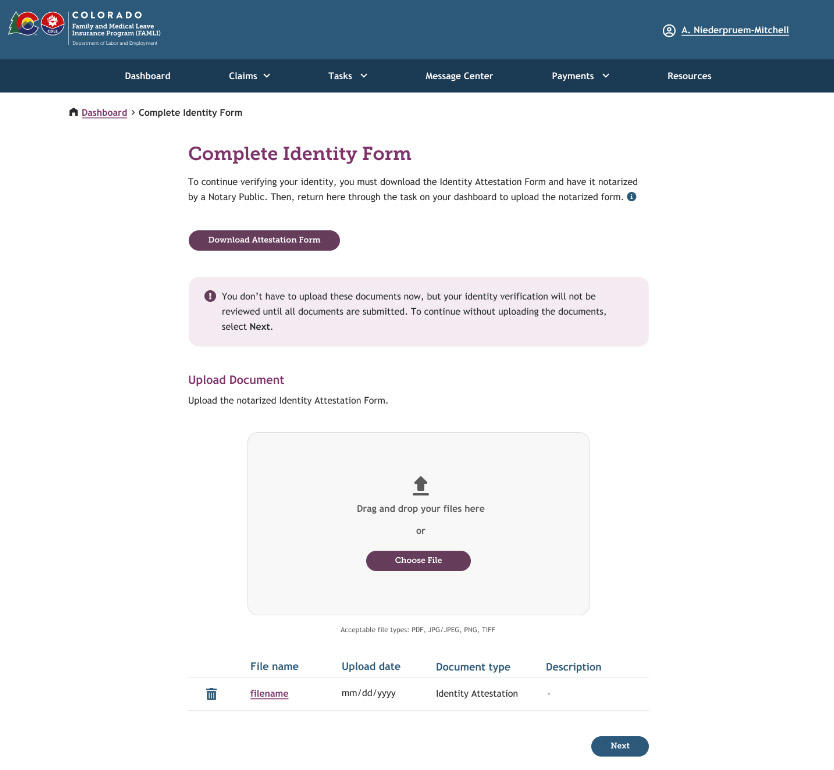
NOTE: If you have a pending identity verification task, the system will remind you with a pop-up message as soon as you select the Update Payment Type option on the Payments tab. You must complete the ID Verification task by uploading a notarized Identity Attestation Form OR wait for FAMLI staff to complete processing that identity verification task if you have already uploaded the required form.
Instructions for updating phone number or address:
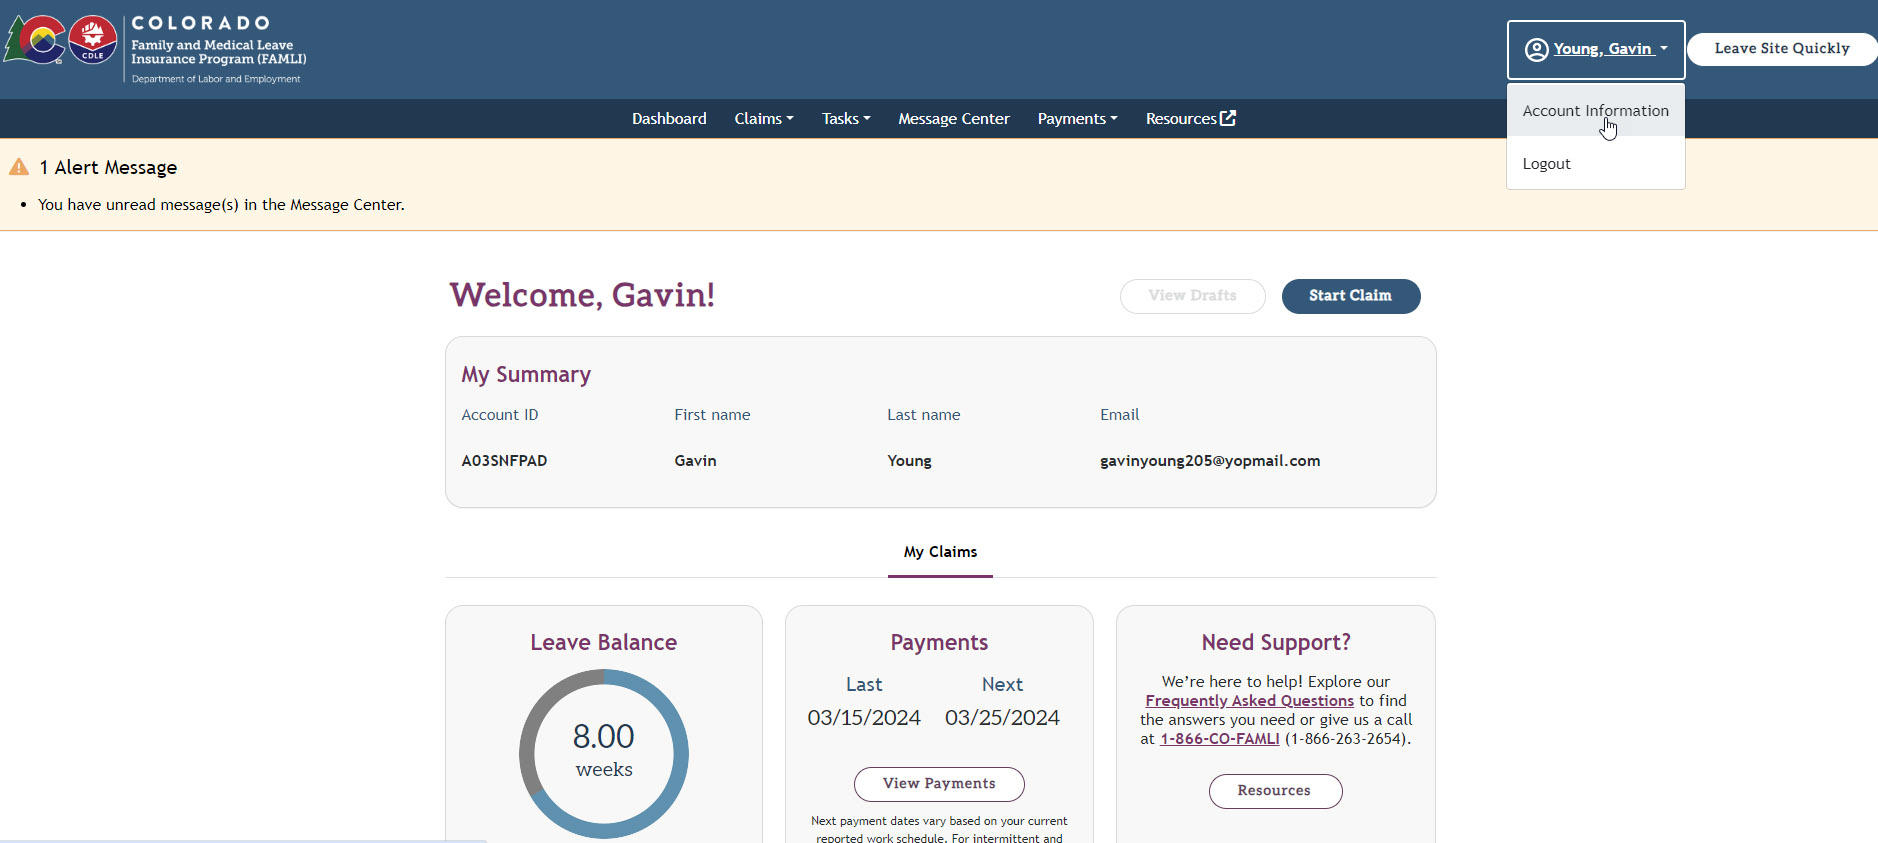
- Select the Account Information option from the dropdown menu when you hover over your name on top right of the dashboard in the My FAMLI+ portal.
The My Account Information page will display.

- Select the Edit Contact Information button to update your phone number. Enter your new phone number and select Save.
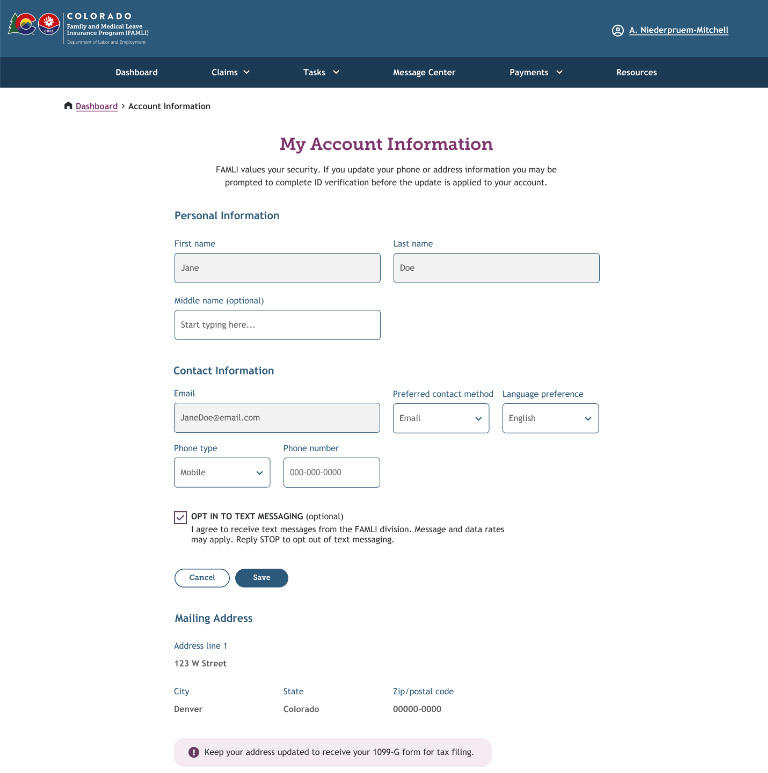
- Select the Edit Mailing Address button to make changes to your address. Enter your new address by selecting the Enter Address button and then selecting Save.
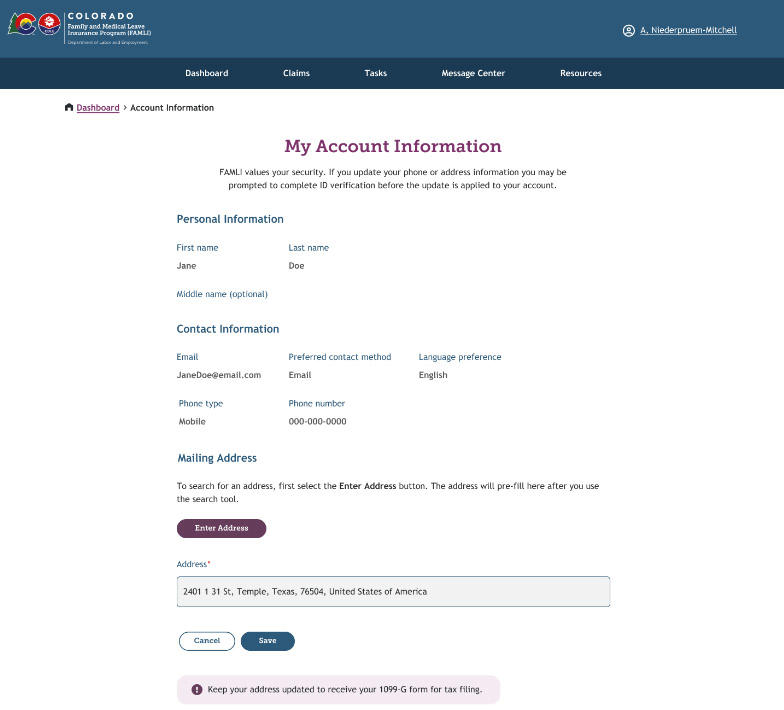
- Next, you may be directed to the ID proofing steps. Complete all the steps following the directions that display.
NOTE: You may be prompted to enter a one-time verification code that will be sent to your new phone number and/or email. To get a new code select Resend Code button. If you select the I Didn’t Receive a Code button, the system won’t send another code and will direct you to the Complete Identity Form page.
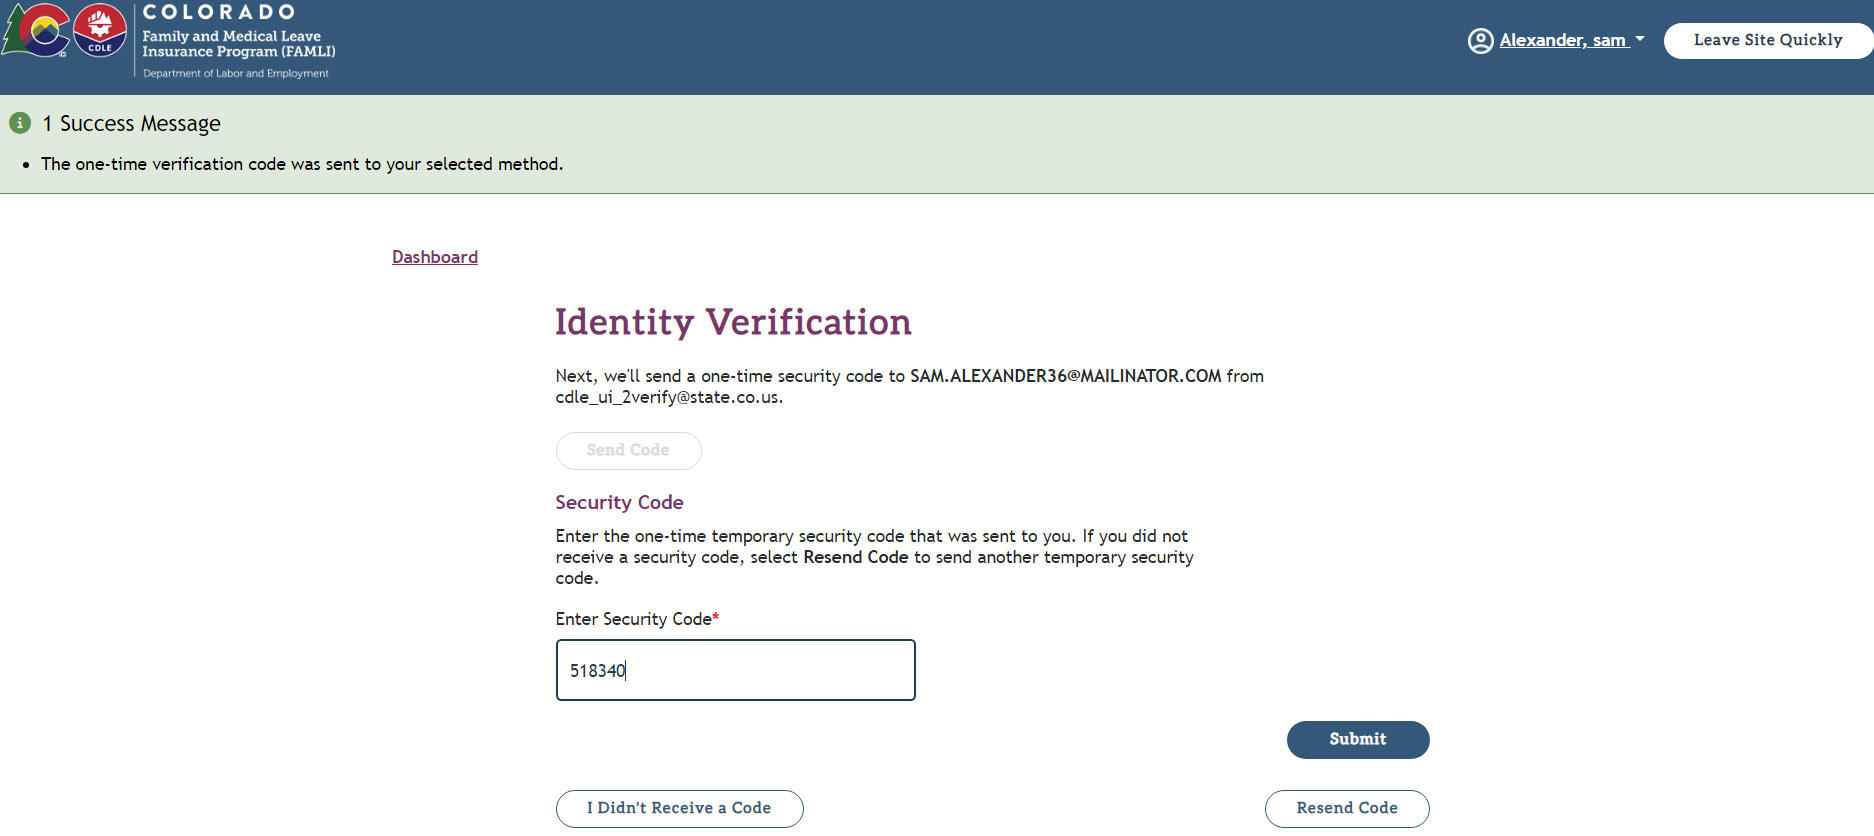
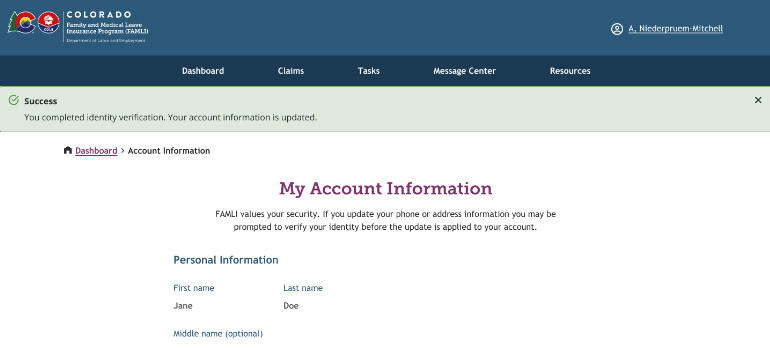
- Upon completion of the identity verification process, the Success Message “You completed identity verification. Your account information is updated.” will display on top of the My Account Information page.
The system will save the updated phone number or address information.
NOTE: If you have a pending identity verification task, the system will display the pop-up message Your Identity Verification is Pending after you enter a new phone number or new address and select Save. You must complete the ID Verification task by uploading a notarized Identity Attestation Form OR wait for FAMLI staff to complete the identity verification process if you have already uploaded the required form.
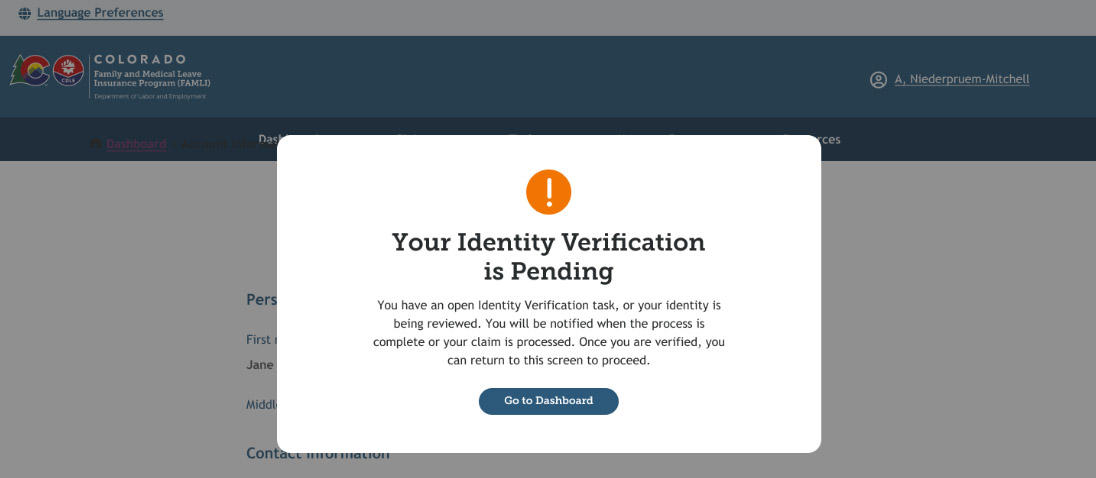
You can view and complete a pending Identity Verification task by selecting My Tasks from the dropdown menu on the Tasks tab, or by selecting the Start Task button on the bottom right of the Dashboard in the My Tasks field. This task is due within 30 days of the date it was assigned to you.
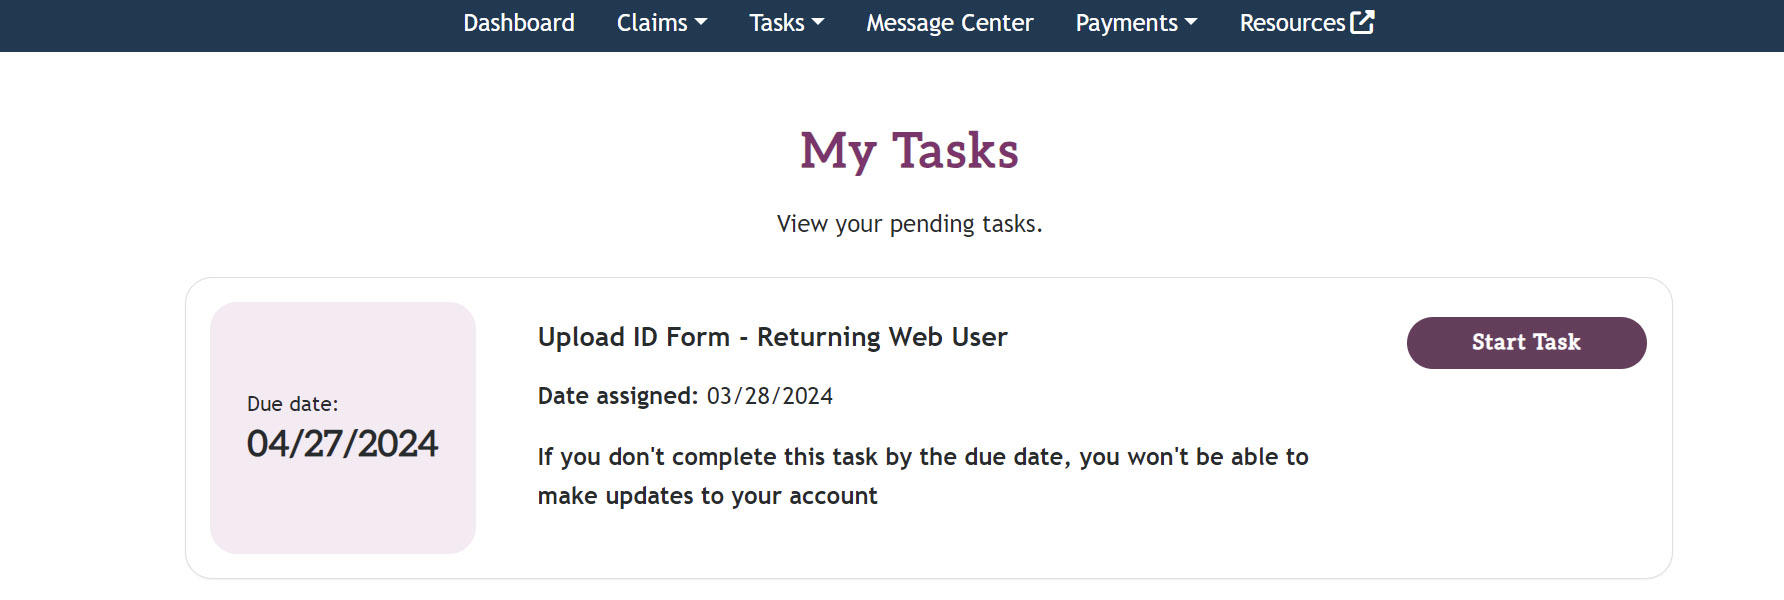
Upload your notarized form by selecting the Choose file button on the Complete Identity Form page that will display when you select the Start Task button.
If the task is not completed by the due date, you will receive a communication indicating that you cannot make changes to your account and must re-verify your identity in order to update your phone number or mailing address. Your current claims won’t be impacted.
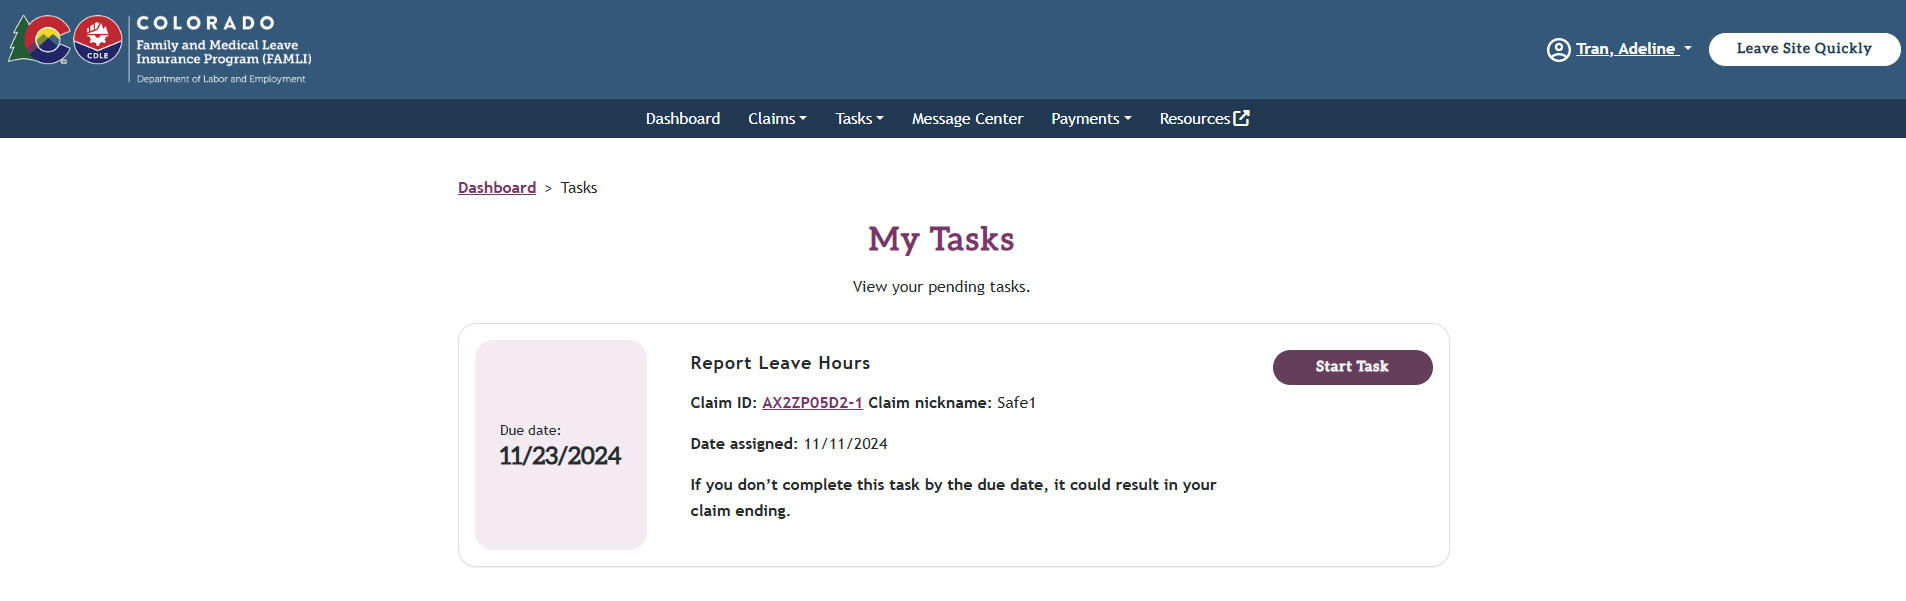
Claimants with approved intermittent and reduced leave claims are required to report their hours away from work on a weekly basis. Claimants with irregular work schedules can update their work schedule for the past week(s) any time they report their weekly leave hours.
Follow the steps below to report your leave hours:
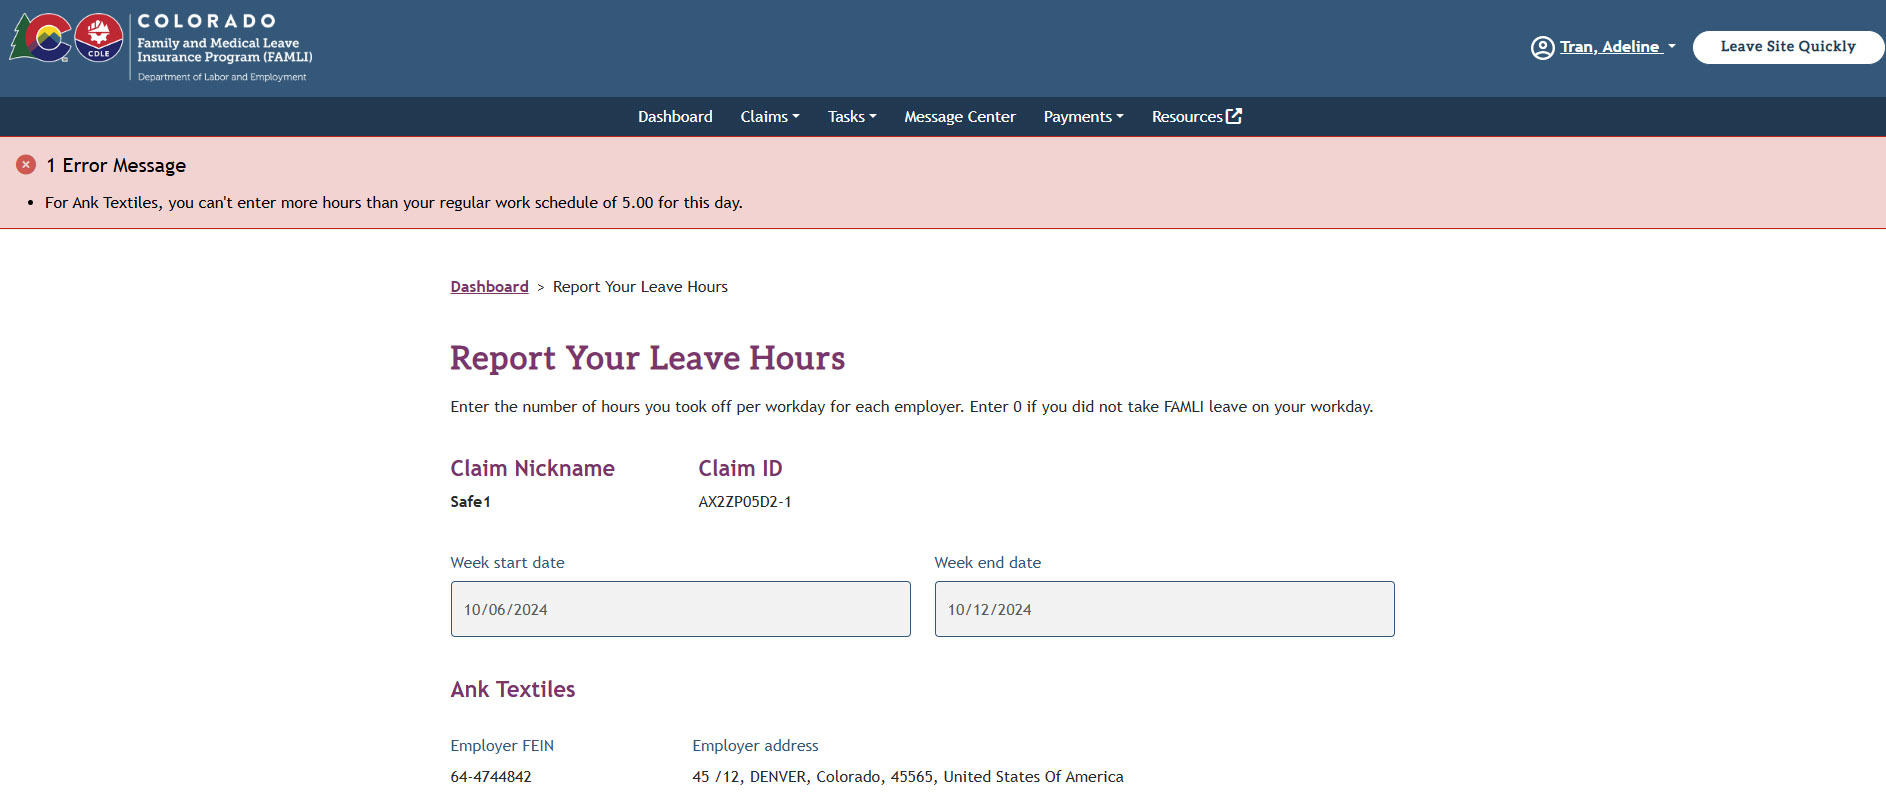
- Navigate to the My Tasks page and select the Start Task button on the Report Leave Hours task.
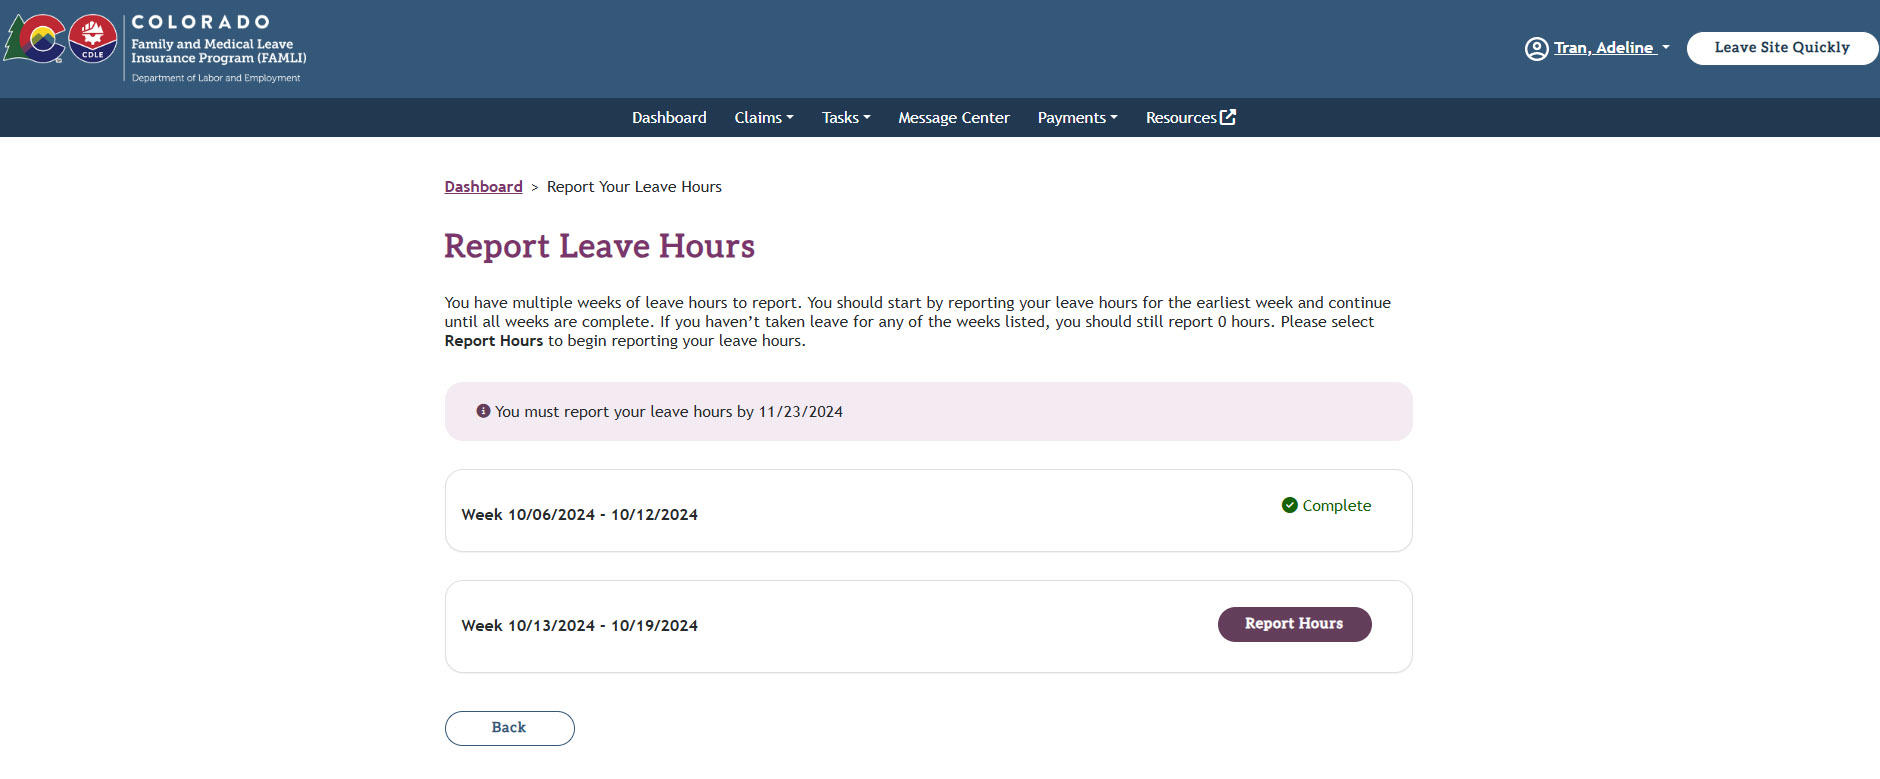
- Select the Report Hours button next to the week you are reporting your leave hours for on the Report Leave Hours page. If you have only one week to report leave hours for, you will skip this step and move straight to the next step.
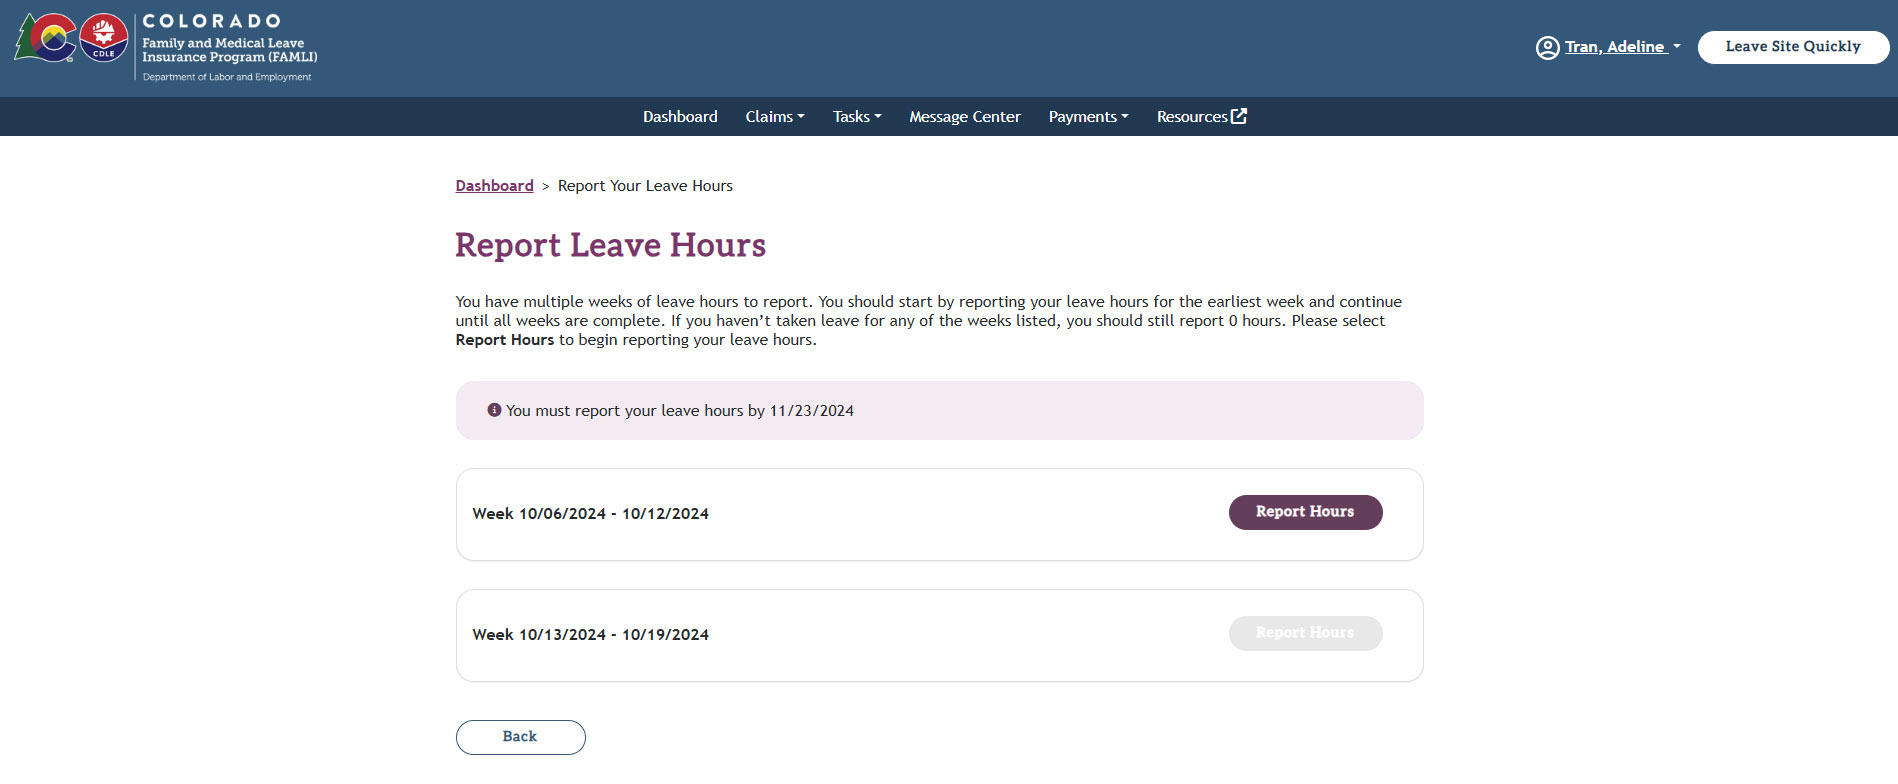
Note: If a claim is filed and approved by FAMLI two or more weeks after the leave start date, you will get one task to report your leave hours for each of those weeks. Leave hours for qualifying weeks have to be reported in order from the oldest to the most recent.
- Upon selecting the Report Hours button, you’ll see the Report Your Leave Hours page.
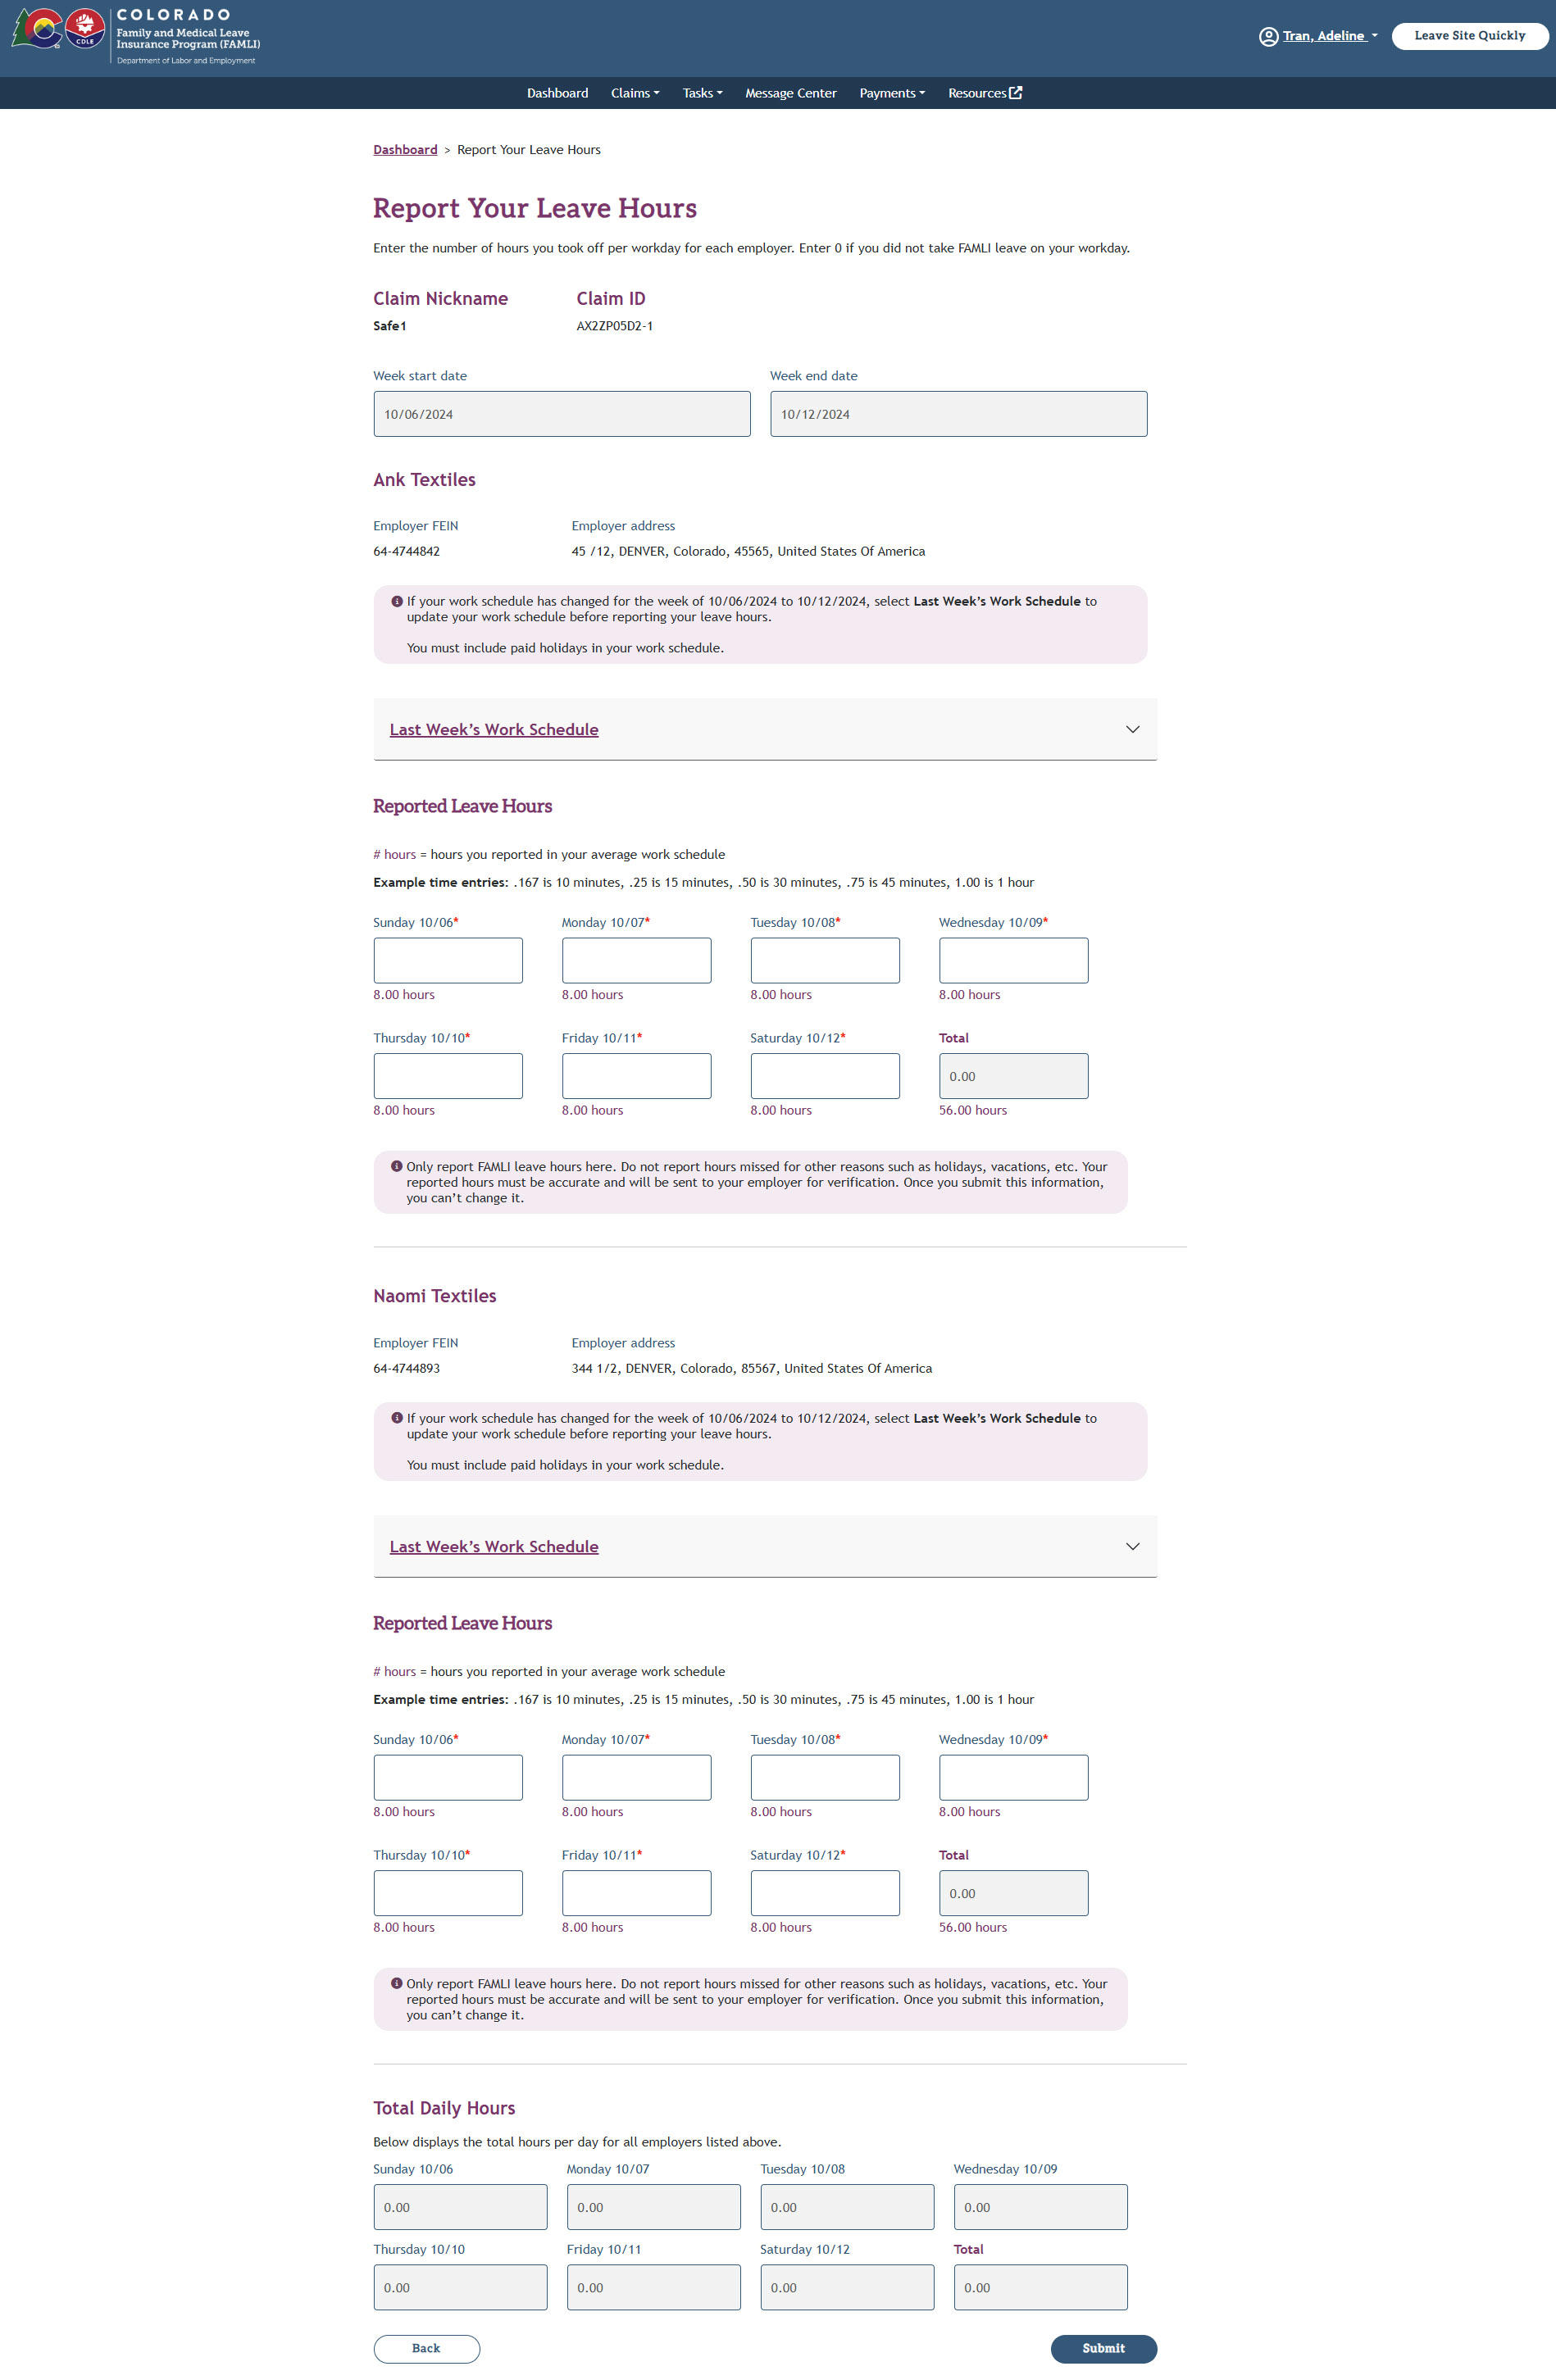
- If your work schedule changed for the week you are reporting leave hours for, you need to update it. Select the caret next to Last Week’s Work Schedule to see additional fields with days of the week and the Edit button.
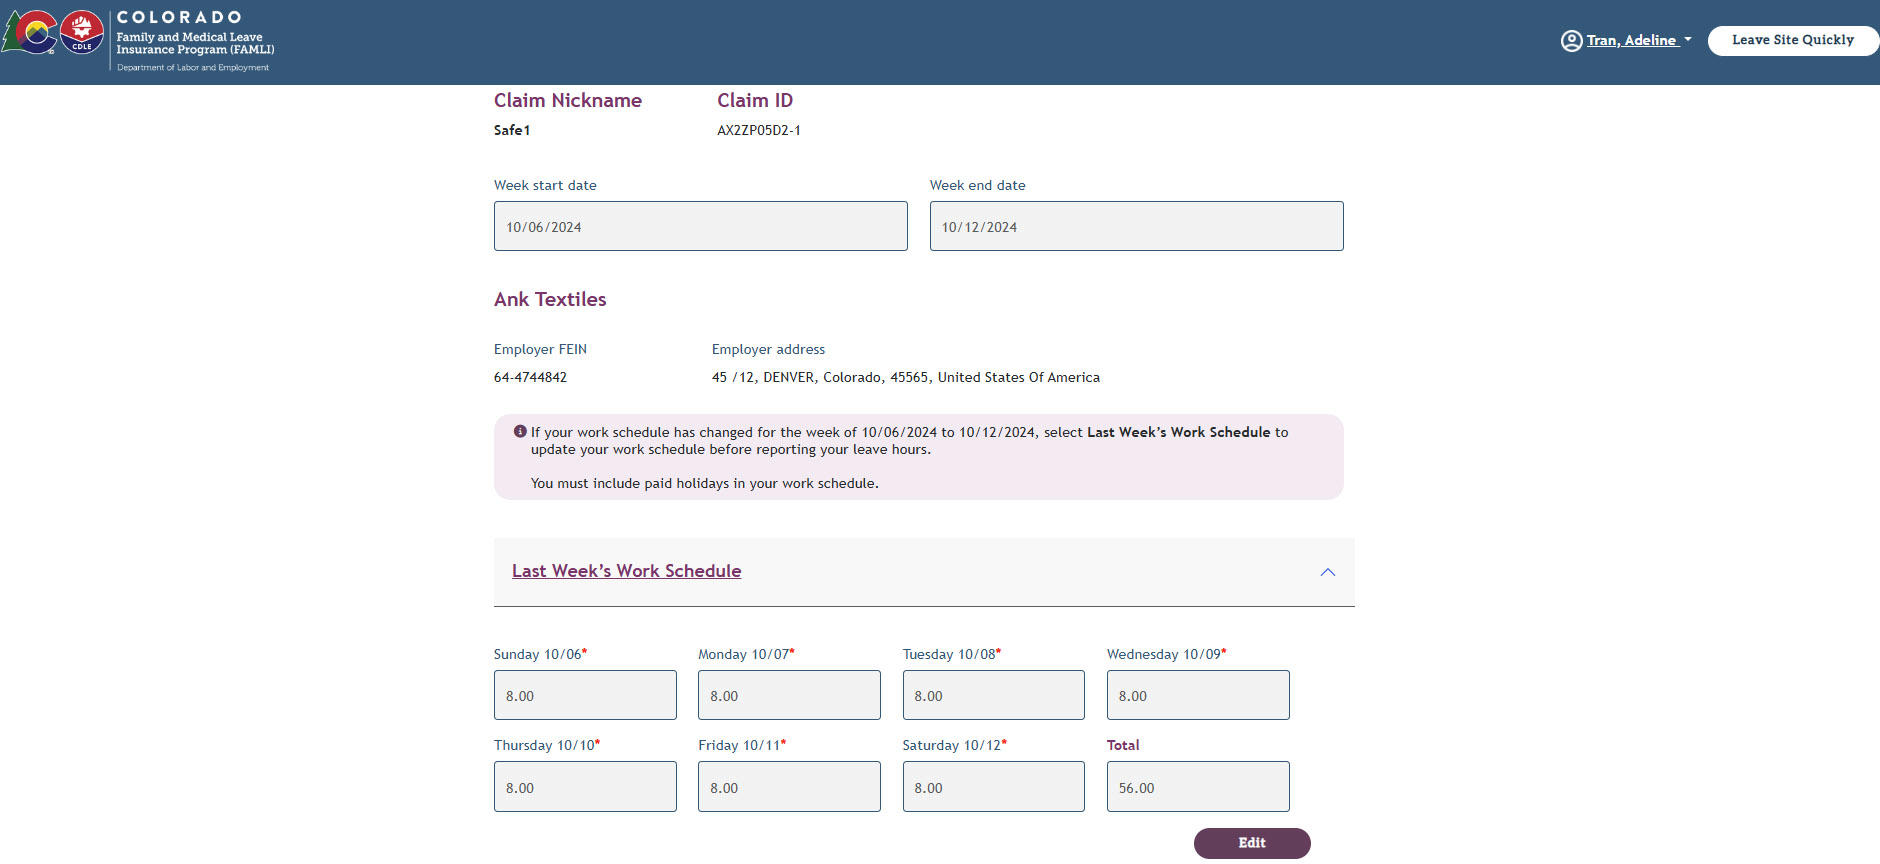
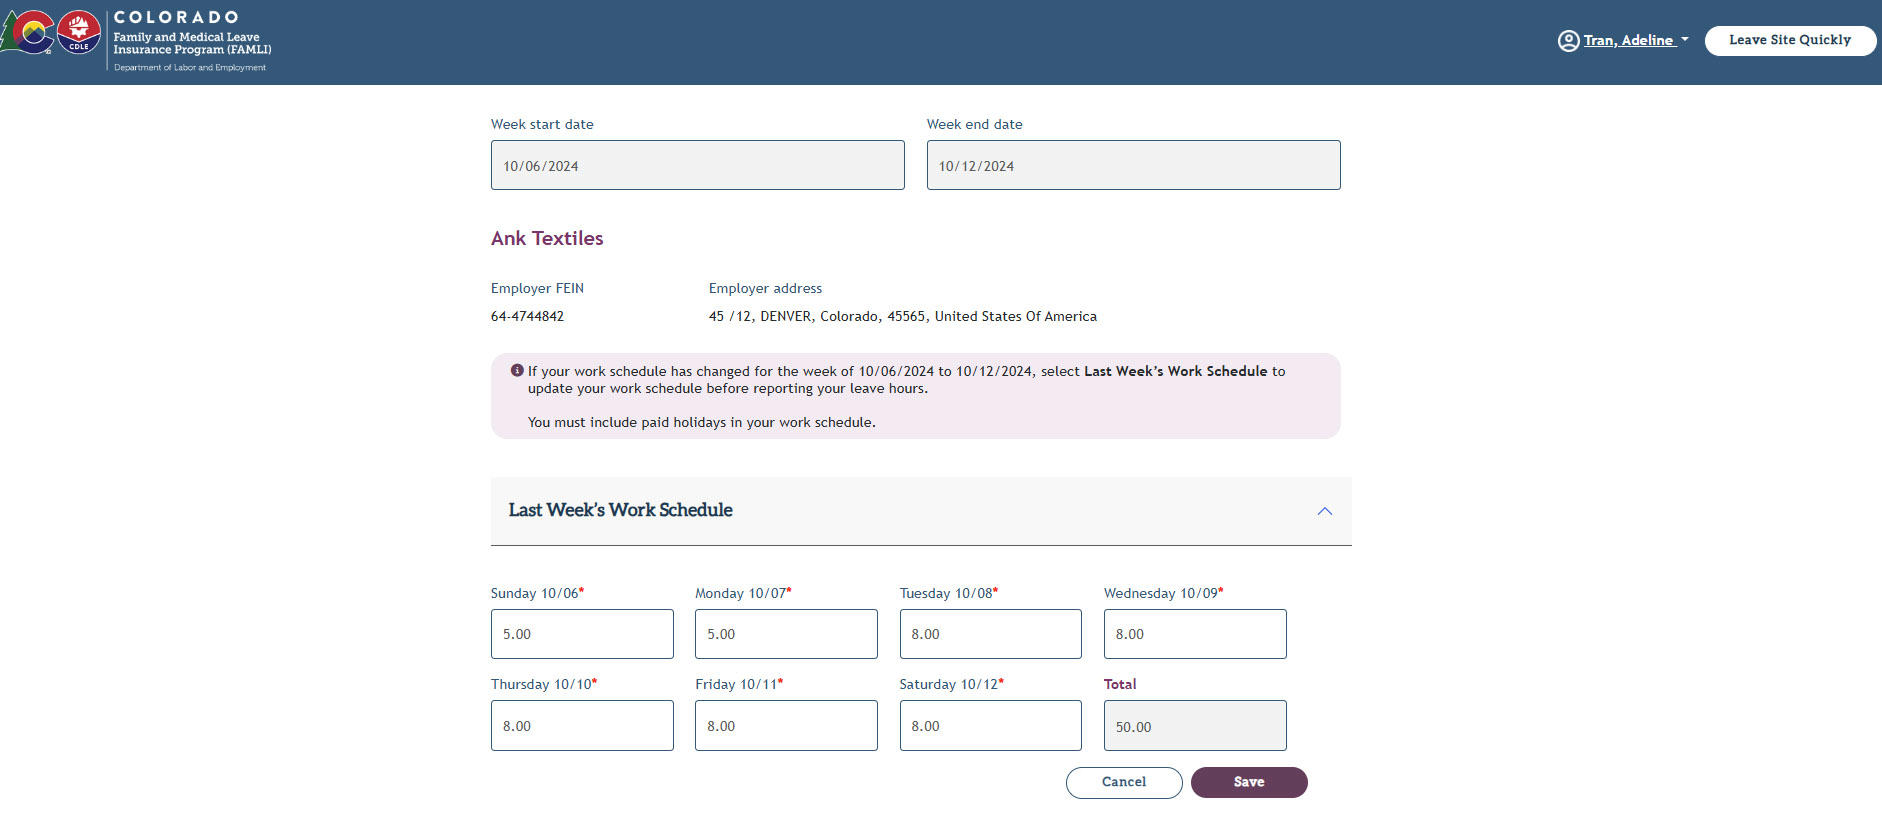
- Select the Edit button and enter your work schedule for the week. Select the Save button when you’re done.
- Enter your leave hours in the Reported Leave Hours section and then Submit.
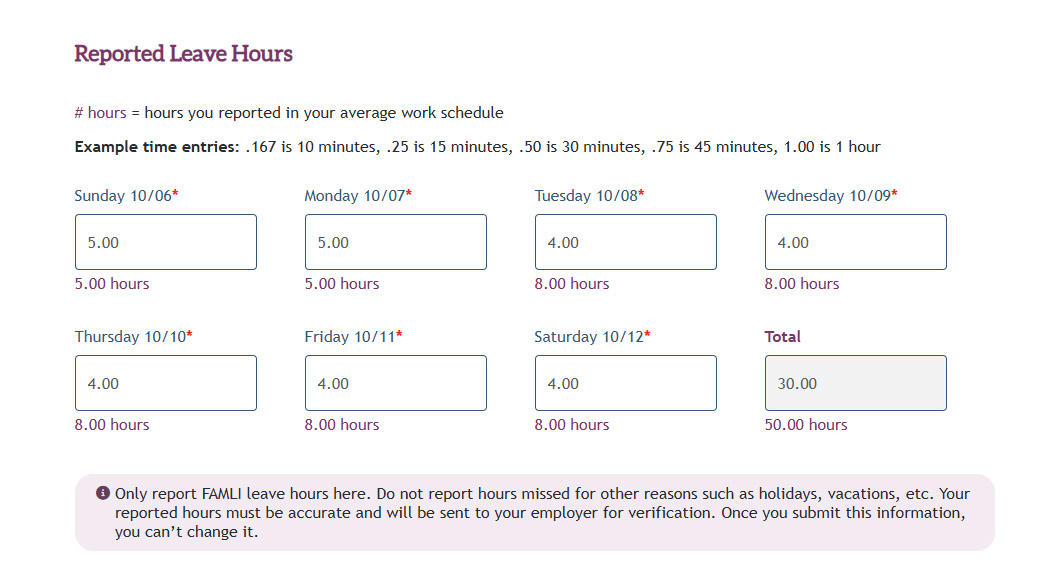
The Total Daily Hours field is displayed only if you have more than one employer.

- If you enter leave hours that exceed your work hours or hours allowed by your Health Care Provider on Medical, Pregnancy, and Care leave claims, an Error Message will display. You must correct your leave hours in order to submit your information.
- After submission, the system takes you back to the Report Leave Hours page and the Complete status will be displayed next to the week you just reported your leave hours for.
Note:If you had only one week to report leave hours for, you will see the Success Message stating “Your leave hours are submitted.”
- Now, you are ready to report leave hours for the following week exactly the same way. Select the Report Hours button next to the week and follow the same steps. When you complete all weeks, the Success Message will be displayed on top of the screen and the task will be removed from the My Tasks page.
Note: You and your employer(s) will be notified whenever your work schedule is updated. Your employer(s) will also be notified every time you report your weekly leave hours.
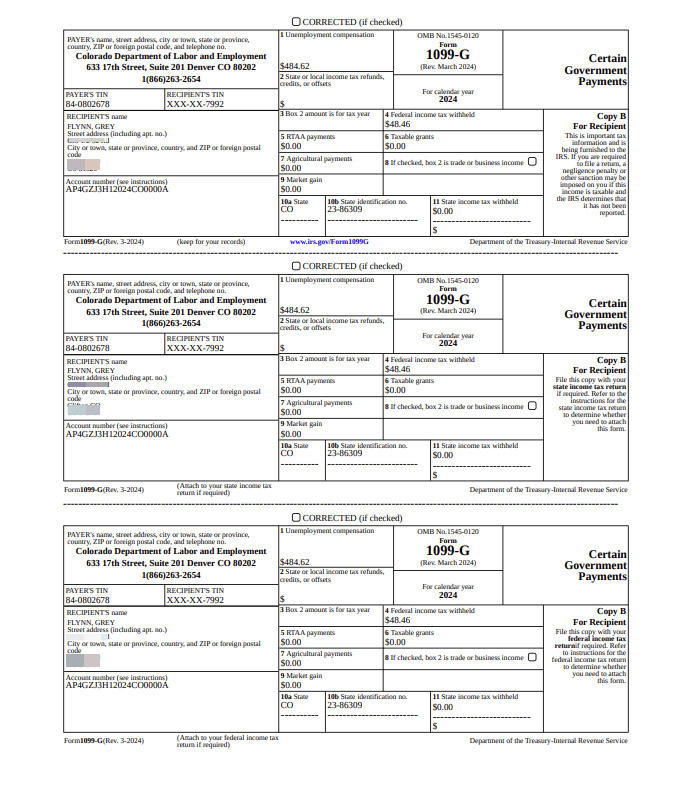
FAMLI benefits are not subject to Colorado state income tax but they may be subject to federal income tax.
The FAMLI Division will issue Form 1099-G to all claimants who receive FAMLI benefits totaling 10 dollars or more. Received FAMLI benefits will be reported in Box 1 which is labeled “unemployment compensation.”
In January of 2025, all eligible claimants who received FAMLI benefits in 2024 will be notified of upcoming 1099-G forms.
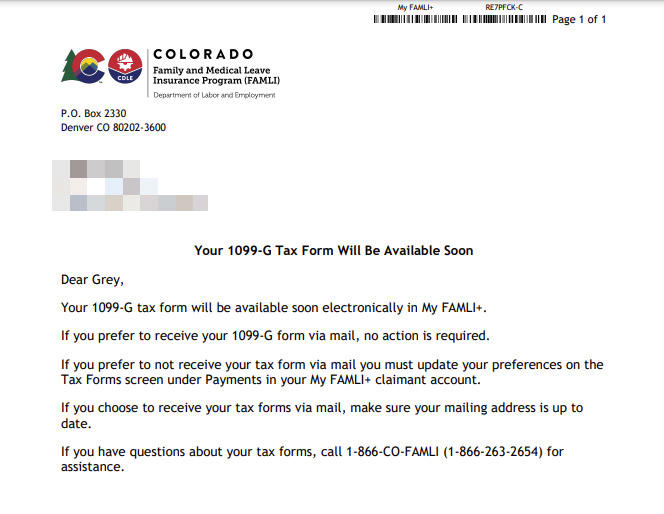
Form 1099-G will be mailed and/or available electronically to all eligible claimants based on their delivery preference.
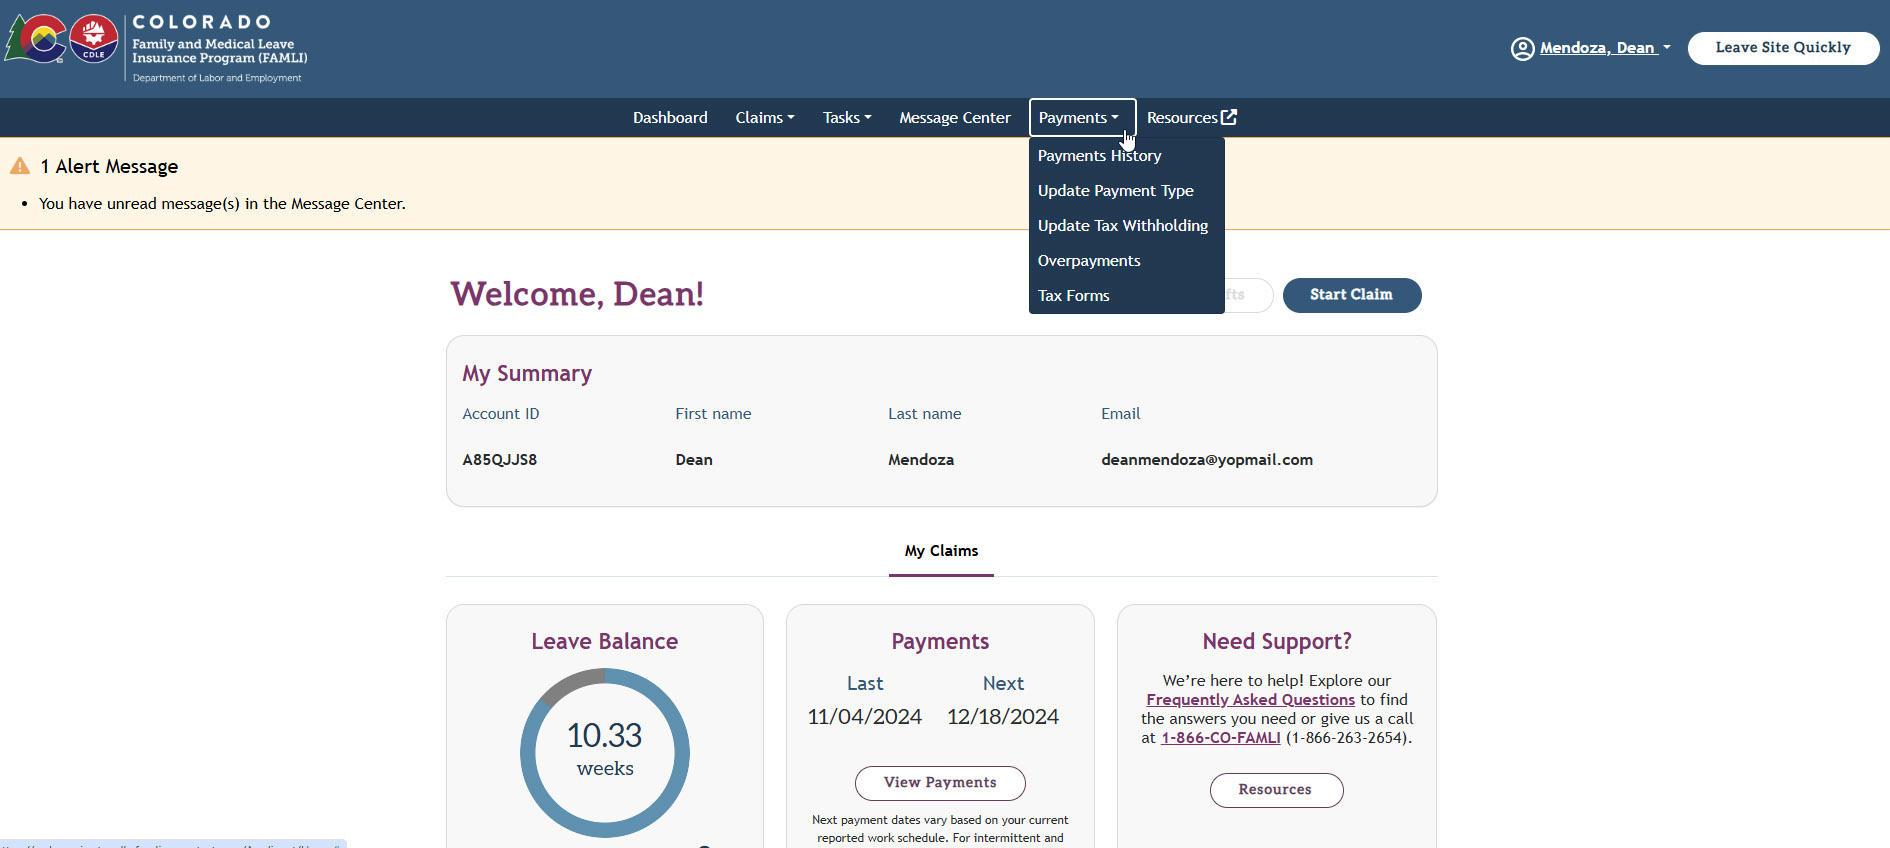
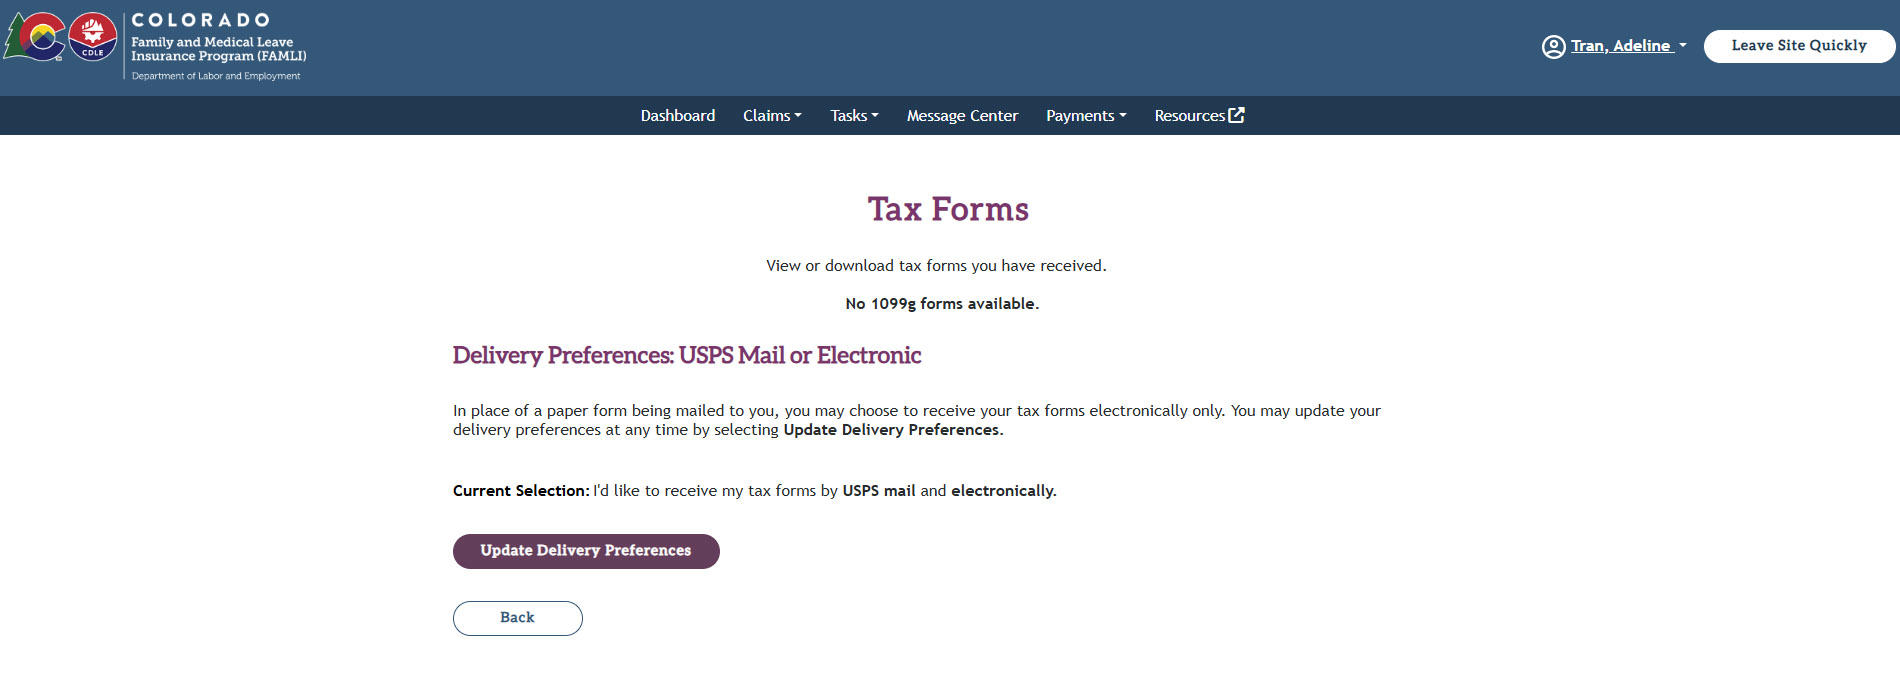
You can update delivery preference from USPS mail to an electronic delivery only in the My FAMLI+ portal by following these steps:
- Select the Tax Forms option on the Payments tab.
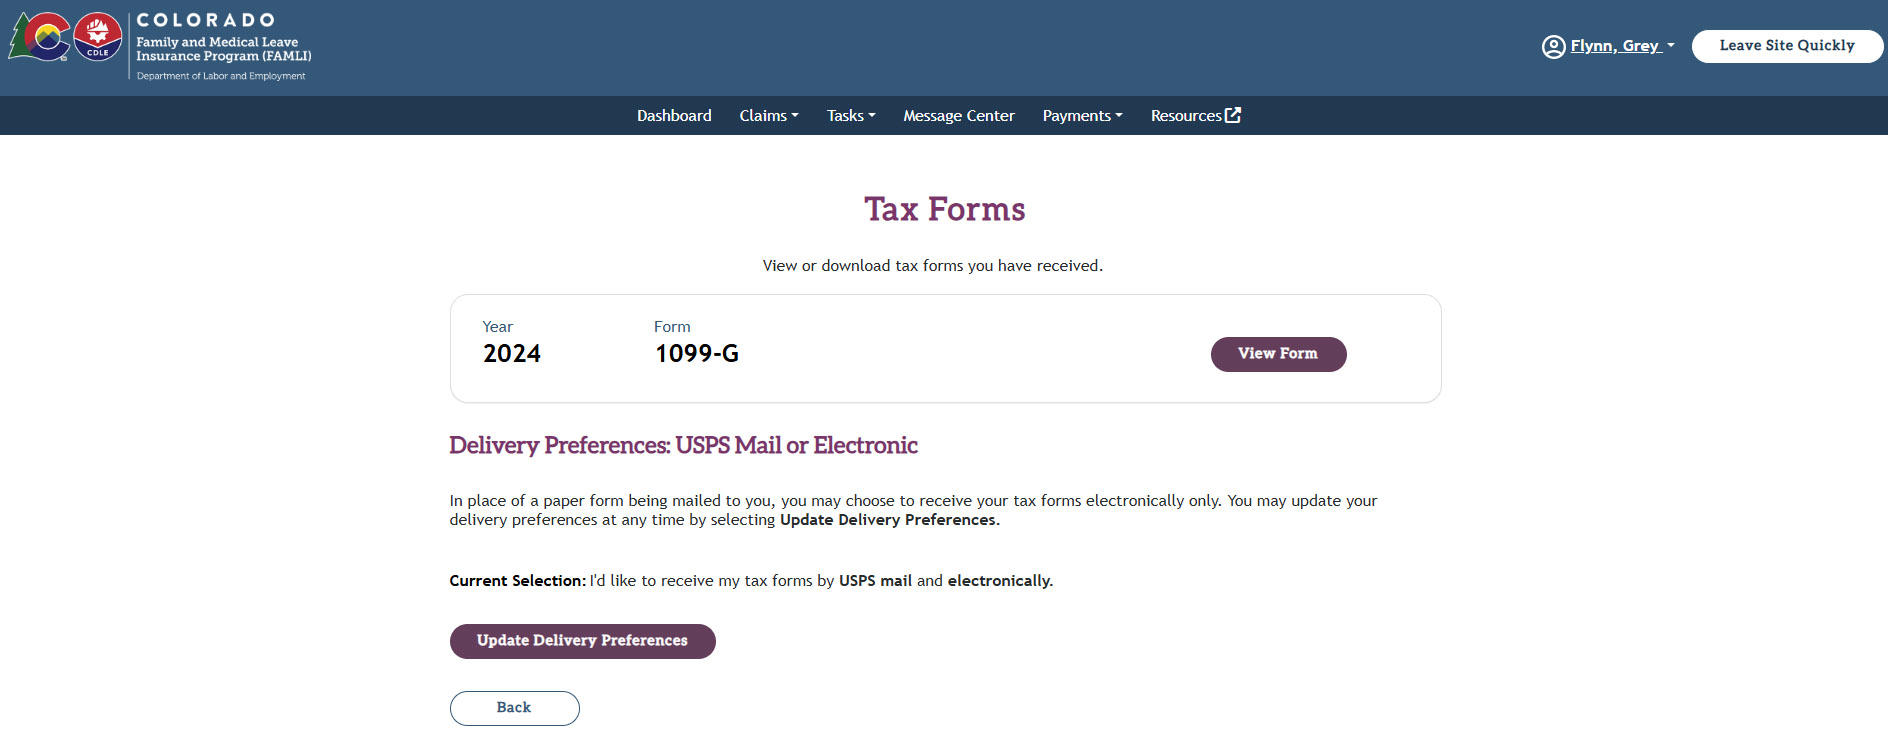
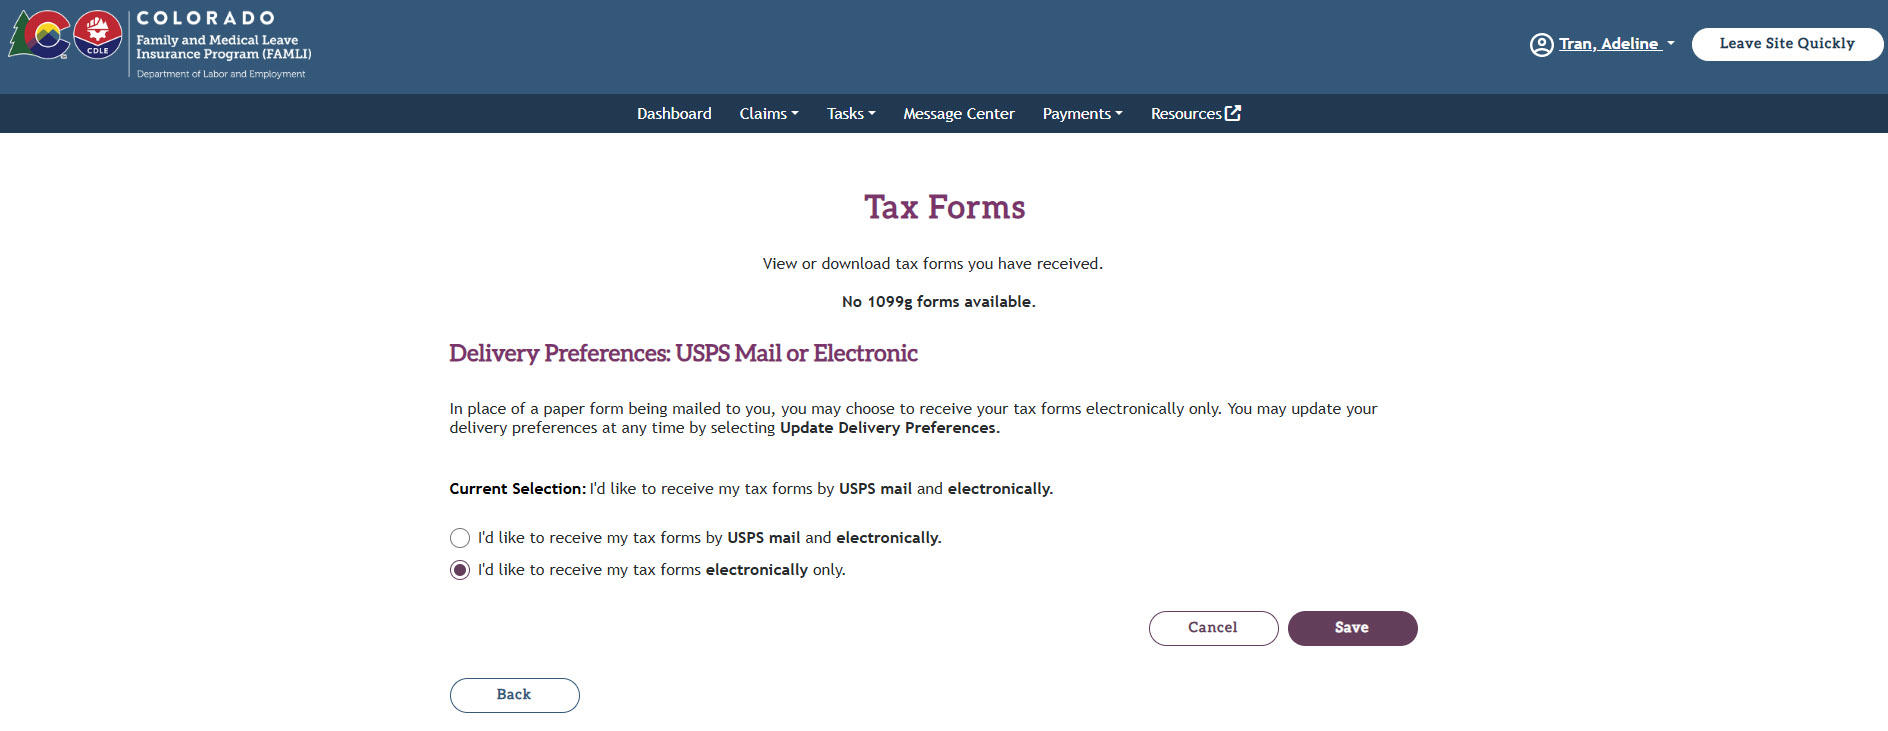
- Next, the Tax Forms page will display. Select the Update Delivery Preferences button.
- Select the second radio button for an electronic-only option and then Save.
You can view your 1099-G history and maintain records on the Tax Forms page. Select the View Form button to view the form.
NOTE: Your 1099-G form will be corrected if the paid amount of FAMLI benefits has changed. Claimants will be notified when their corrected Form 1099-G is available and it will be displayed on the Tax Forms page when available.
If you have further tax questions, you should consult a tax professional for advice as FAMLI Division cannot advise individuals on their tax compliance.
Claimants can update their tax withholding information from their account in My FAMLI+ portal by following the steps below:
- Select the Update Tax Withholding option from the Payments tab menu on their dashboard.
- Select the appropriate radio button based on your choice on the Update Tax Withholding page and then Submit.
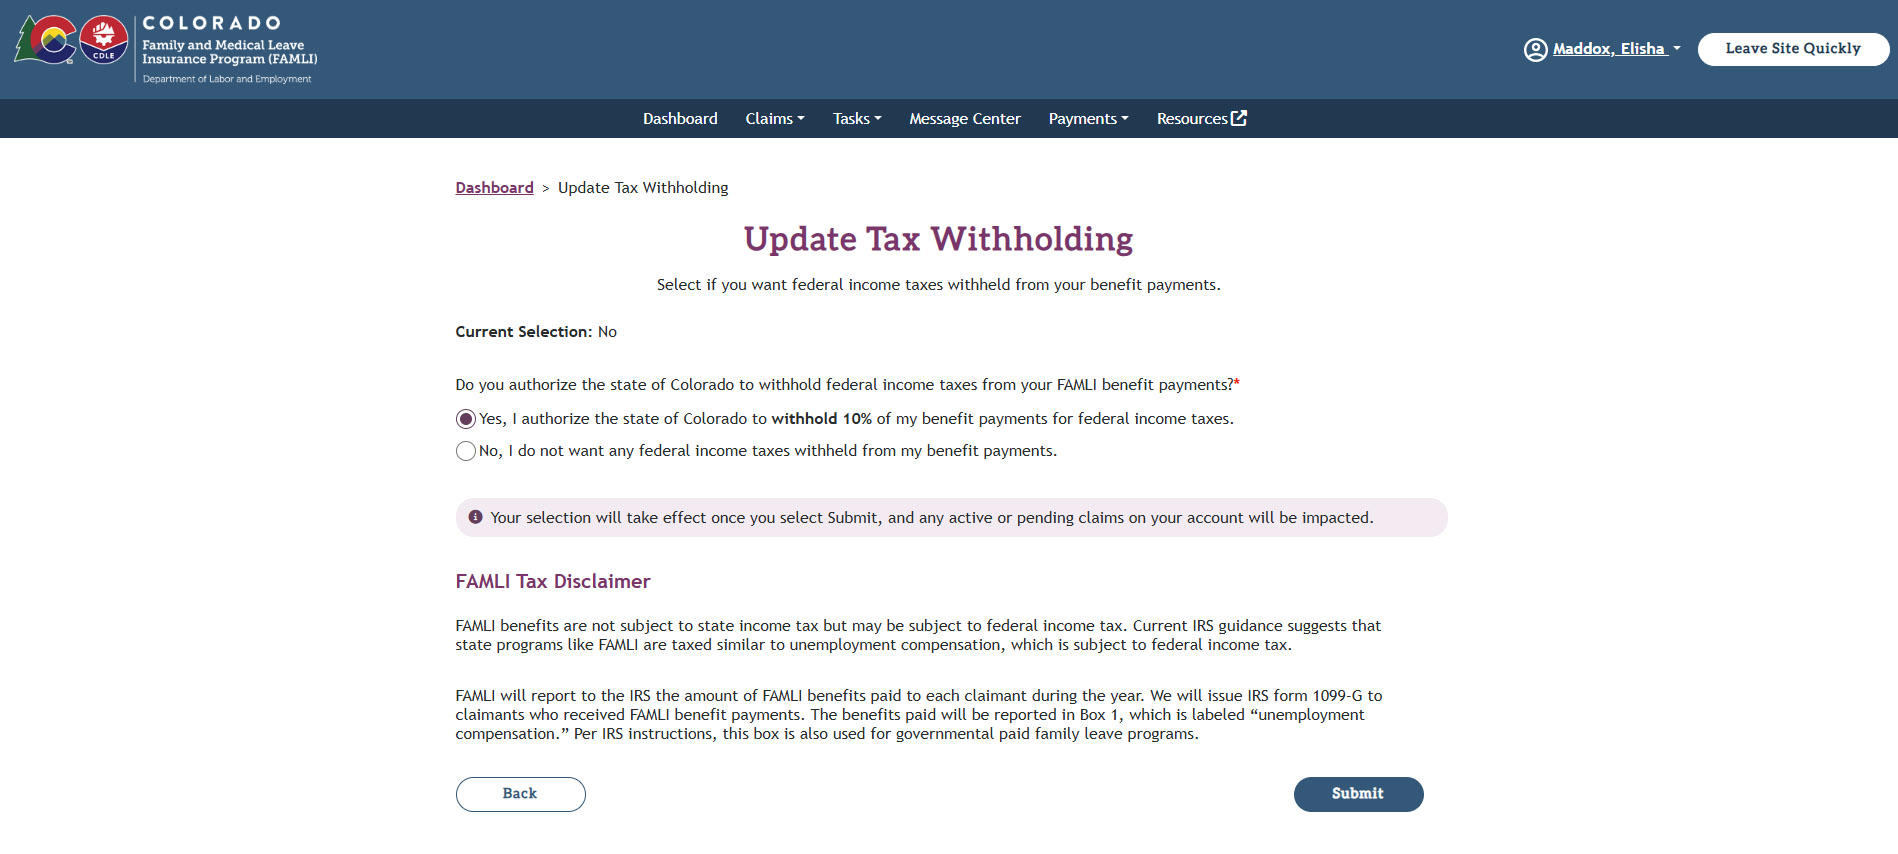
- The Success Message will display on top of the dashboard upon submission.