
My FAMLI+ User Guide: Appeals

My FAMLI+ is a secure system providing claimants, employers, insurance providers and legal representatives online access to file, manage and track all FAMLI-related appeals.
Before You File an Appeal: Employers
In most cases, employers must request a reconsideration (or file a grievance) before they can file an appeal. Employers can fill out this online form to request a reconsideration, or they can follow the instructions that are included on every mailed correspondence they are sent whenever FAMLI informs them about a decision made on one of their employees’ claims. Please refer to the Appeals page for more details.
Before You File an Appeal: Claimants
Claimants must request a reconsideration before they can file an appeal. This must be done in My FAMLI+ before following the steps below to create an appeals account. To request a reconsideration, claimants should follow the prompts on the Claim Details page of the Claims Tab in My FAMLI+. Read the step-by-step instructions on how to request a reconsideration in the My FAMLI+ User Guide for Claimants. In order to file an appeal, claimants must upload a reconsideration notice or a letter of determination.
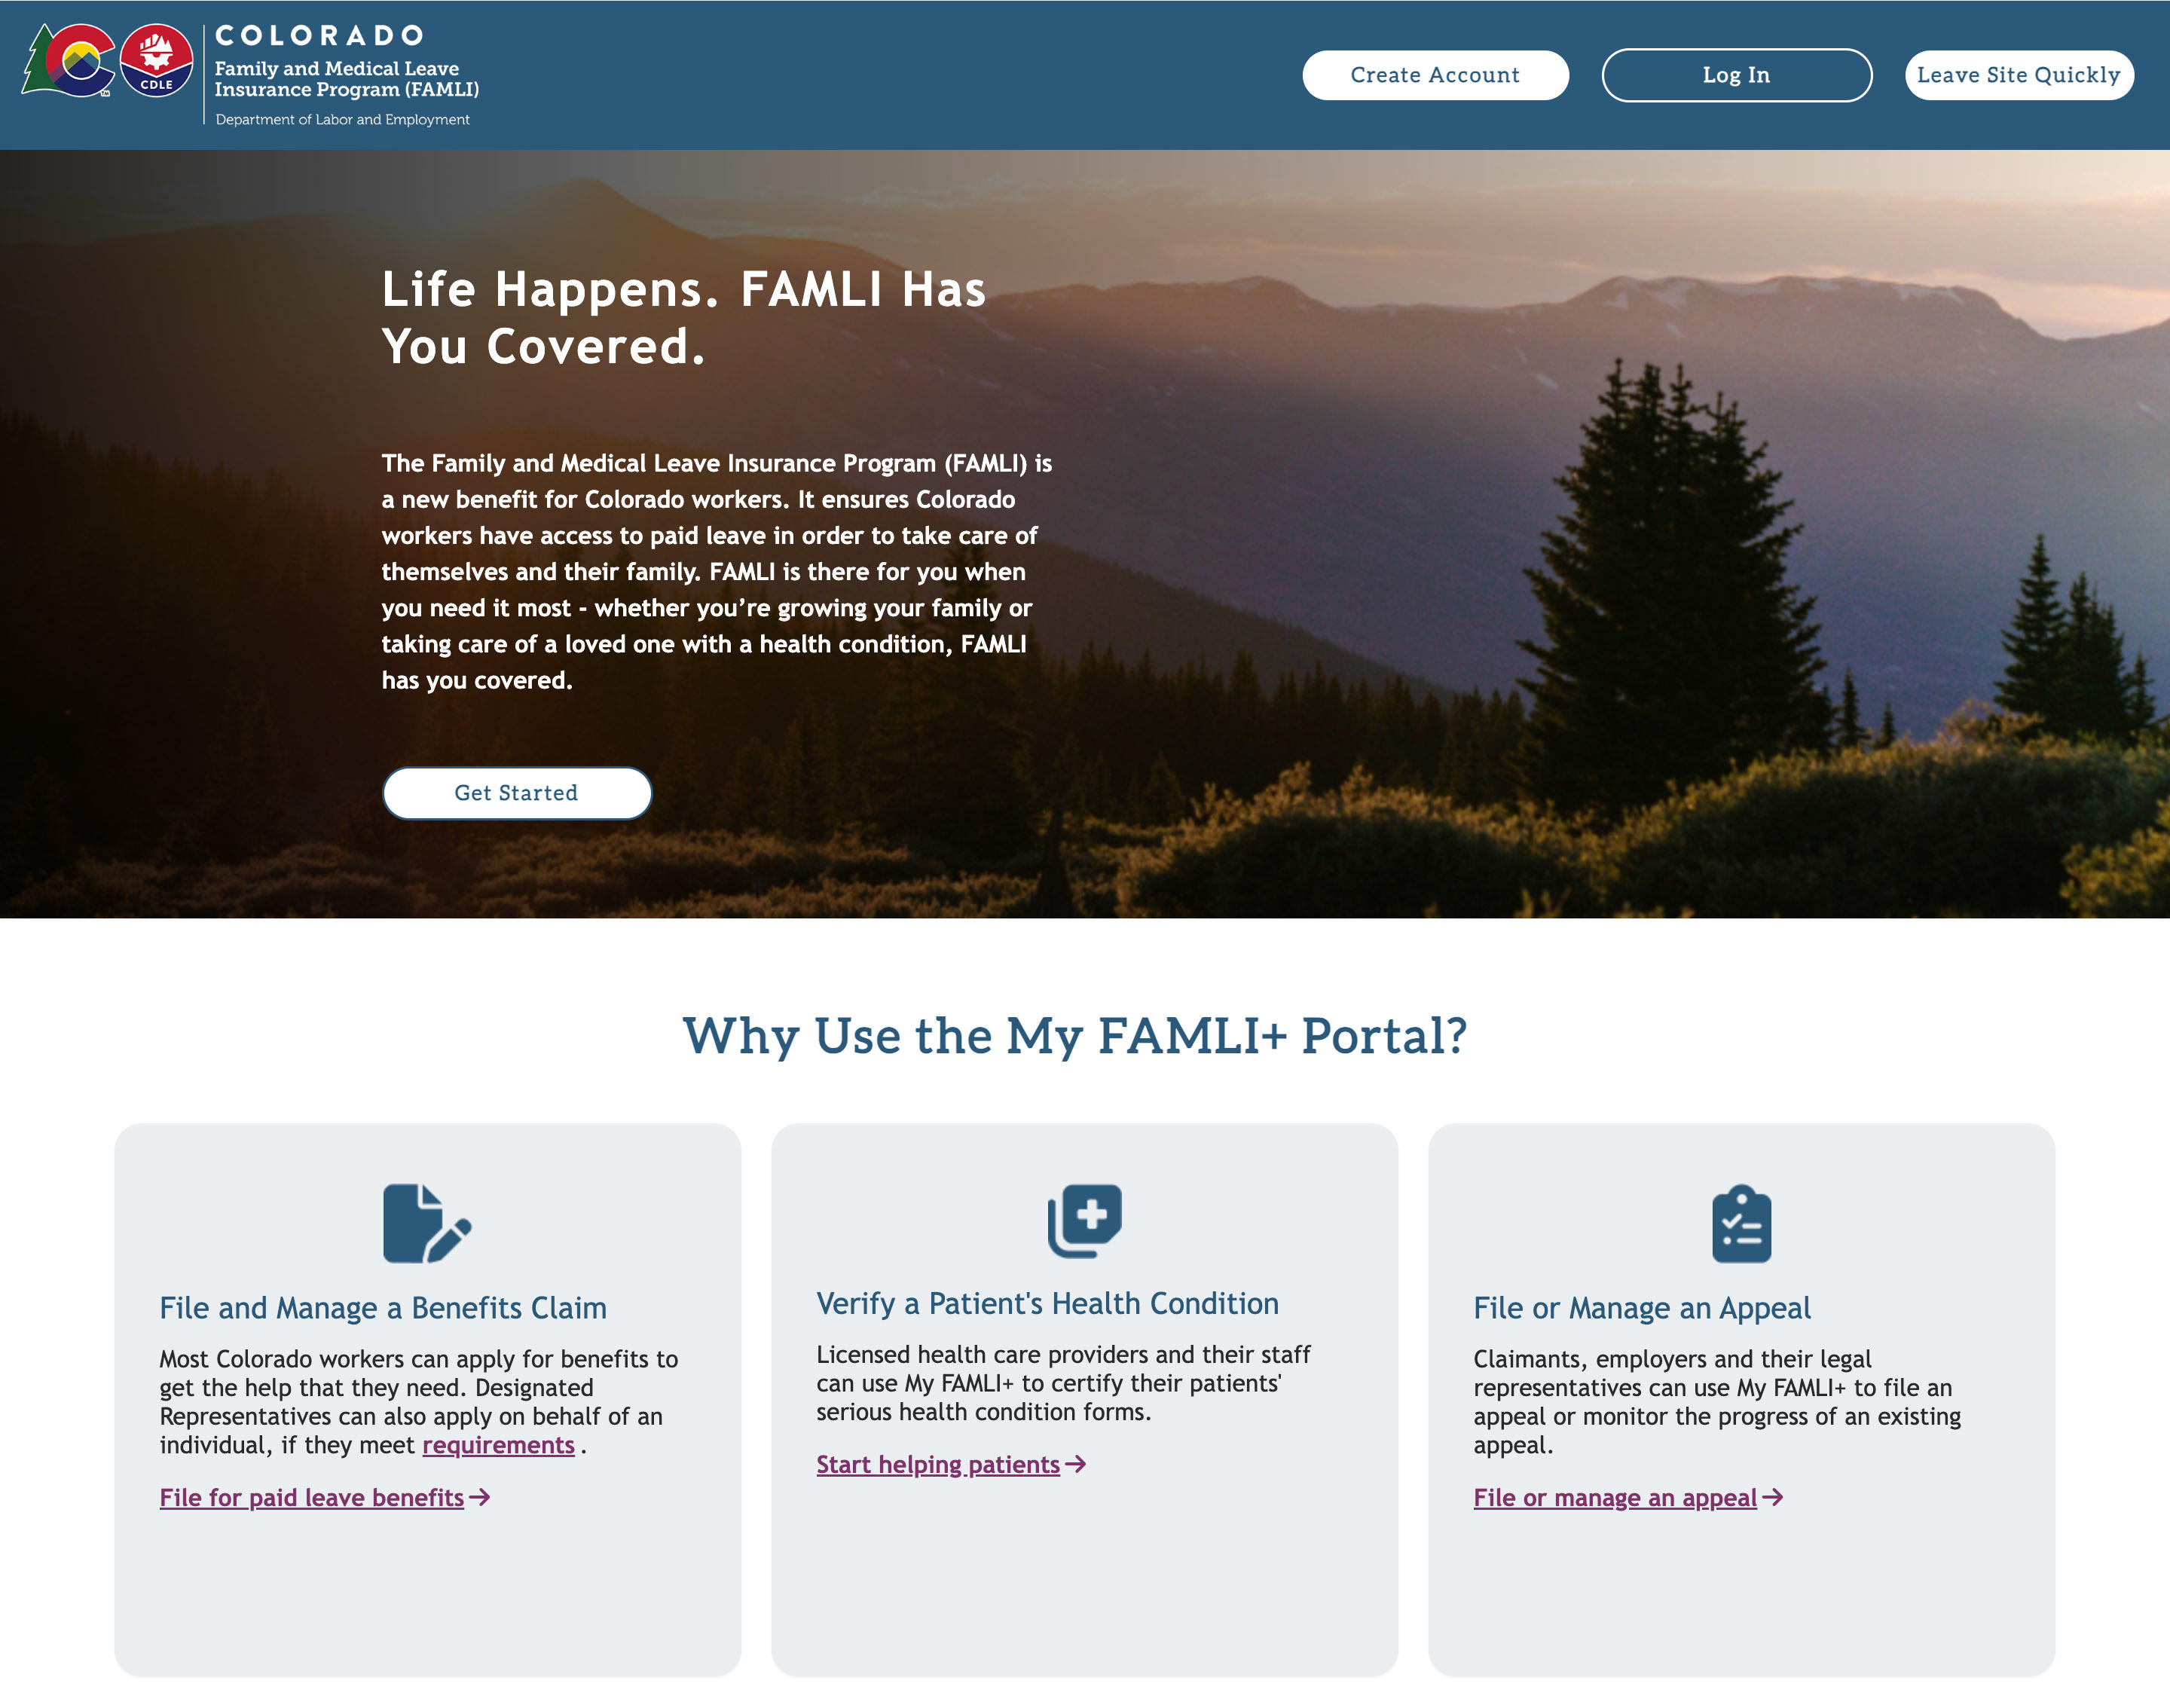
Welcome Page
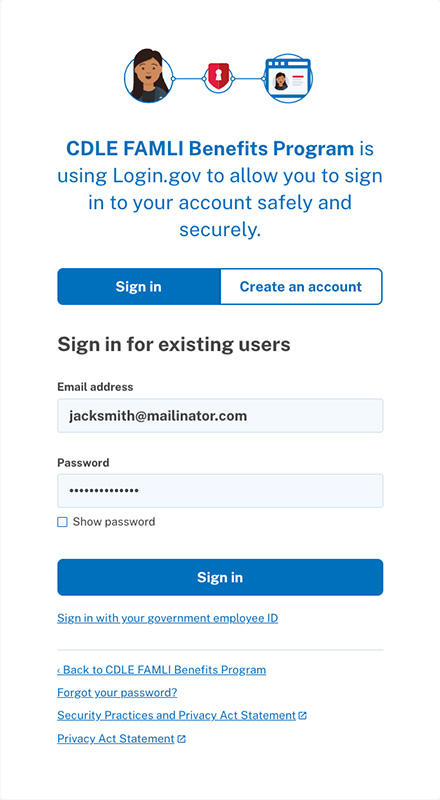
Access your account by selecting the Log in to My FAMLI+ button on the home page of this website. The Welcome page is where you will log in or create your account.
Instructions to create a new account
- Select the Create Account button. You will be taken to the Create a Login.gov Account to Access My FAMLI+ page.
Note: If you are a claimant who already has an account in My FAMLI+, you’ll log in using the same login.gov credentials you already use for My FAMLI+. If you have successfully completed the steps to request a reconsideration and still disagree with the outcome, My FAMLI+ will create an appeals account for you, and direct you to the File A New Appeal chapter.
- Create a Login.gov account by selecting the Create an Account button. Once the account is set up, you will be taken to the Let’s Get Started page on the My FAMLI+ portal.
Note: If you need to change an email address after you create your account, this must be done through Login.gov. This can’t be done within the portal itself.
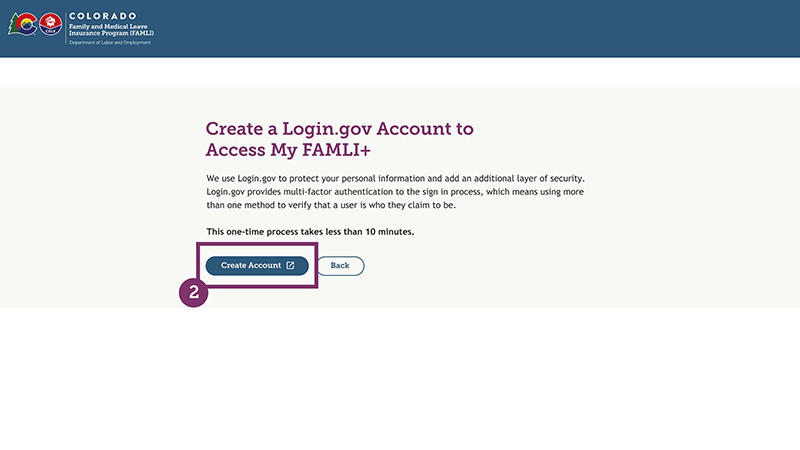
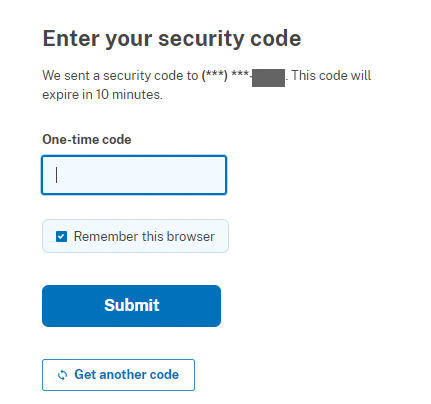
To ensure your account information is kept private and secure, each user is required to register through Login.gov. This provides multi-factor authentication to the login process. Multi-factor authentication means using more than one method to verify that a user is who they claim to be. It also adds an additional layer of security to protect your personal information.
If you use Login.gov for other platforms, including My FAMLI+ Employer, you can use the same email address here for a faster log in experience. If this applies to you, you can skip ahead to the Create A New Appeals Account chapter.
Instructions to create a new Login.gov account
- Once you select the Create Account button, you will be taken to the CDLE FAMLI login page within Login.gov. Select the Create an Account button.
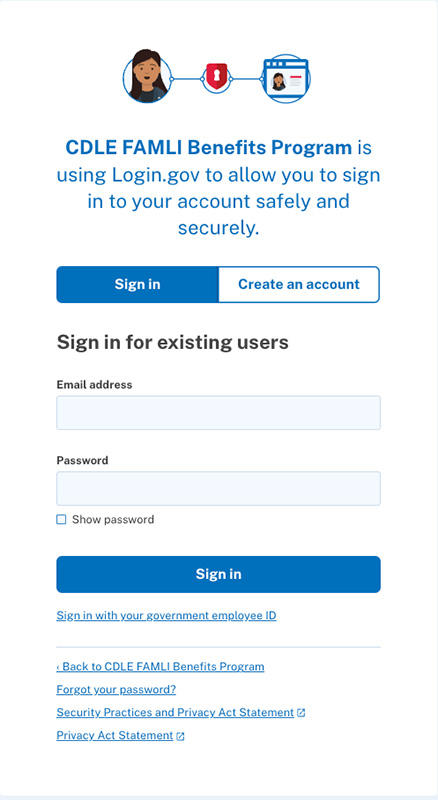
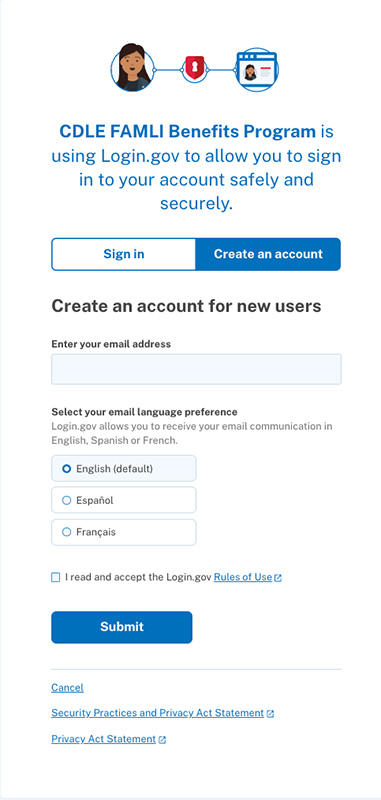
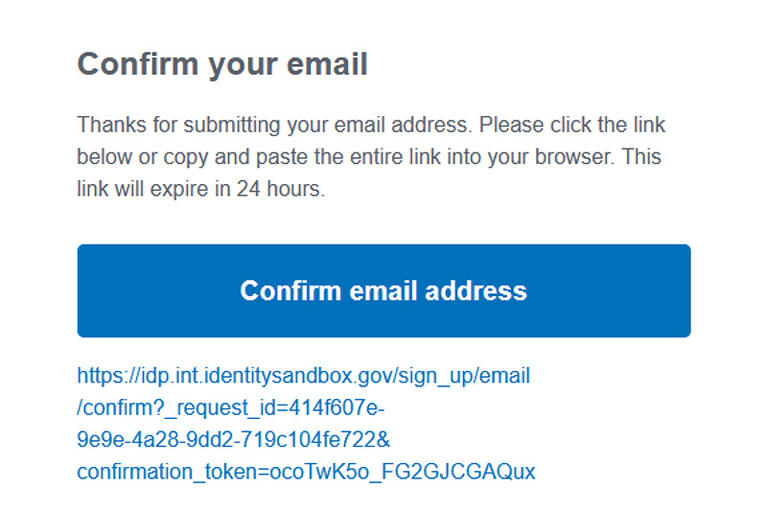
- From the Create your Account page, enter the email address you wish to use and set your language preference. Check the box to indicate that you have read Login.gov’s rules of use before selecting Submit.
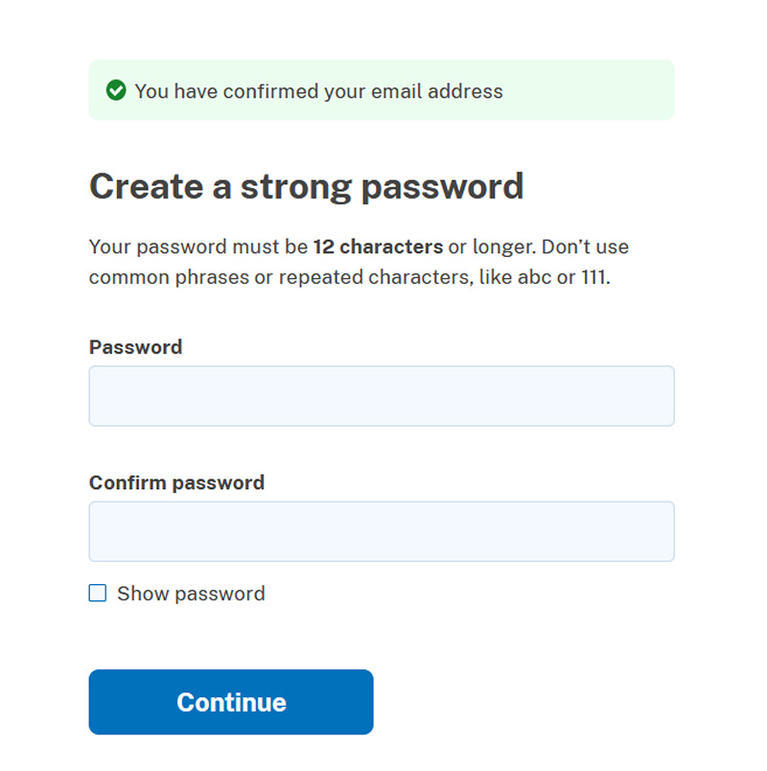
- Once you have selected Submit, you will receive an email from Login.gov to confirm your email. Select the Confirm email address button in that email.
- You will be taken back to Login.gov to create your password. Once you have created your password, select Continue.
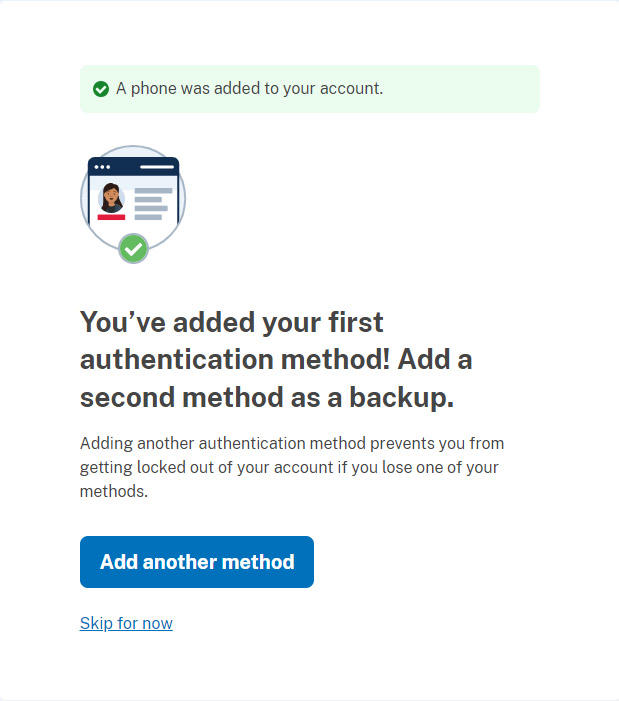
- Login.gov will prompt you to set up an authentication method. Choose your preferred method and select Continue.

- You will be notified by Login.gov when you have successfully authenticated your account. You have the option of adding a second authentication method here, or you can skip this step and proceed to your My FAMLI+ account to complete your registration.
Note: Language settings in Login.gov do not change the language in the My FAMLI+ portal. This setting only affects the language used in system emails generated by Login.gov.
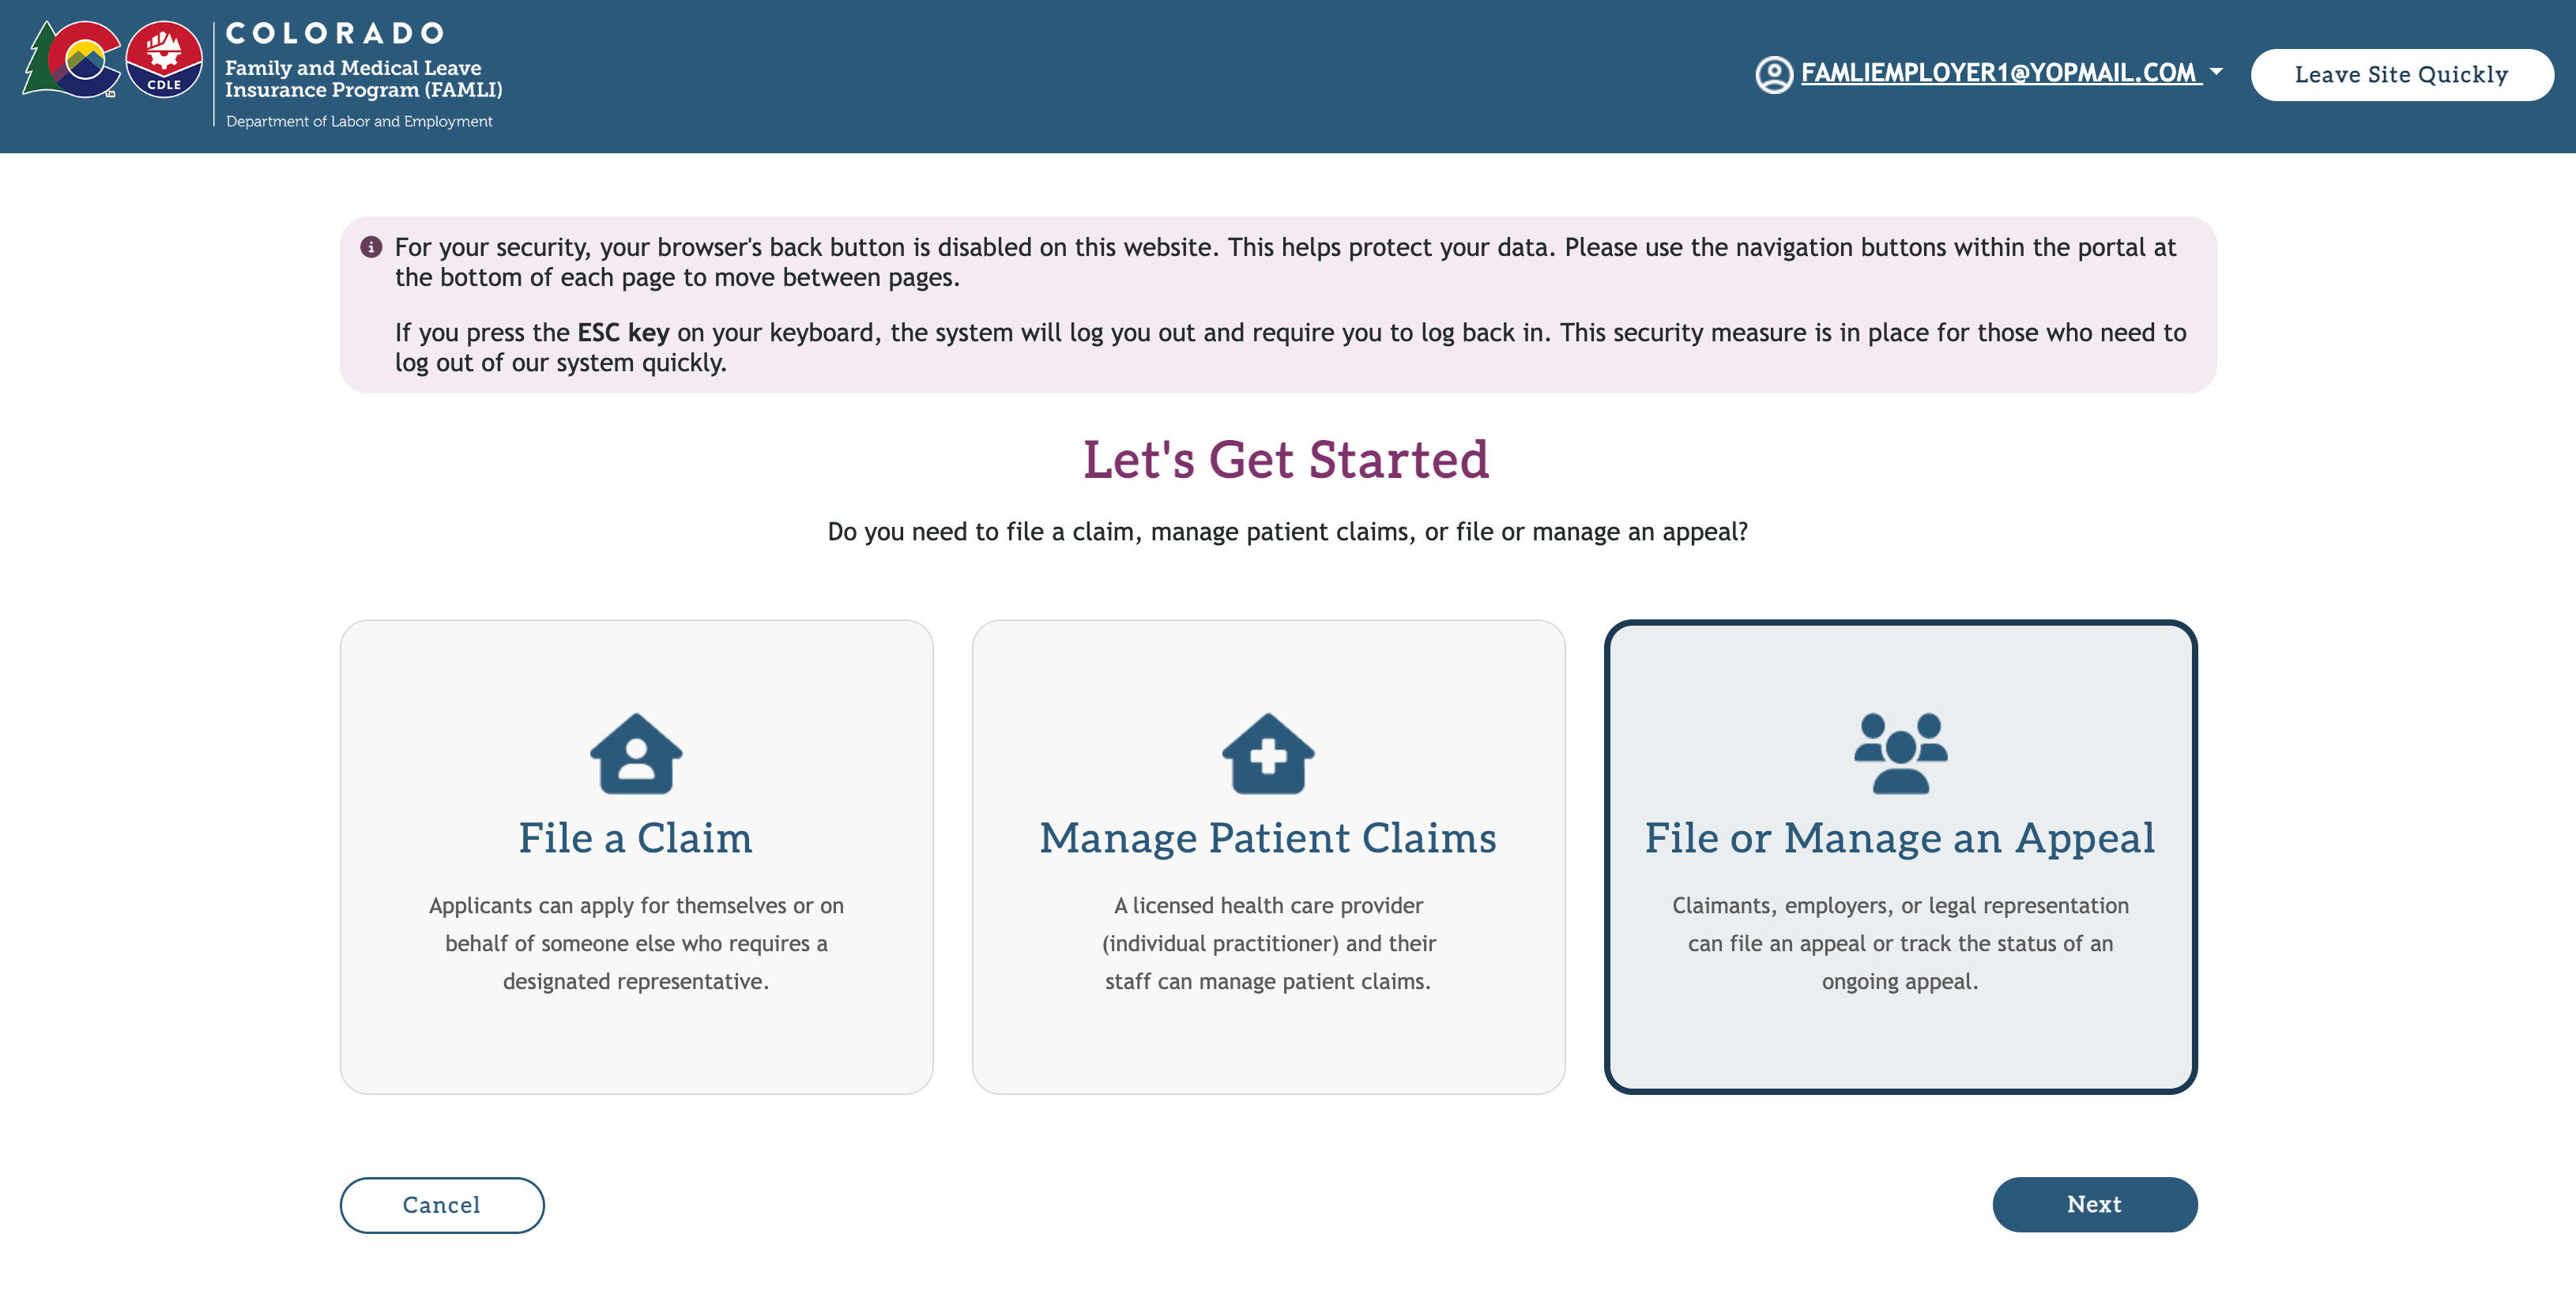
Once the account is set up, you will be taken to the Let’s Get Started page on My FAMLI+.
Instructions to create a new Appeals account
- Select the File or Manage an Appeal tile on the Let’s Get Started page.
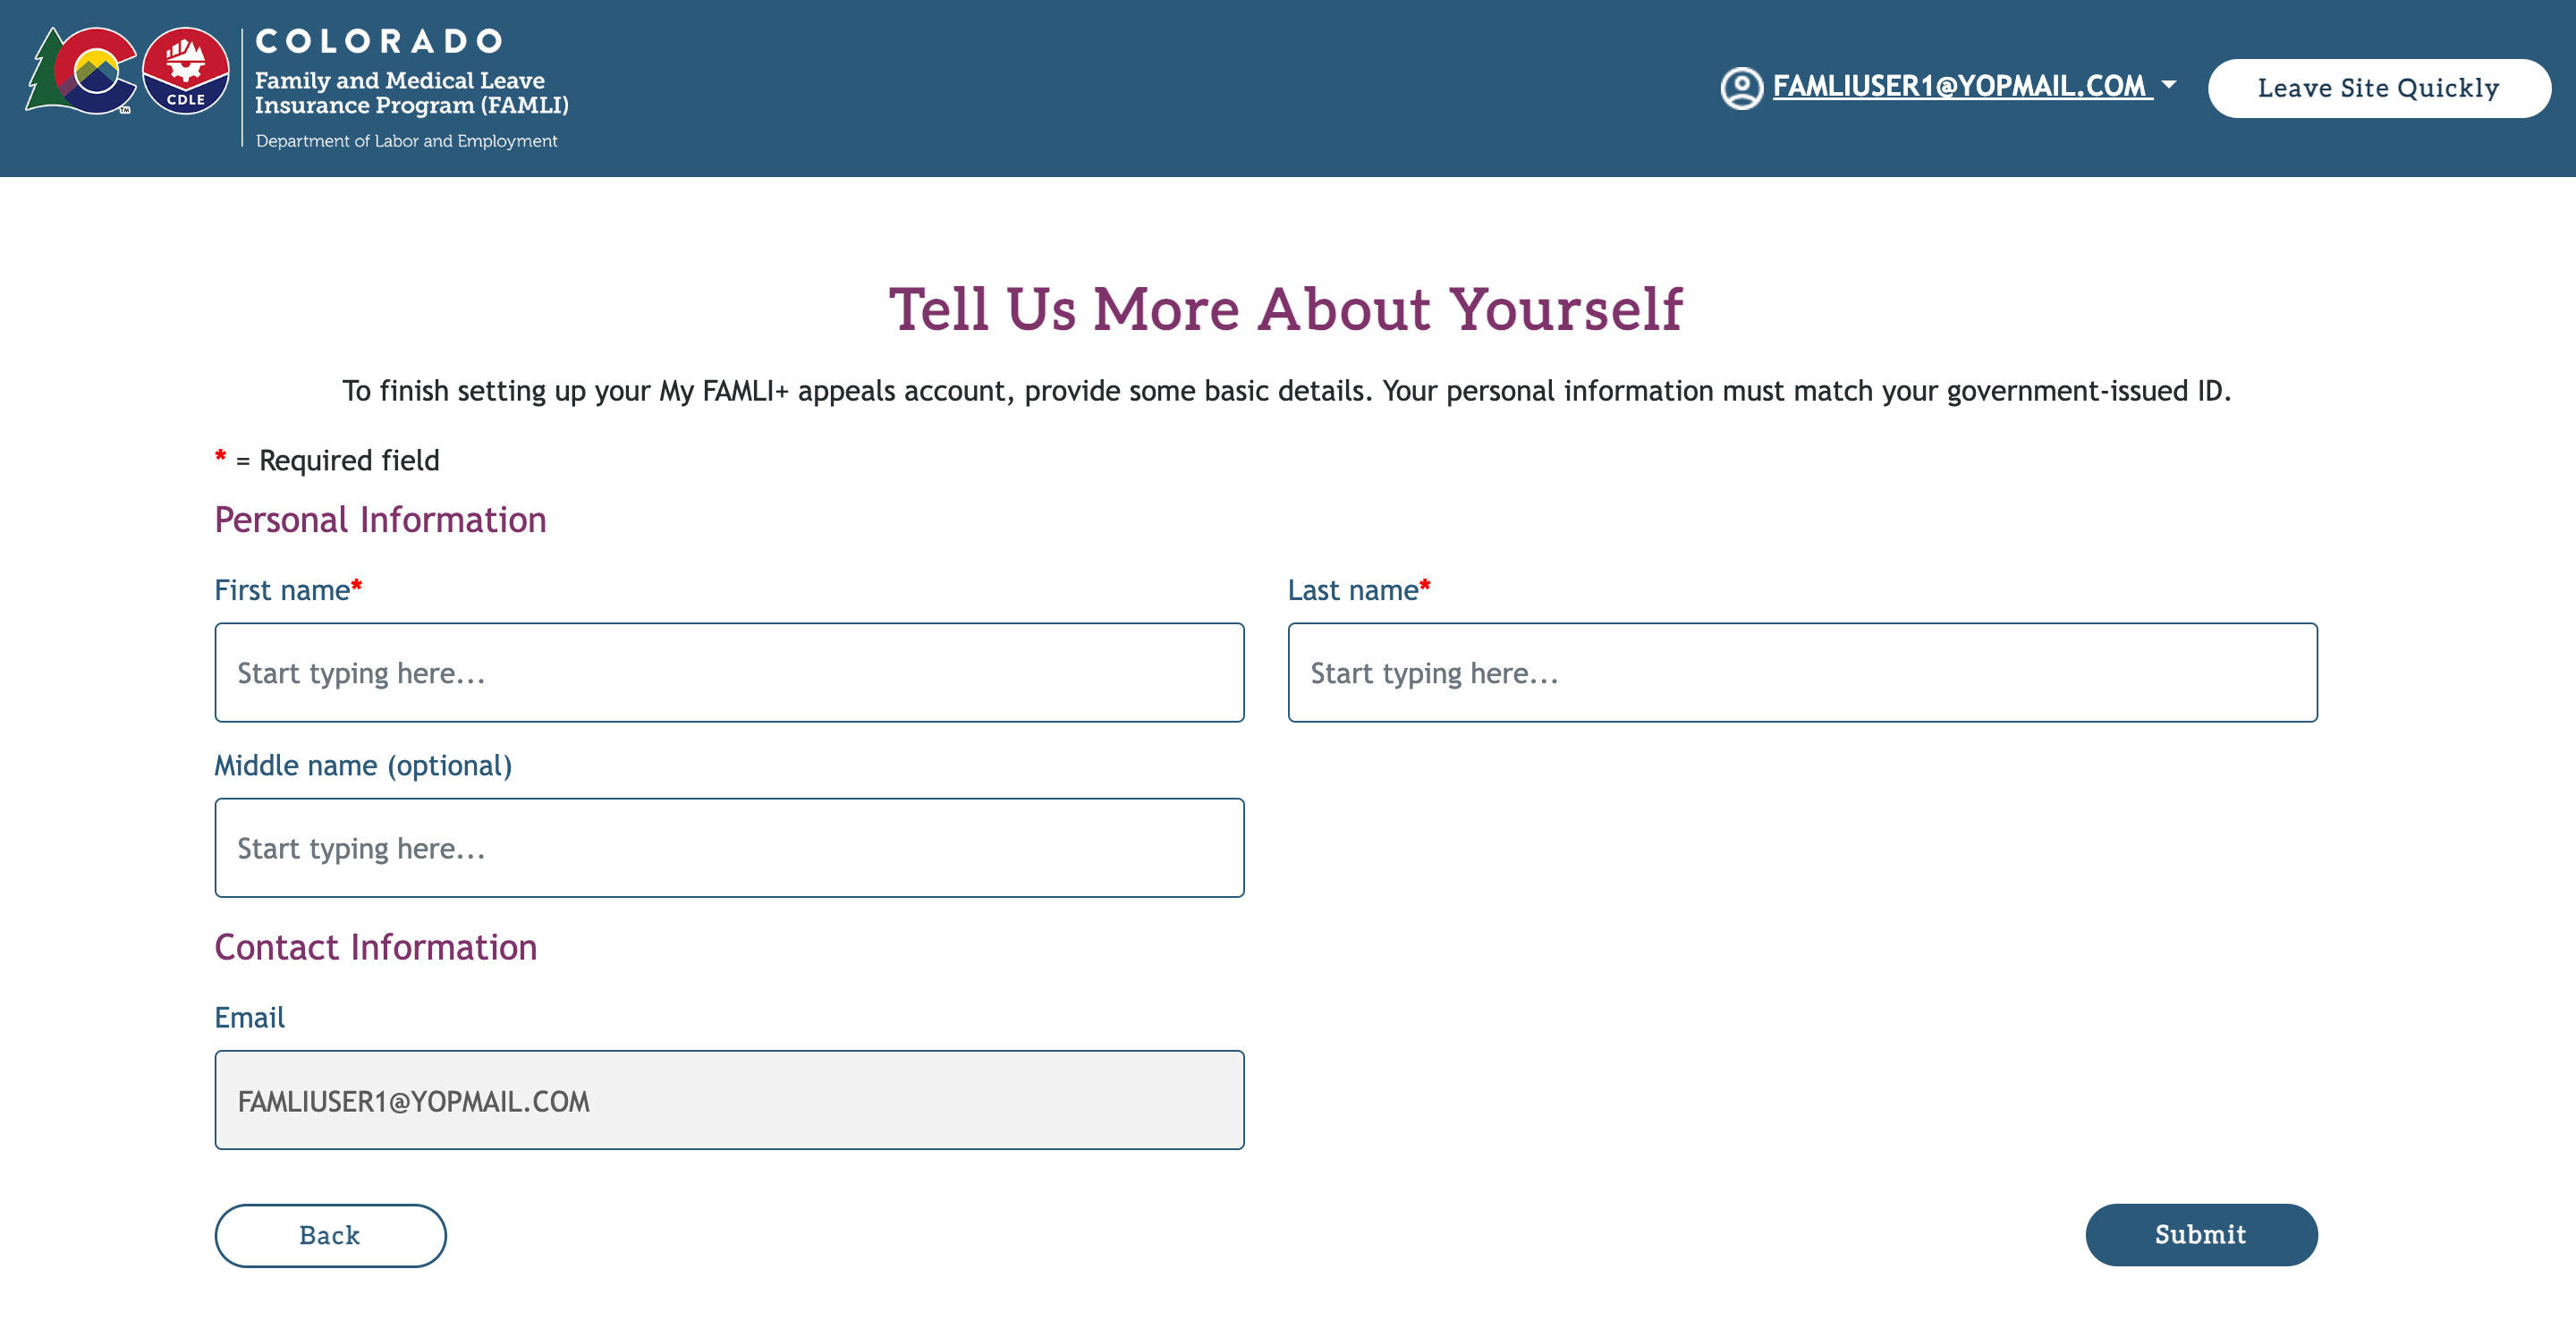
- On the Tell Us More About Yourself page, enter the following details.
- First Name: This field is mandatory.
- Last Name: This field is mandatory.
- Middle Name: This field is optional.
- Contact Information: This field will be auto-populated with the email address that you used while creating the account.
- Select the Submit button. Your account is created.
Instructions to file an appeal
- Navigate to your dashboard and select the File Appeal button.
Remember: If you are a claimant and unhappy with your FAMLI claim decision, you must request a reconsideration before filing an appeal. In order to file an appeal, you must upload a reconsideration notice or a letter of determination. You can find instructions on how to request a reconsideration here.
- This will take you to the Contact Details page.
- There are five steps to the appeal-filing process:
- Contact Details
- Appeal Details
- Upload Documents
- Parties
- Review & Submit
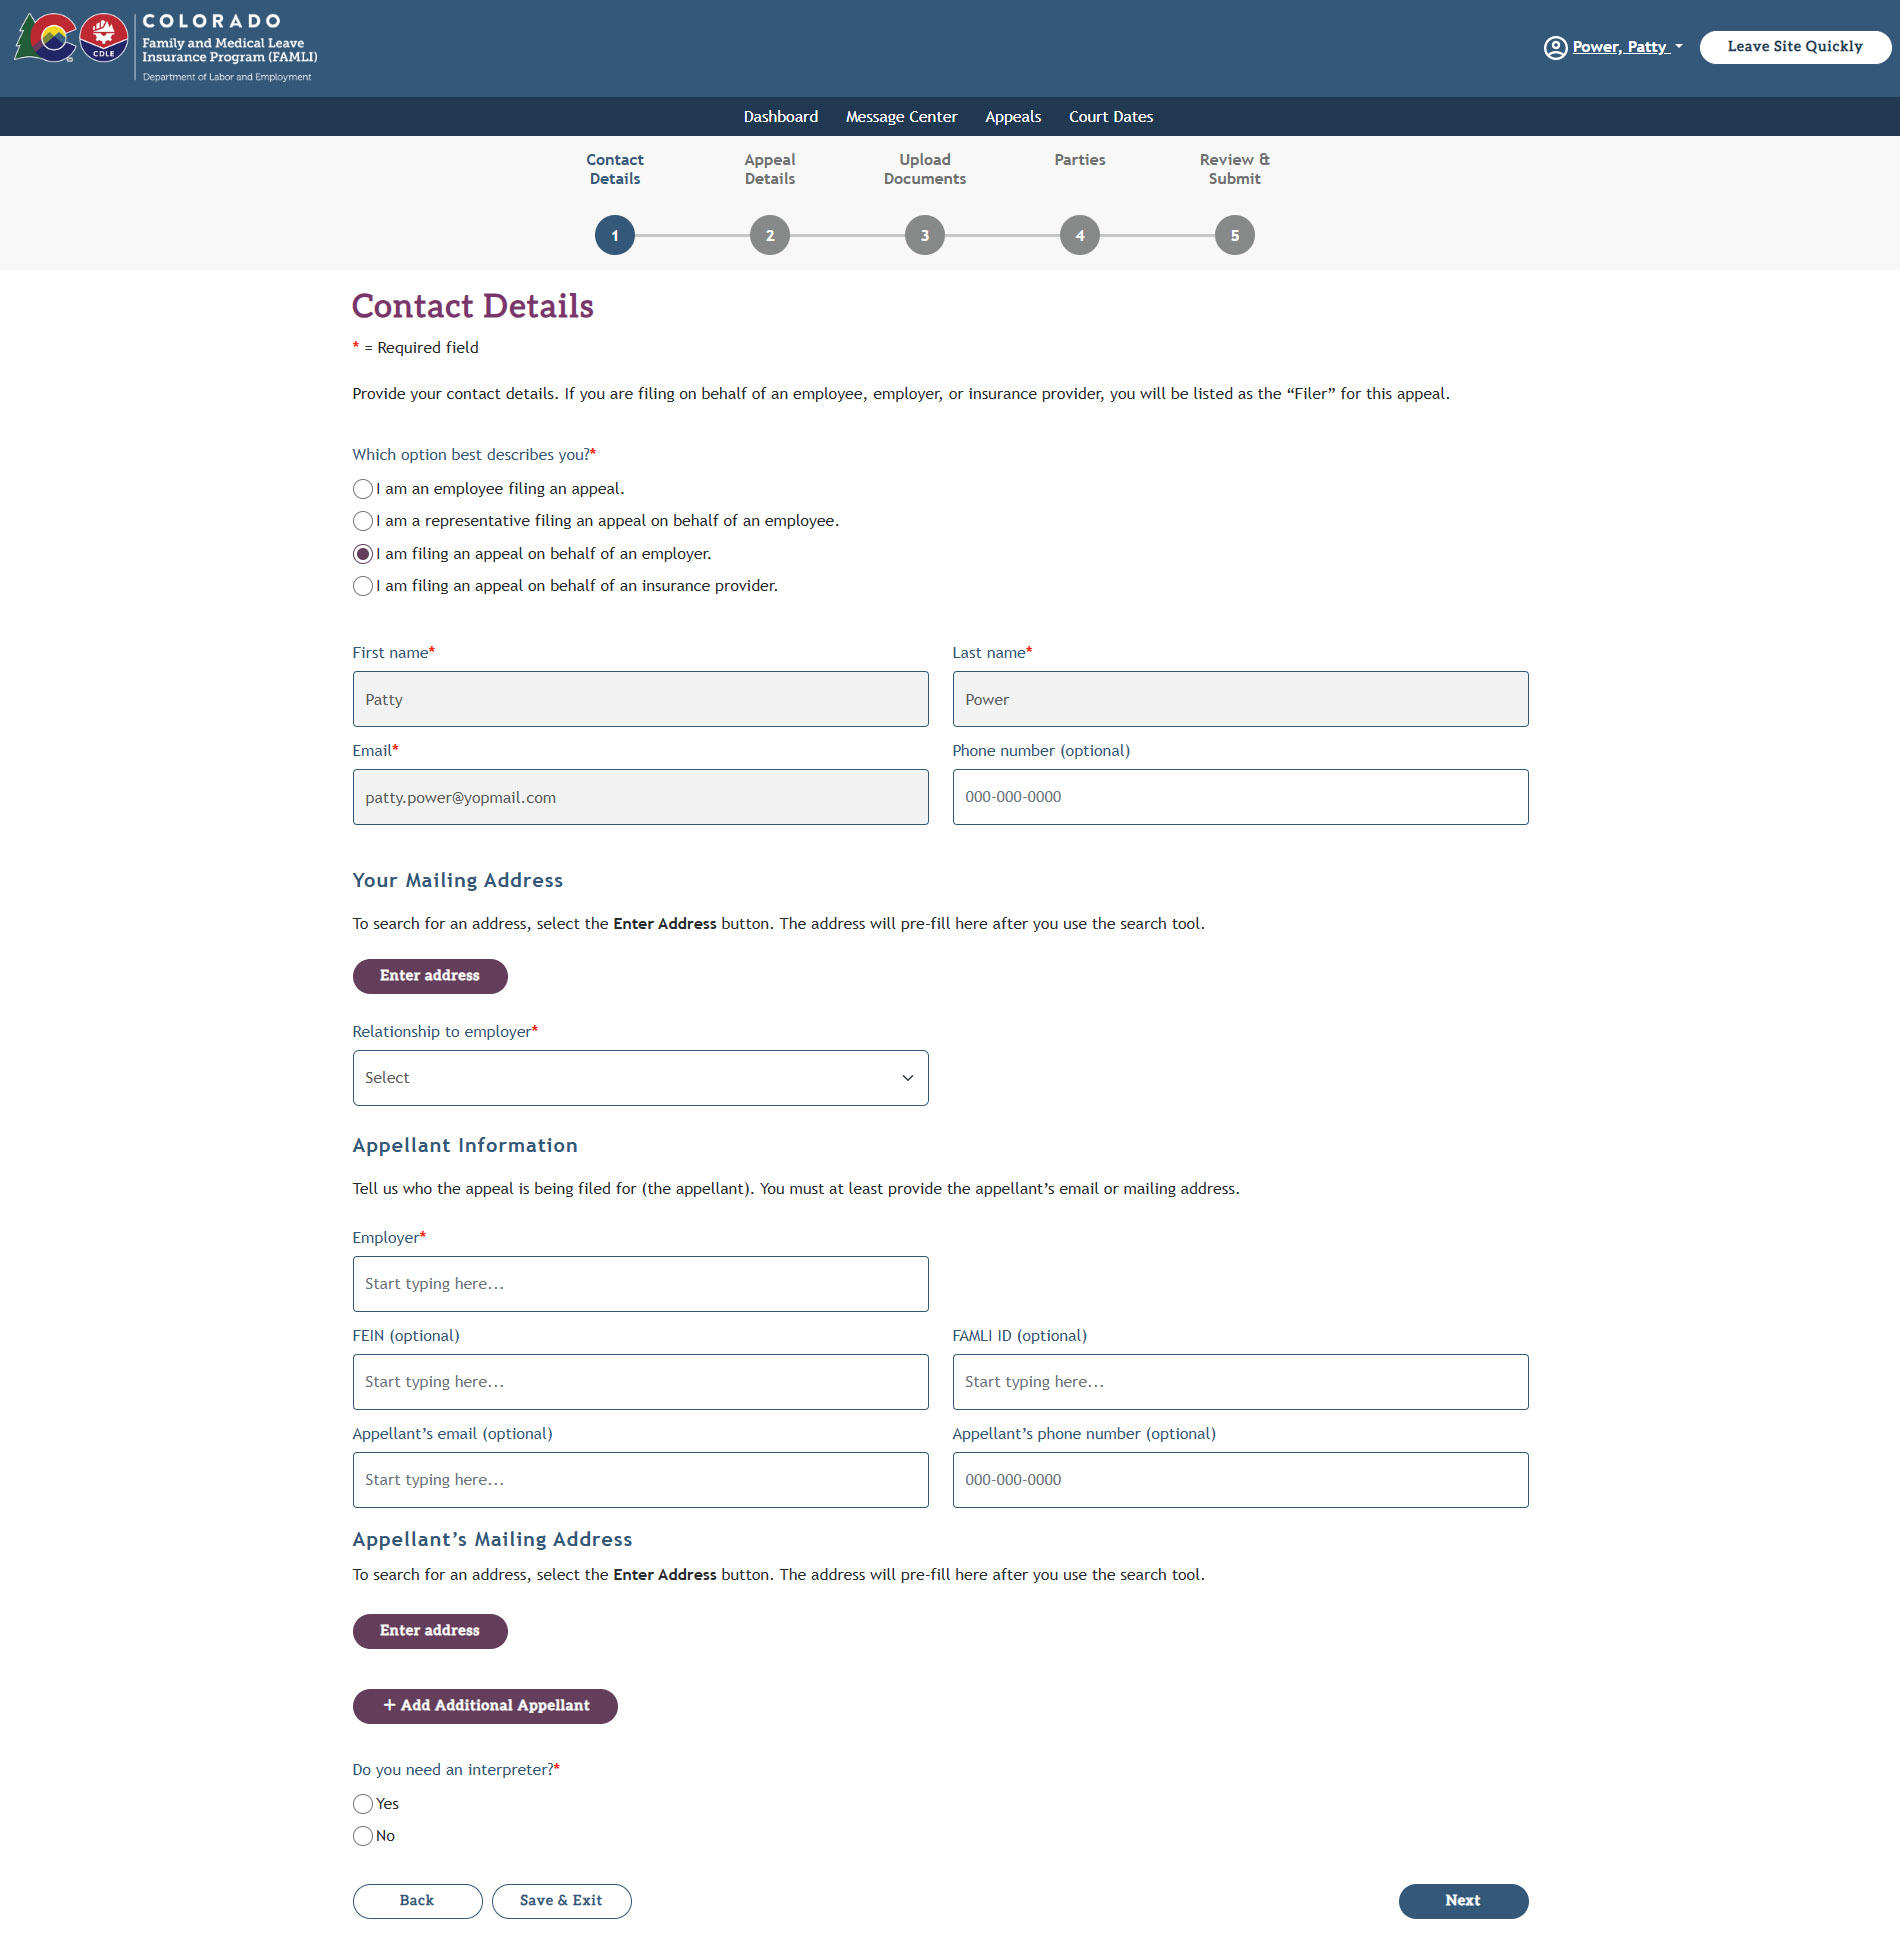
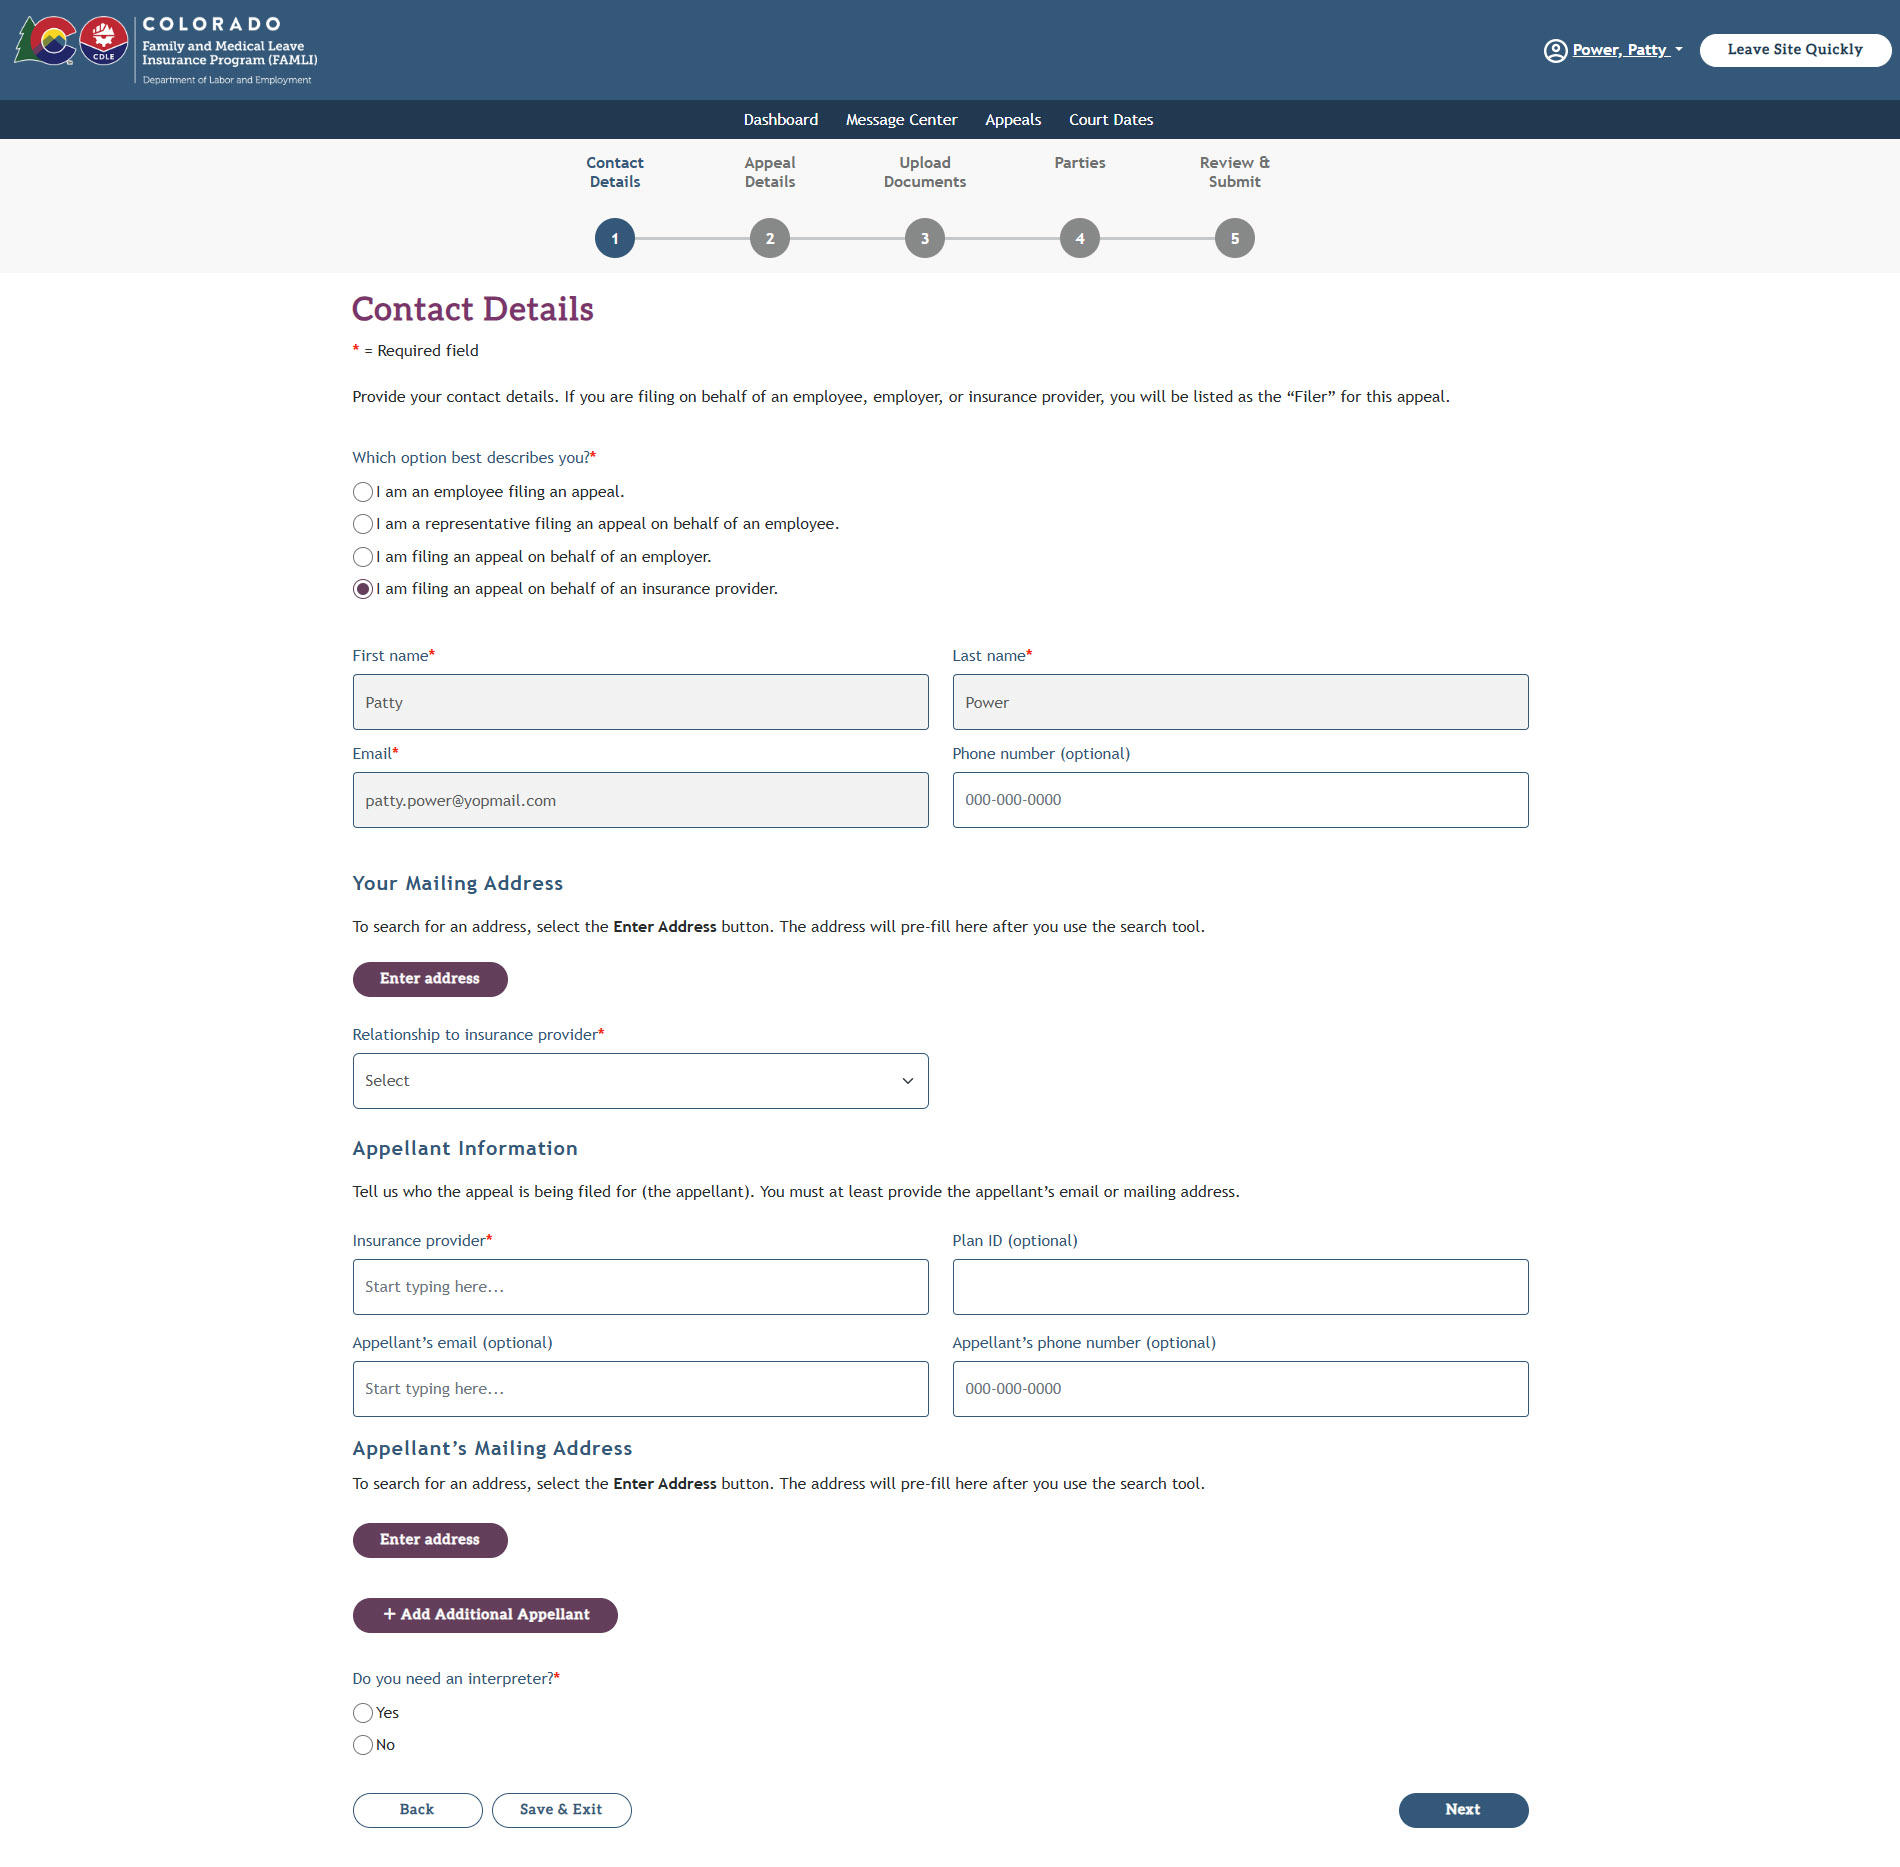
Instructions to provide your contact details
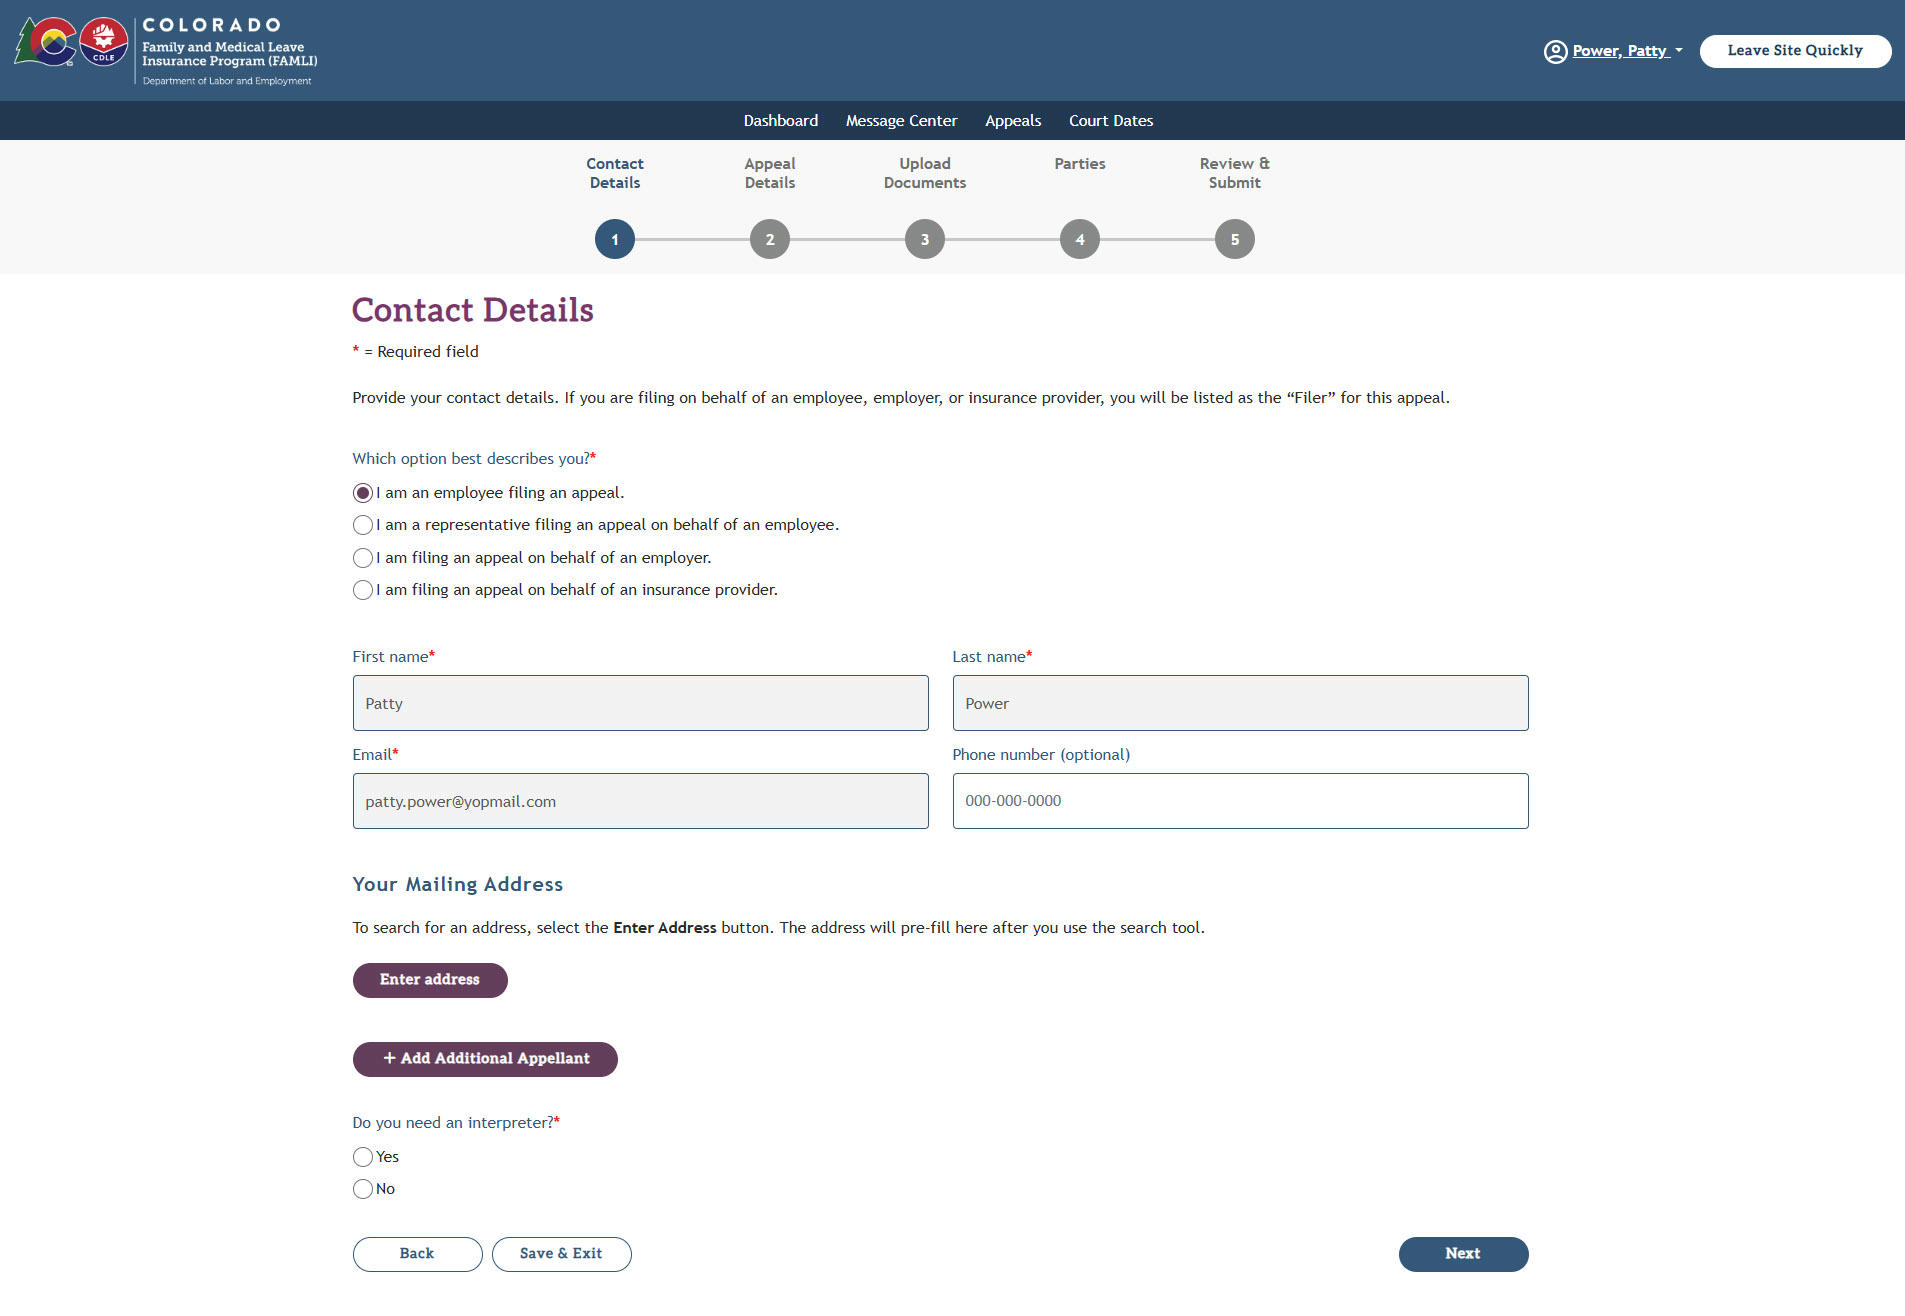
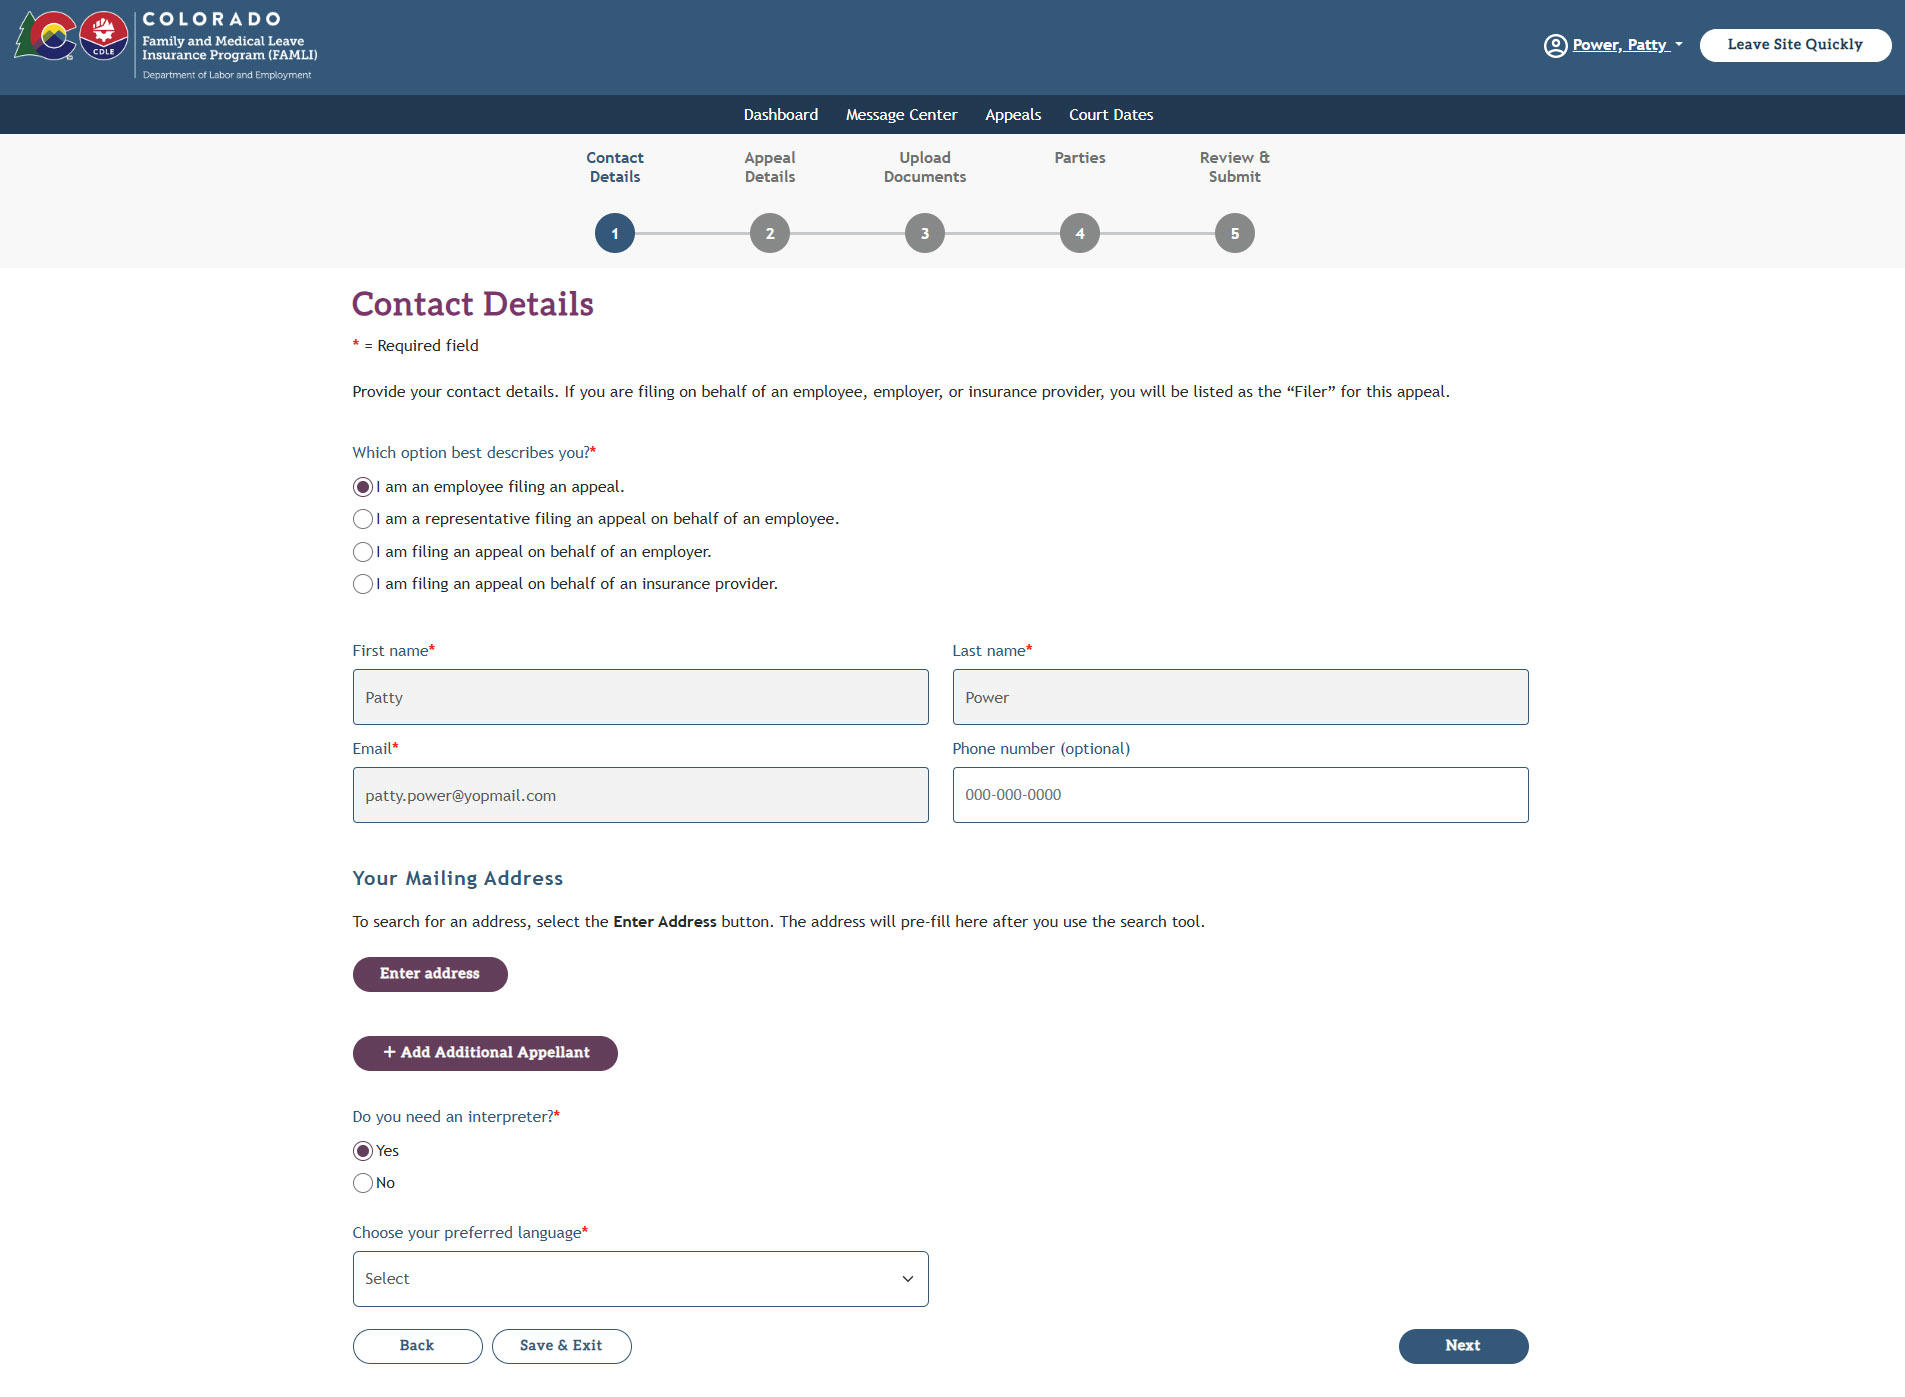
- This is the first step of the process. In this section, you must provide your contact details.
- For this example, we will guide you through the process of filing an appeal as if you are a claimant filing an appeal for yourself. We will cover the other scenarios in the next chapter.
- You will be asked “Which option best describes you?” To begin, please choose the first option: "I am an employee filing an appeal".
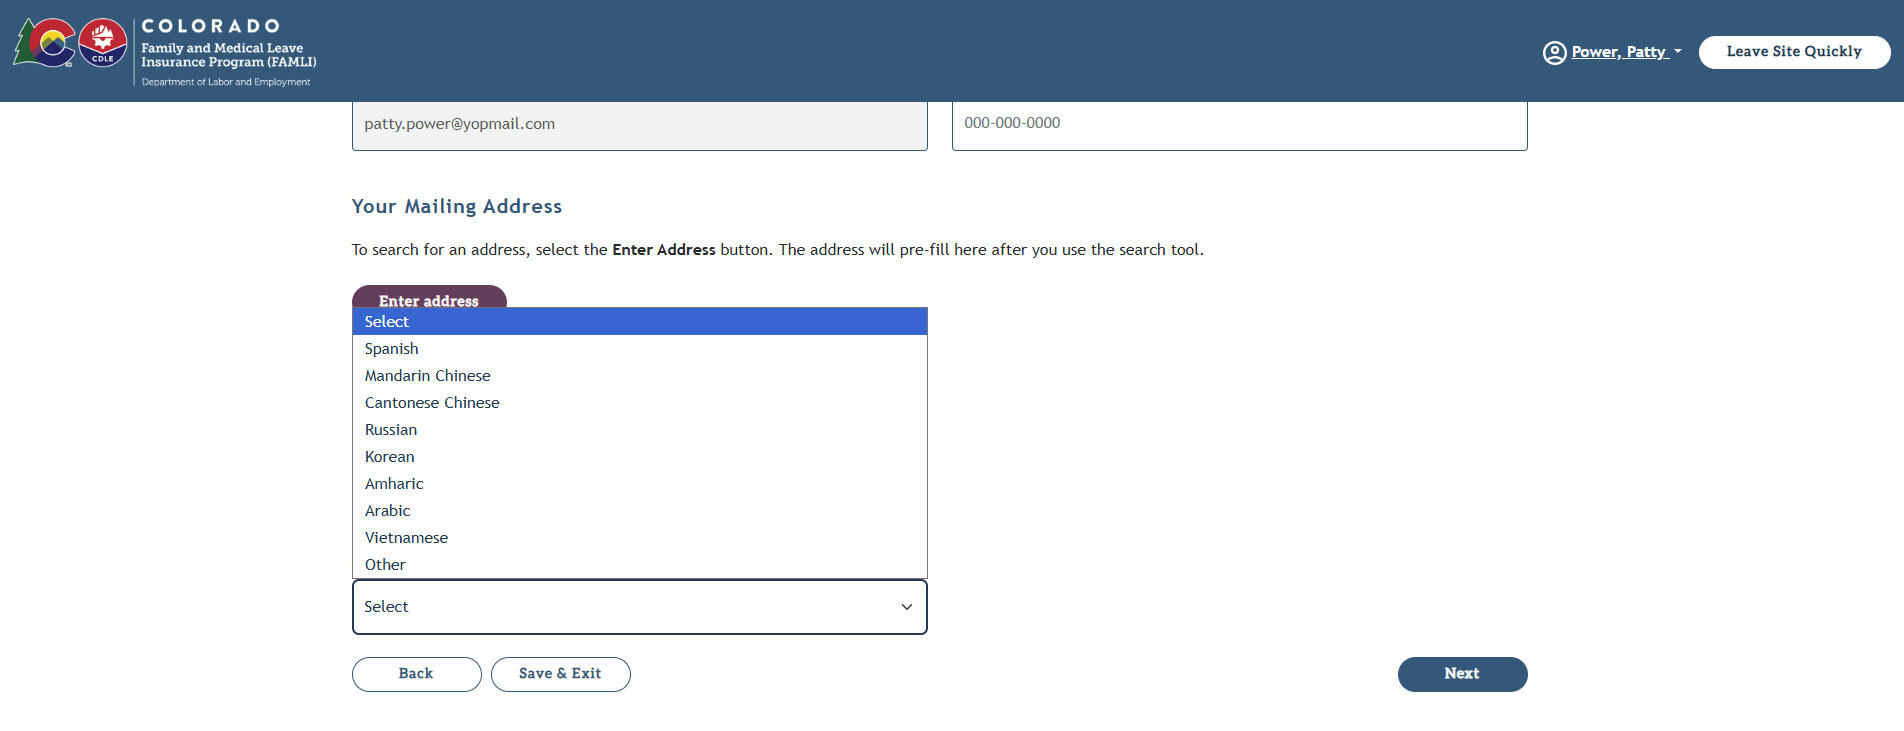
- Next you may choose to enter your mailing address or phone number.
- You have the option to add another appellant to your appeal. You will need to add either the mailing address or email address of the additional appellant.
Note: If you add an additional appellant but no longer want to add their information, you must remove the appellant by selecting Delete before continuing. You can’t submit a blank form. - Next, you have the option to request an interpreter and select from eight different languages.
- Select the Next button.
Instructions to provide your appeal details
- This is the second step in the appeal-filing process. Here you must provide your appeal details.
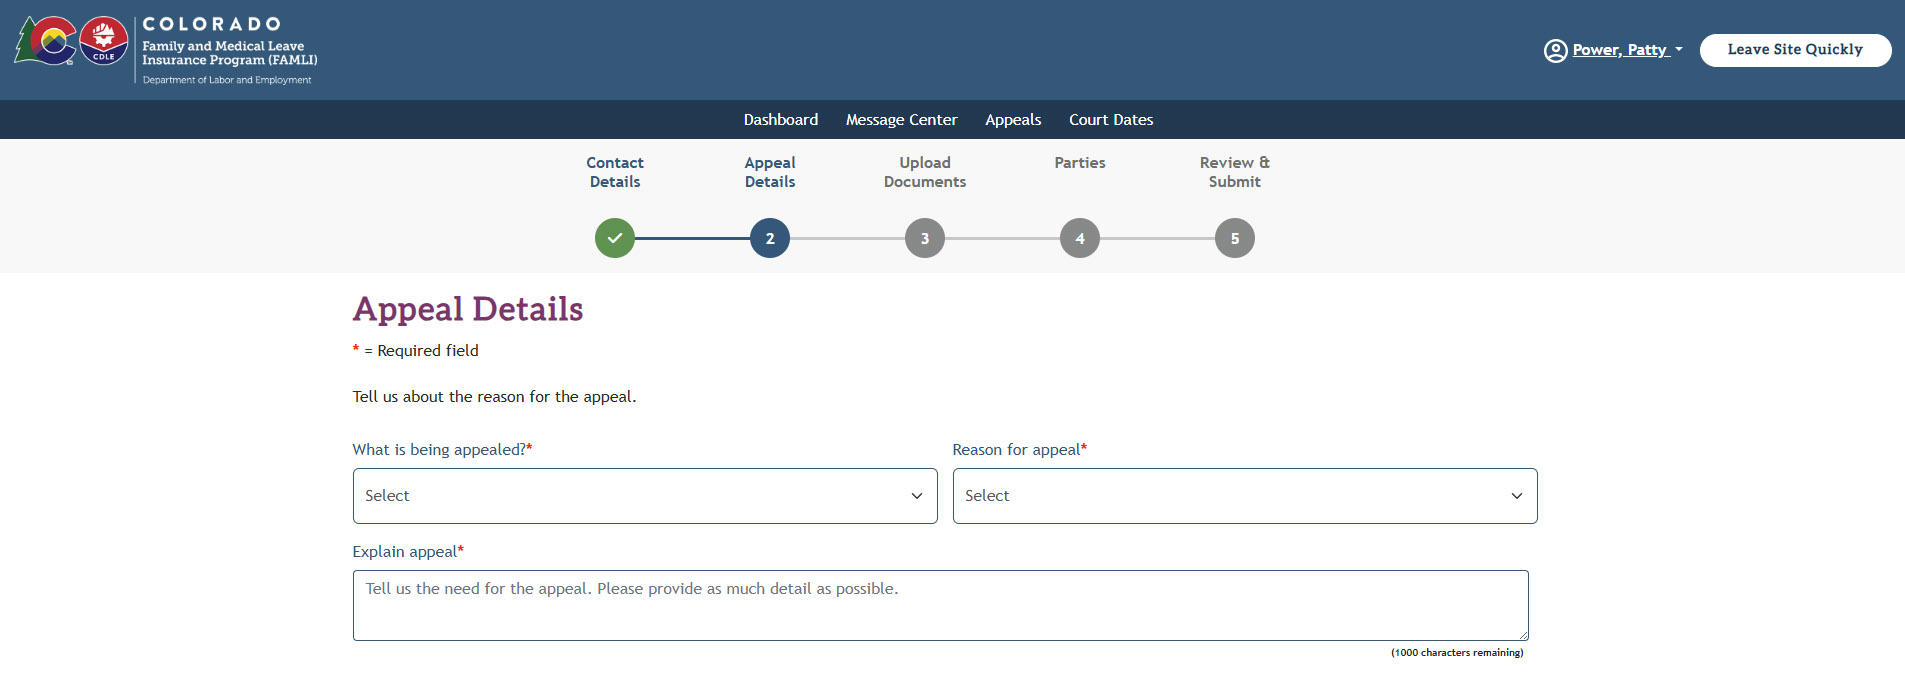
- Select what is being appealed and the reason for the appeal. Fill in the appeal explanation.
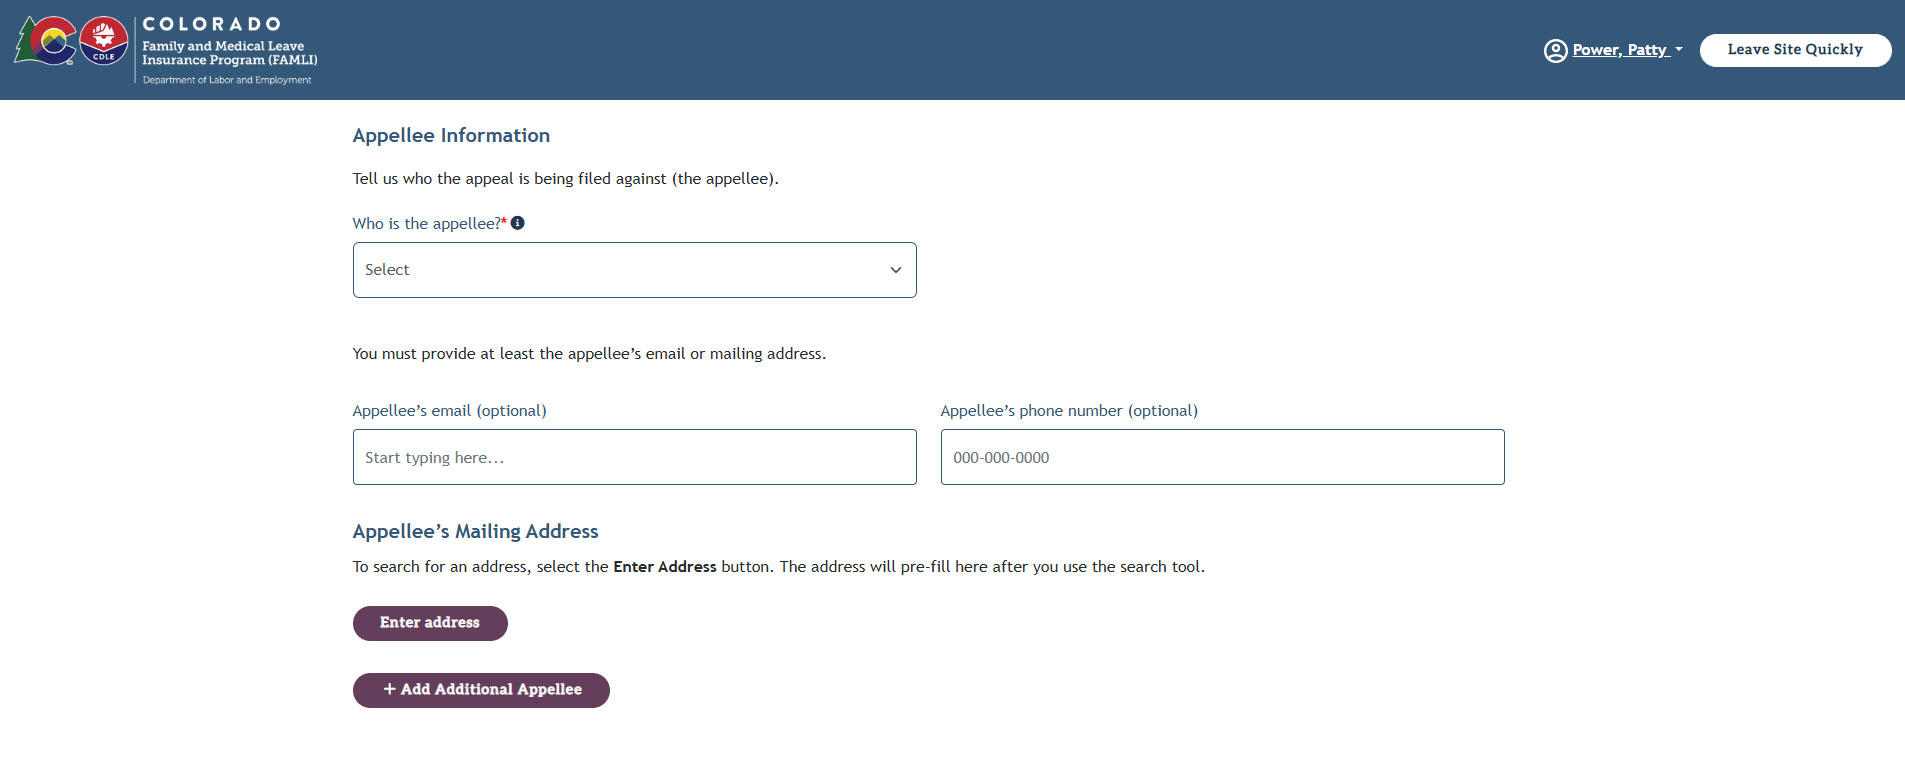
- Next, you will provide the appellee information. This is who you will be filing the appeal against. If you are the claimant filing an appeal against a decision made by the FAMLI Division, you are the appellant and FAMLI is the appellee. There is an option to add an additional appellee. You are required to provide the appellee’s email or mailing address.
- Next, provide claim information if it applies to your appeal.
If you started filing an appeal over a Benefits Decision, you will be able to select the appropriate claim via the Select Claim Information button.

You will be able to select the appropriate claim you wish to appeal from all the processed claims on your claimant account.
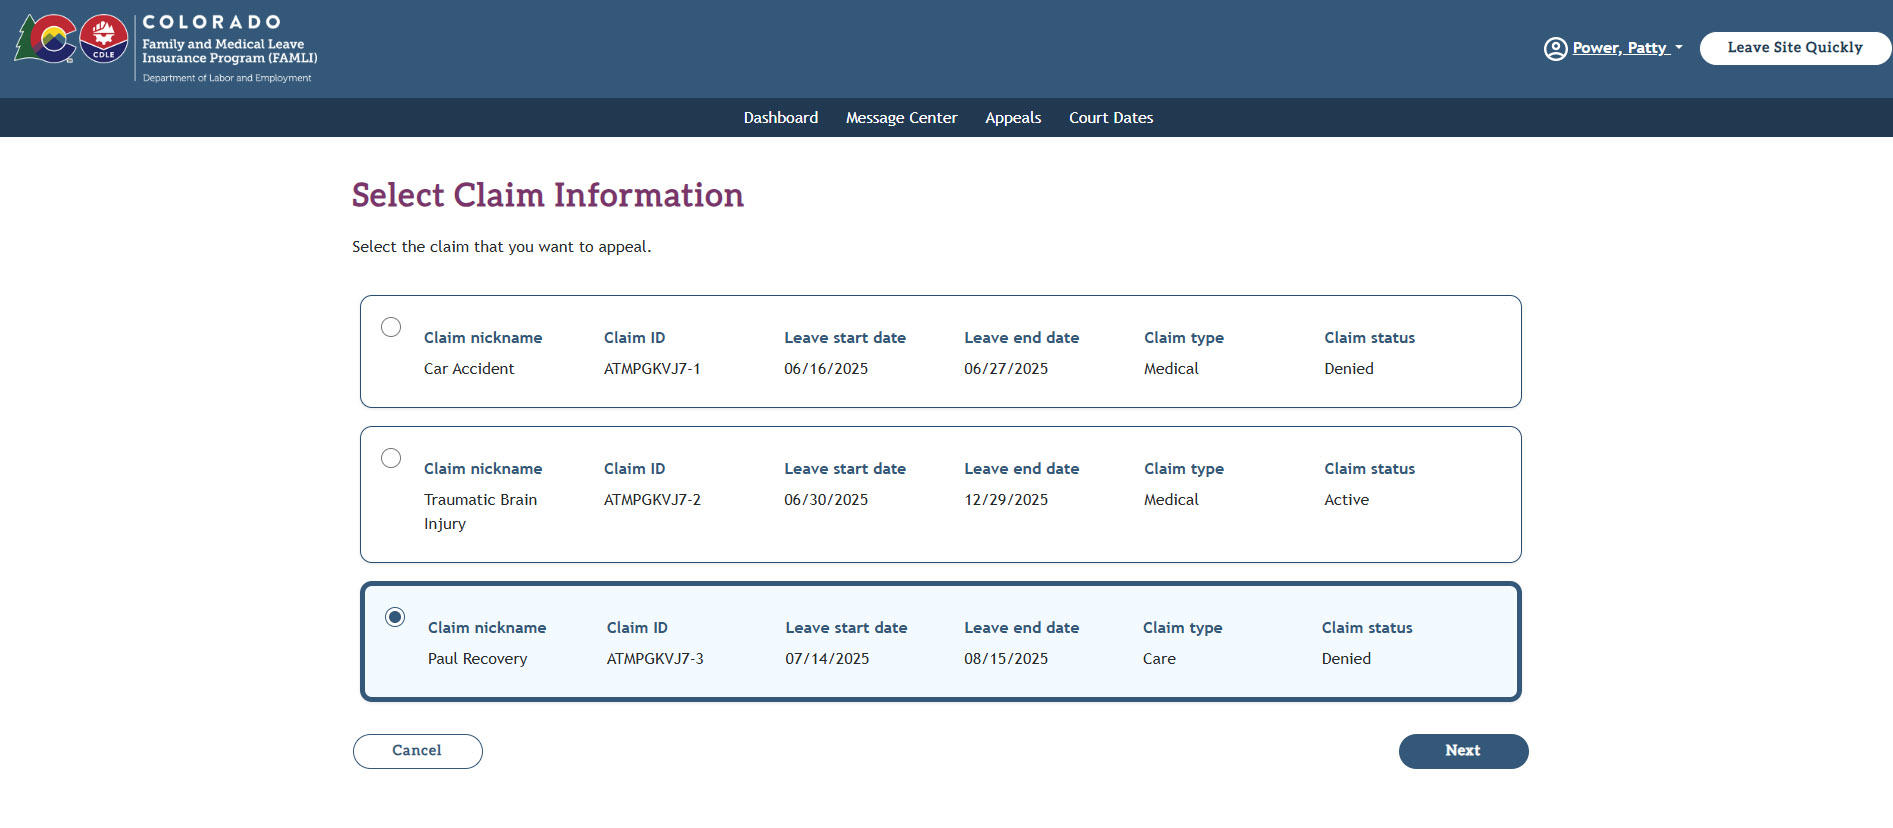
Selecting Next will bring up the list of Eligibility IDs associated with the claim that you can choose to appeal.
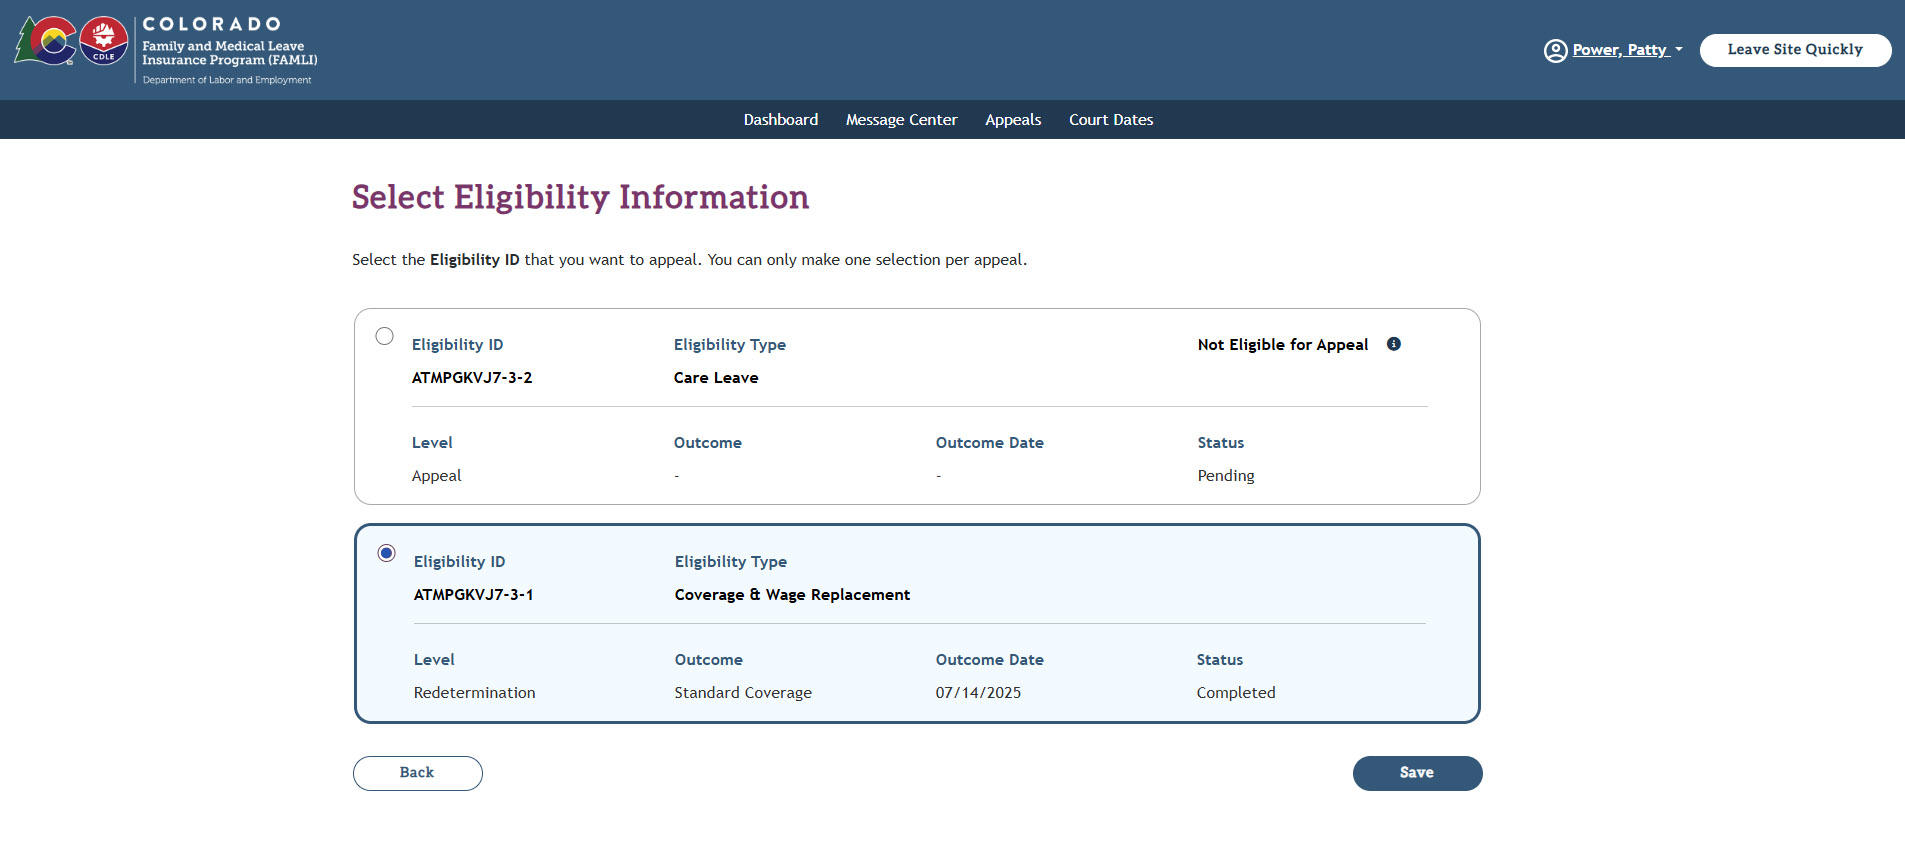
NOTE: Some Eligibility IDs are Not Eligible for Appeal. Selecting the tool tip will explain why the Eligibility ID is not ready to appeal.
Selecting the Save button, will bring you back to the Appeal Details screen where you can review your Claim Information and Eligibility Information selection and change them if needed. The Determination date will automatically populate.
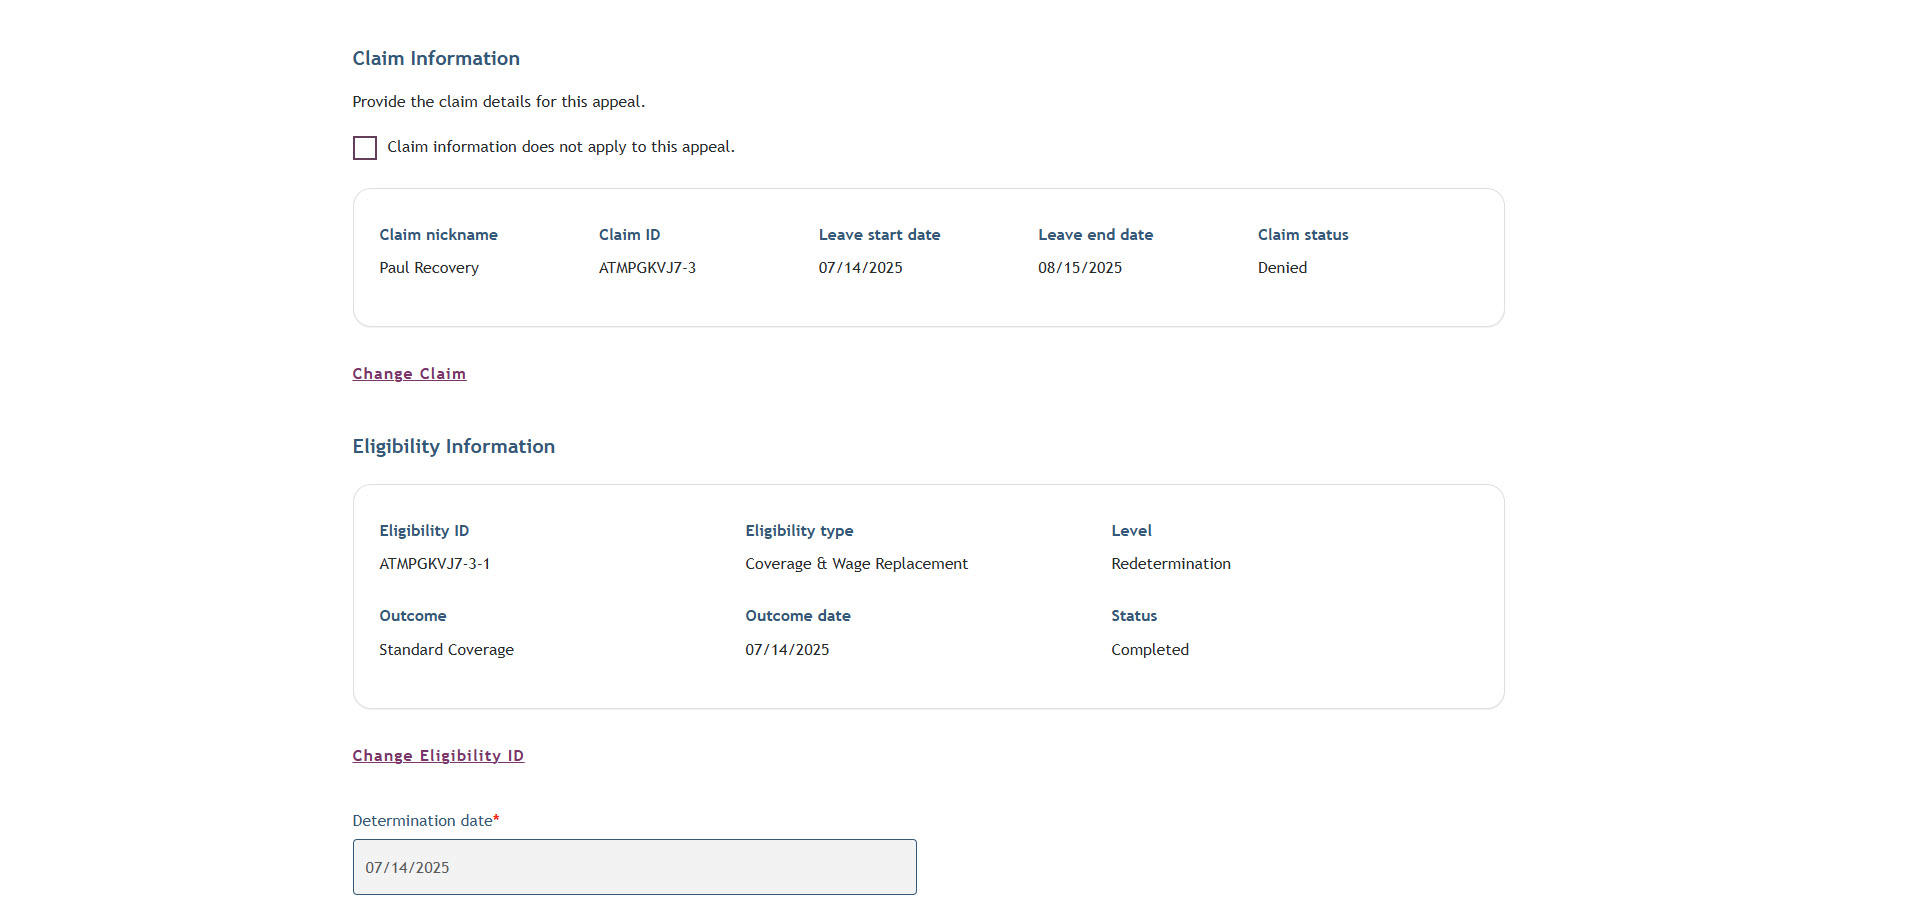
If you started filing an appeal directly from your claimant account, the claim’s information is prepopulated on the Appeal Details screen.

Next, select your employer if it applies to your appeal, or select the checkbox Employment information is not needed for this appeal.
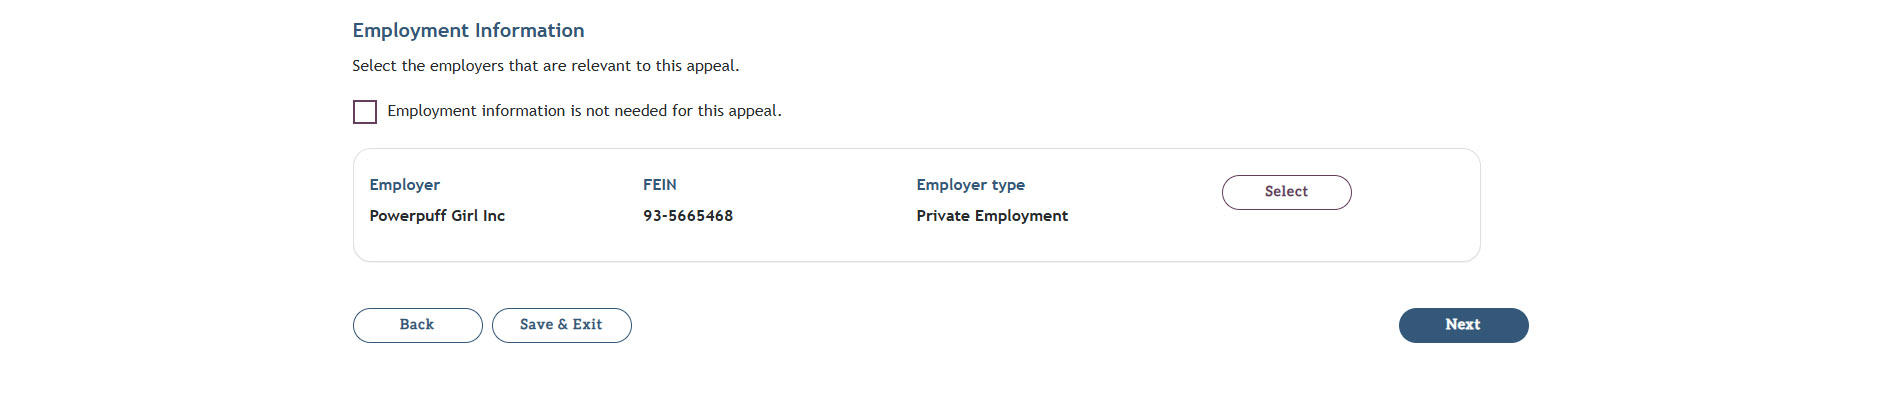
- Select the Next button.
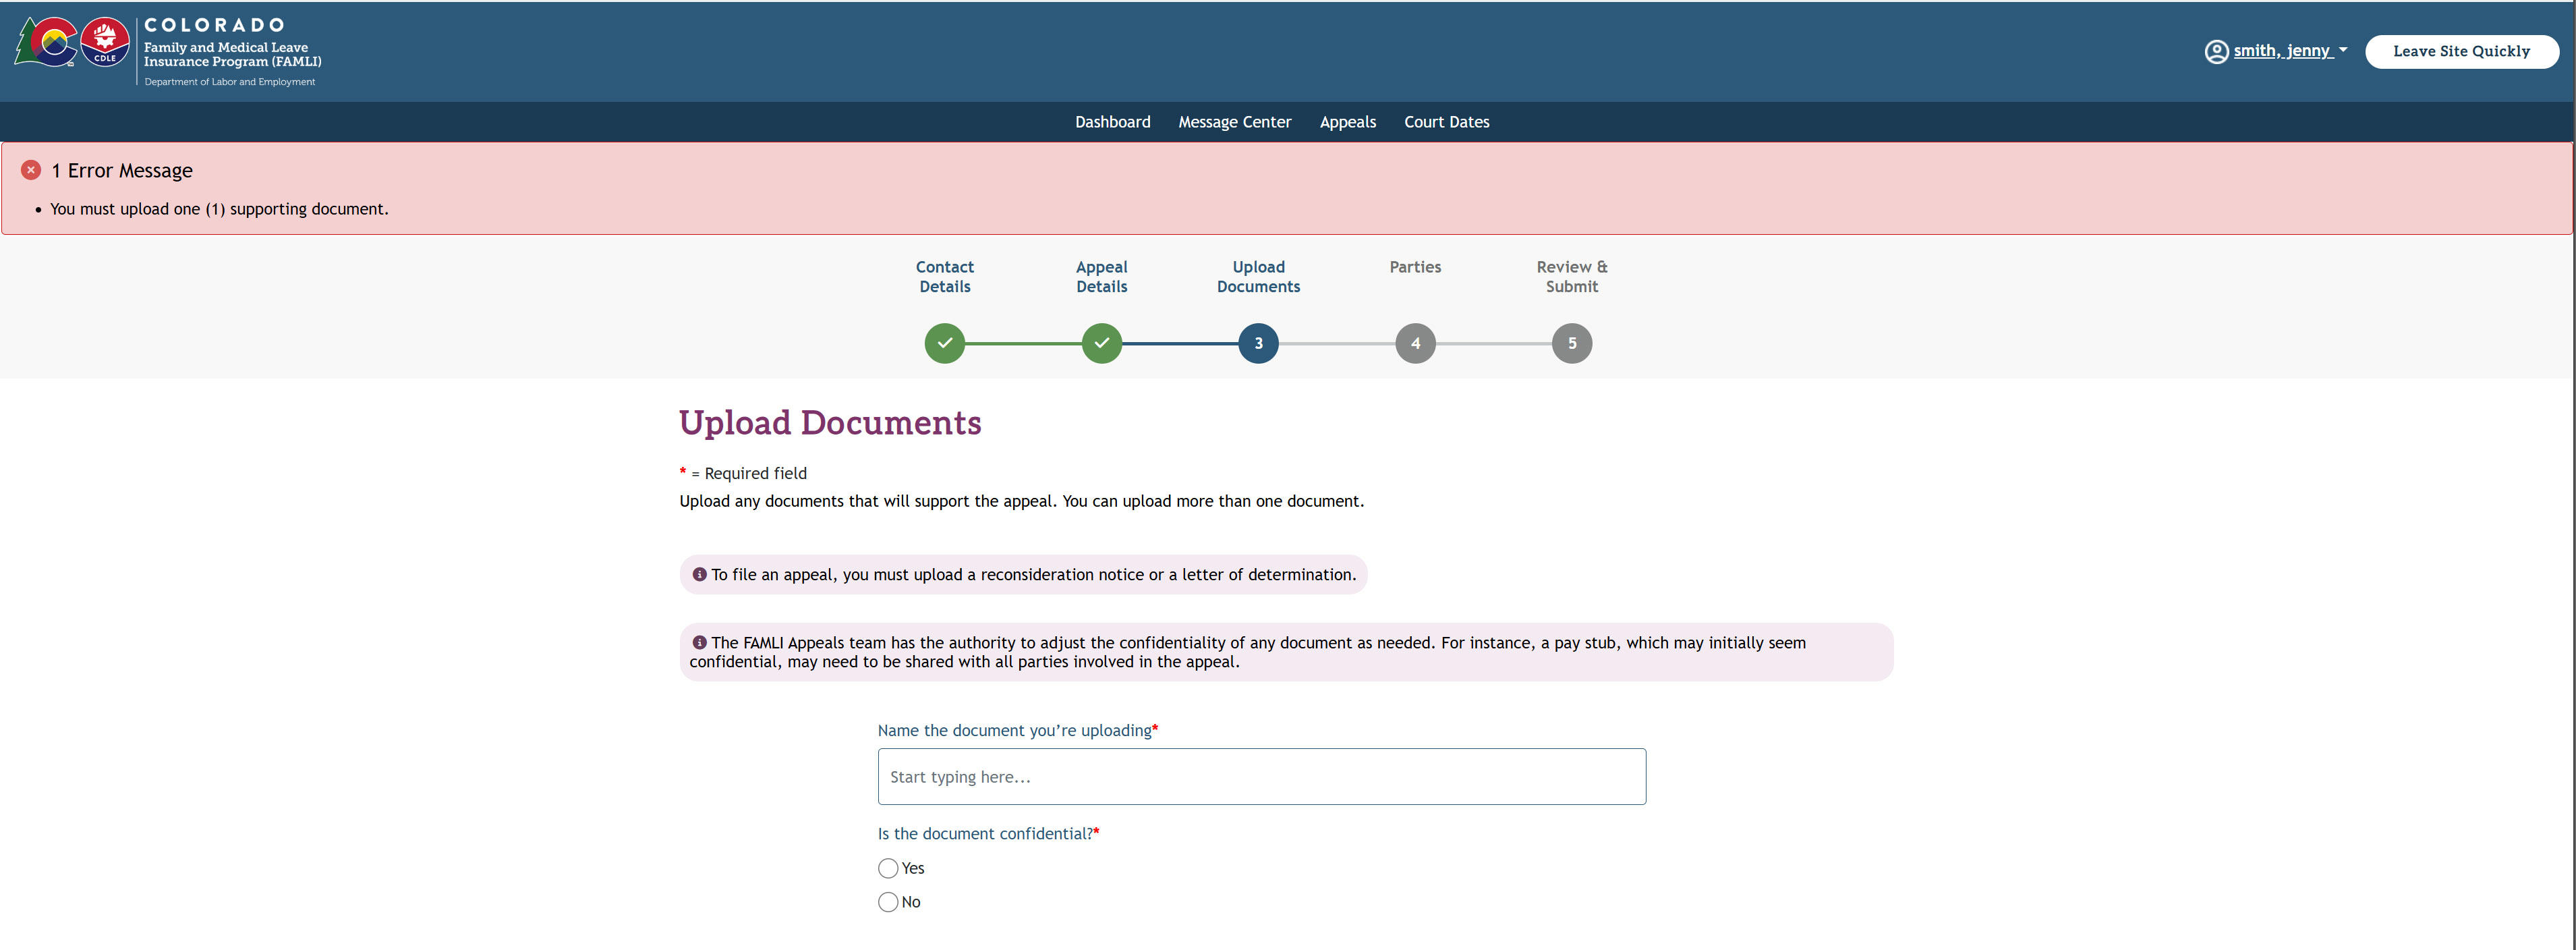
Instructions to upload documents
- This is the third step of the appeal process. You can upload any additional documents that support your appeal. Note that you can upload as many documents as needed.
- For each document, enter a short name that describes it. Additionally, you will be asked if the document is confidential. Select Yes or No.
- Then, choose the document from your device or drag it into the box.
- If the wrong document is uploaded, click the trash icon on the leftmost column under Delete.
- Once you have uploaded all necessary documents, select the Next button.
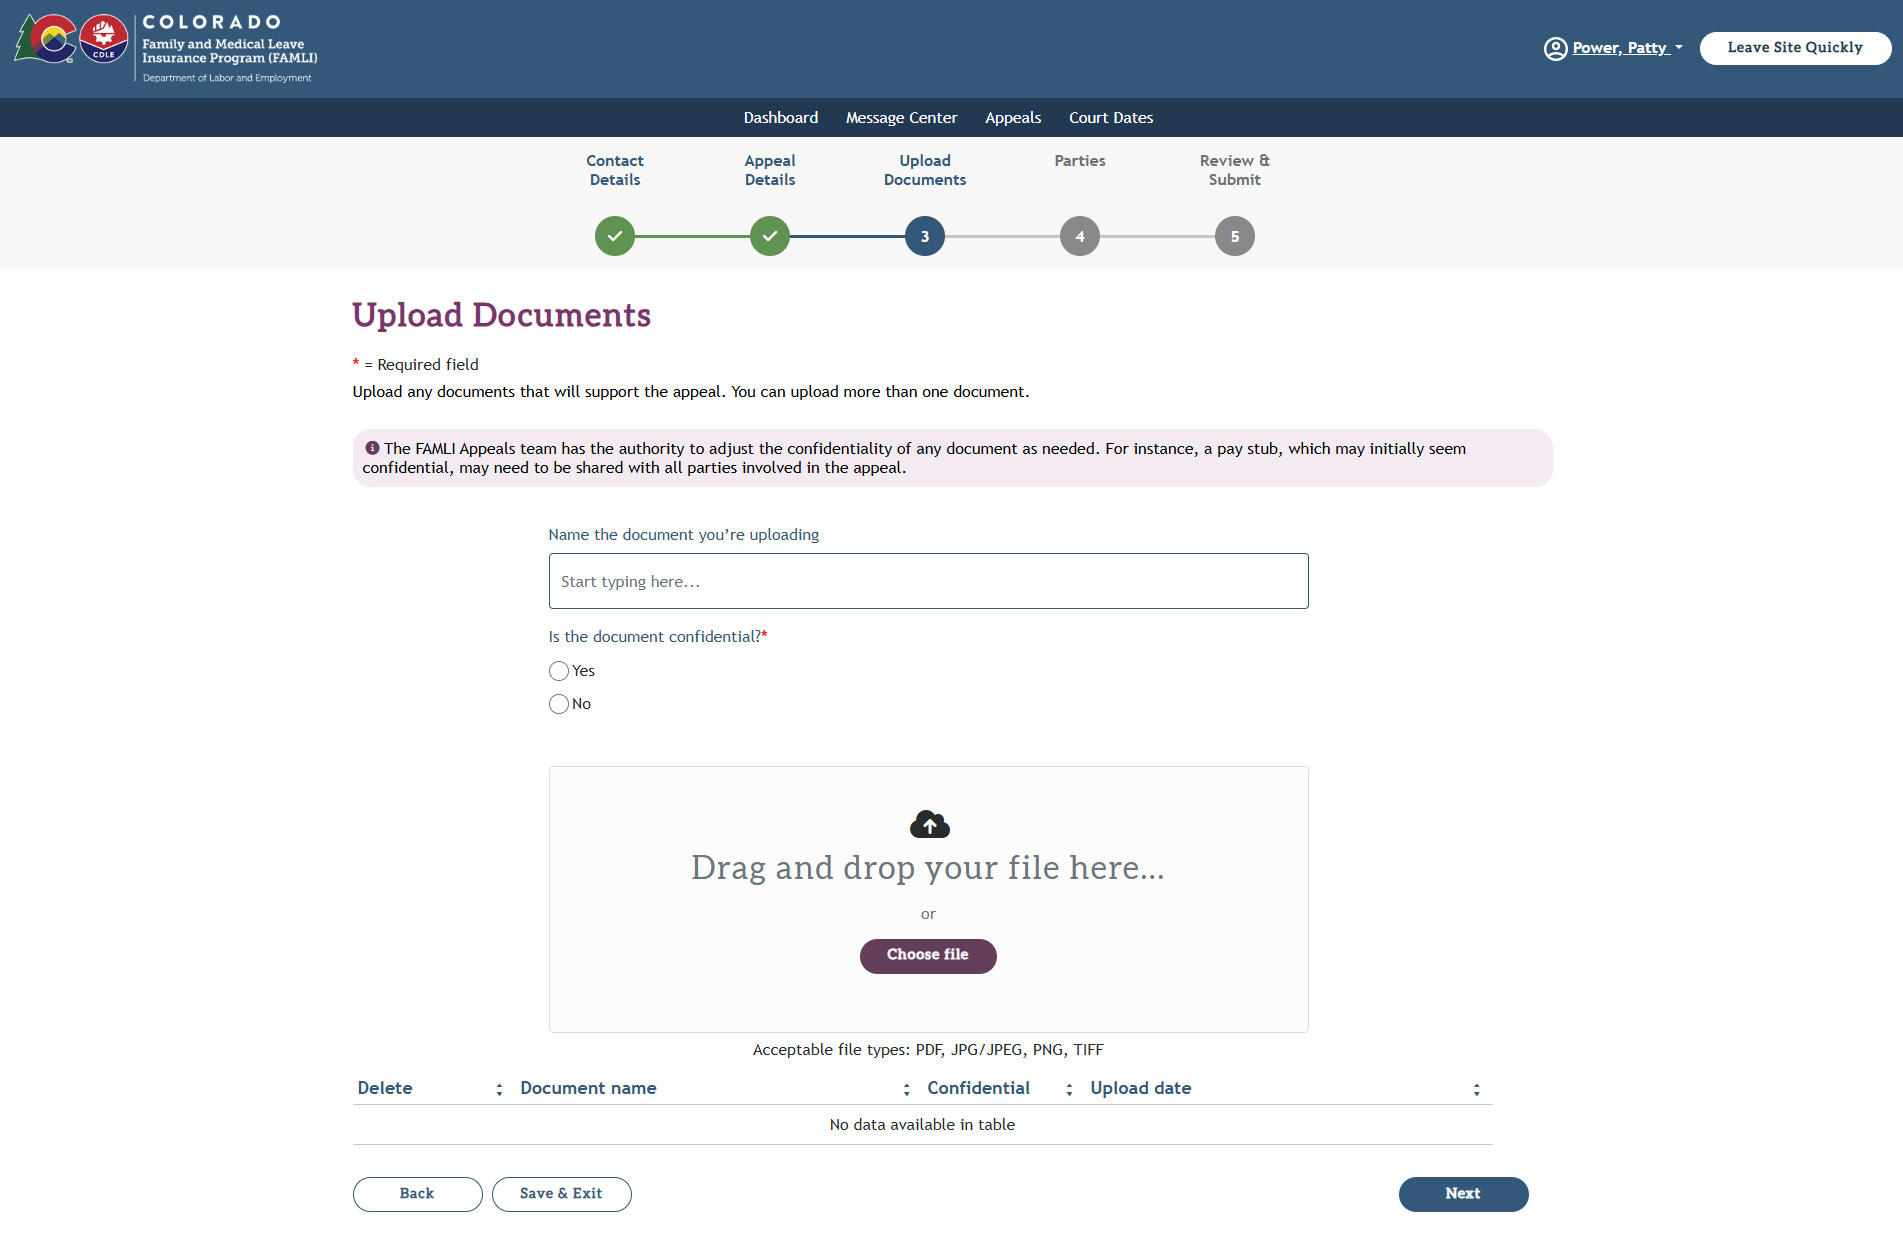
Note: Uploading a document may be required. You will receive an error message and will not be able to proceed until you have uploaded the necessary documentation.
Instructions to add parties
- In the fourth step of the process, you will have the option to add parties to your appeal. Adding parties ensures that all relevant individuals who have a stake in the outcome are kept informed. Click Yes if you would like to add parties. Otherwise, click No to proceed.
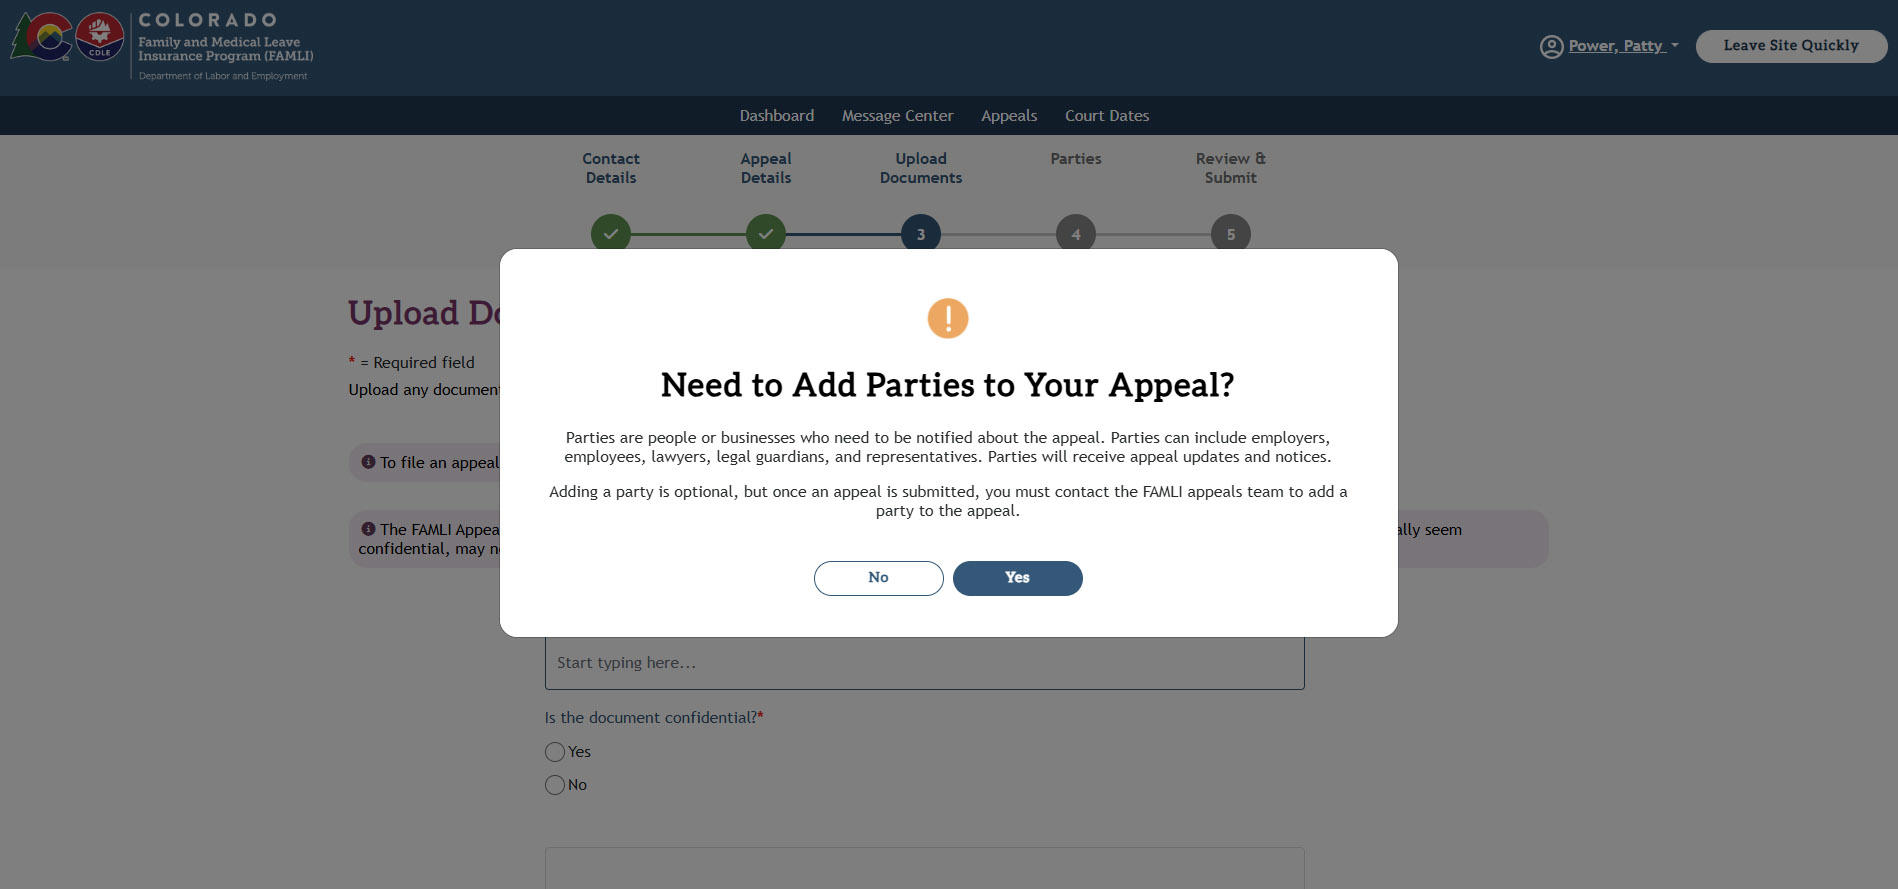
- If you select Yes, you will be taken to the Parties page. Select Add Party.
- Select the type of party you are adding and their role in the appeal.
Next, enter the reason you would like to add the party and their contact information. Either an email address or a mailing address must be provided for each party.
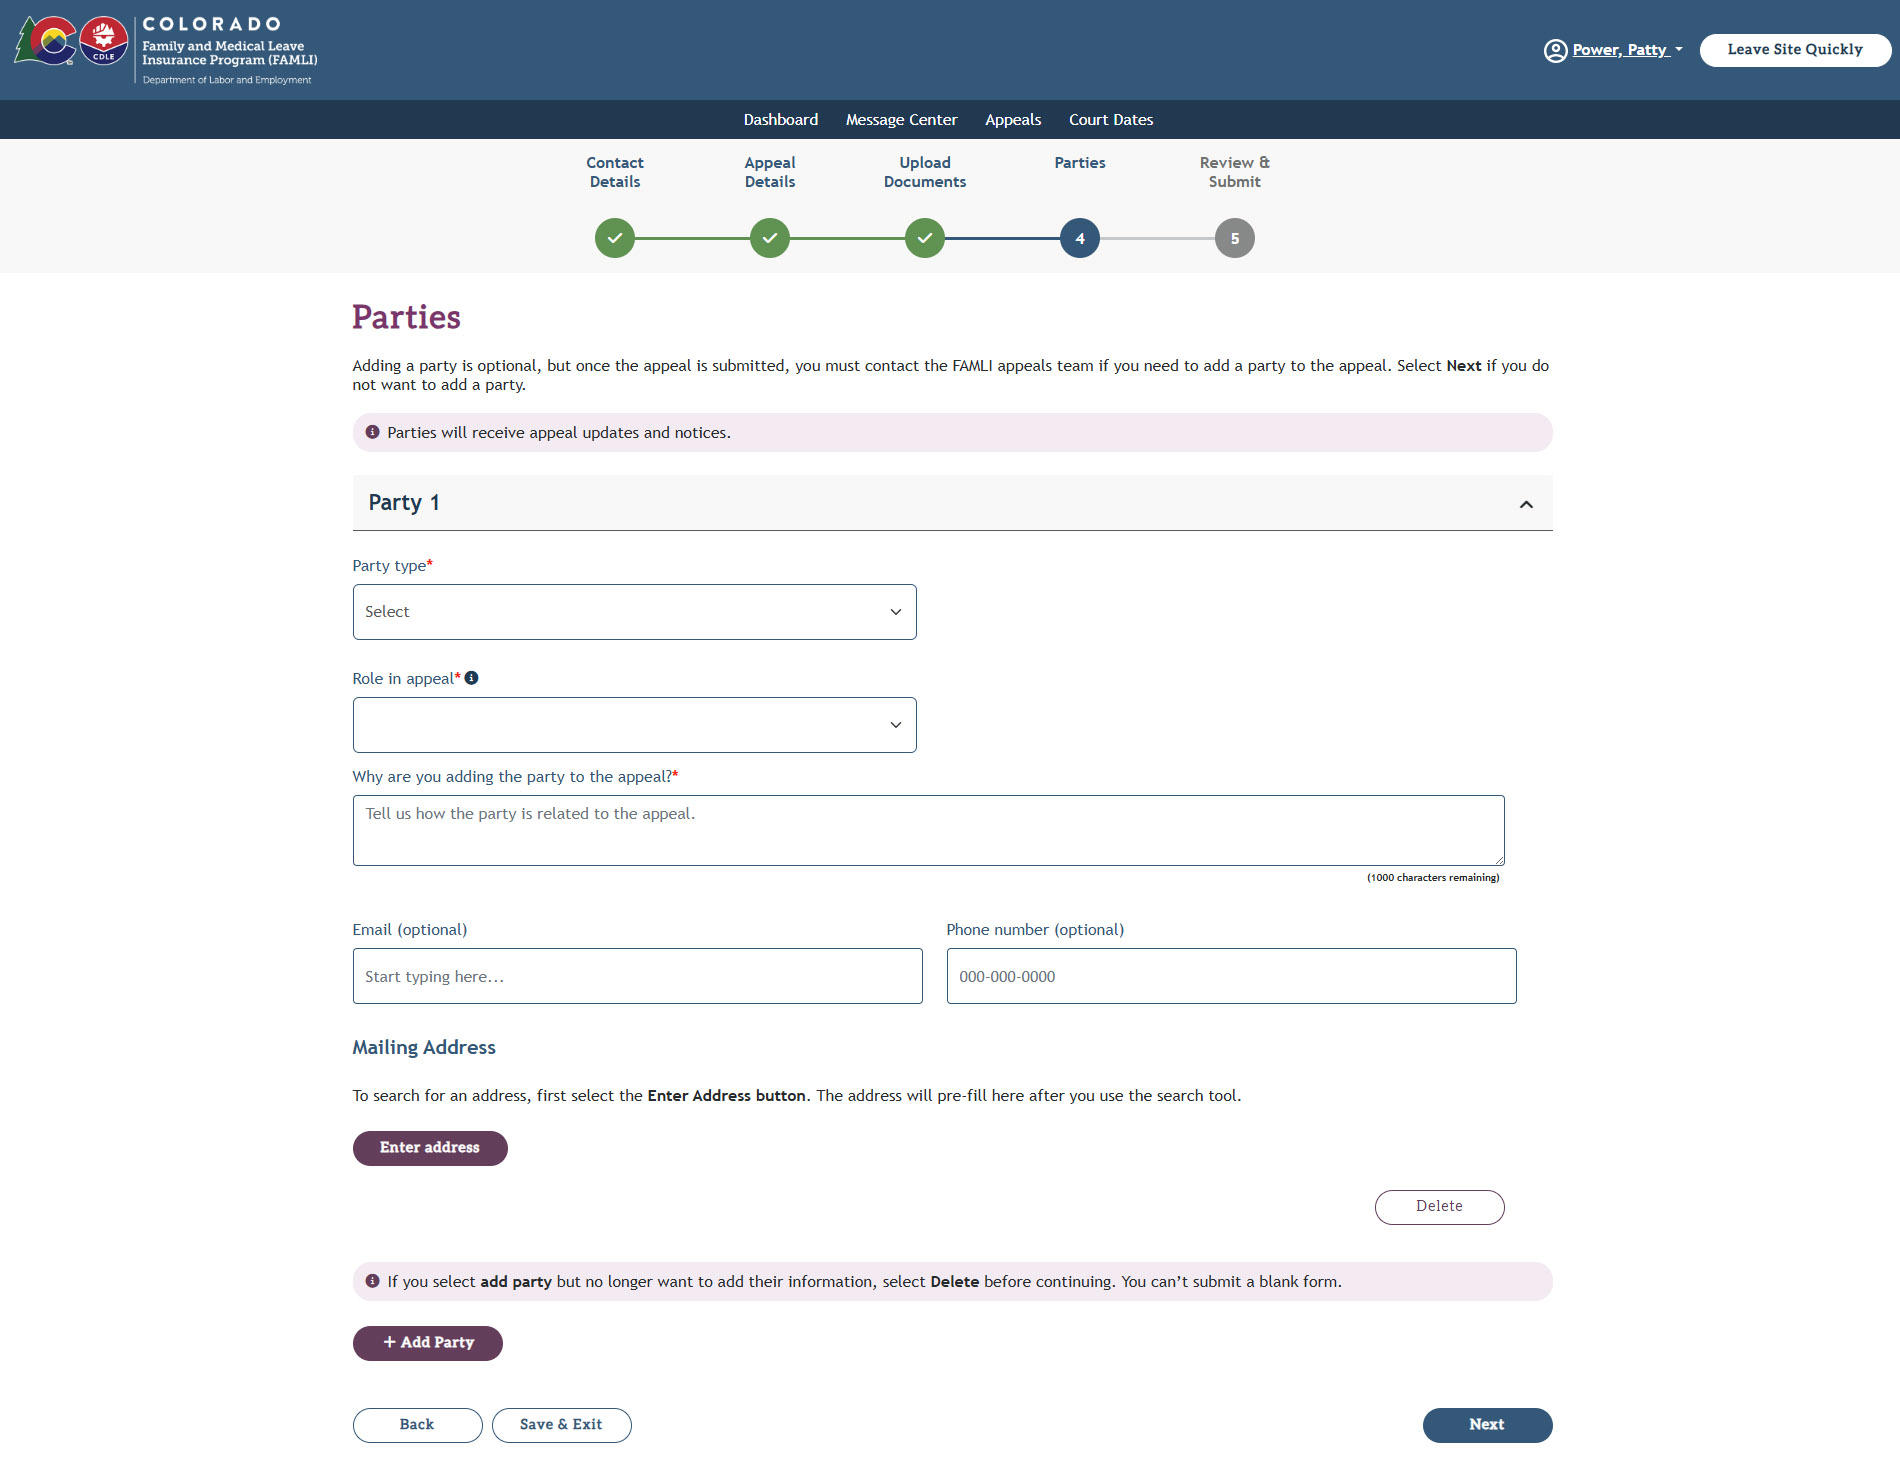
Note: If you add a party but no longer want to add their information, you must remove the party by selecting Delete before continuing. You can’t submit a blank form.
- Once you have added the necessary parties, select Next.
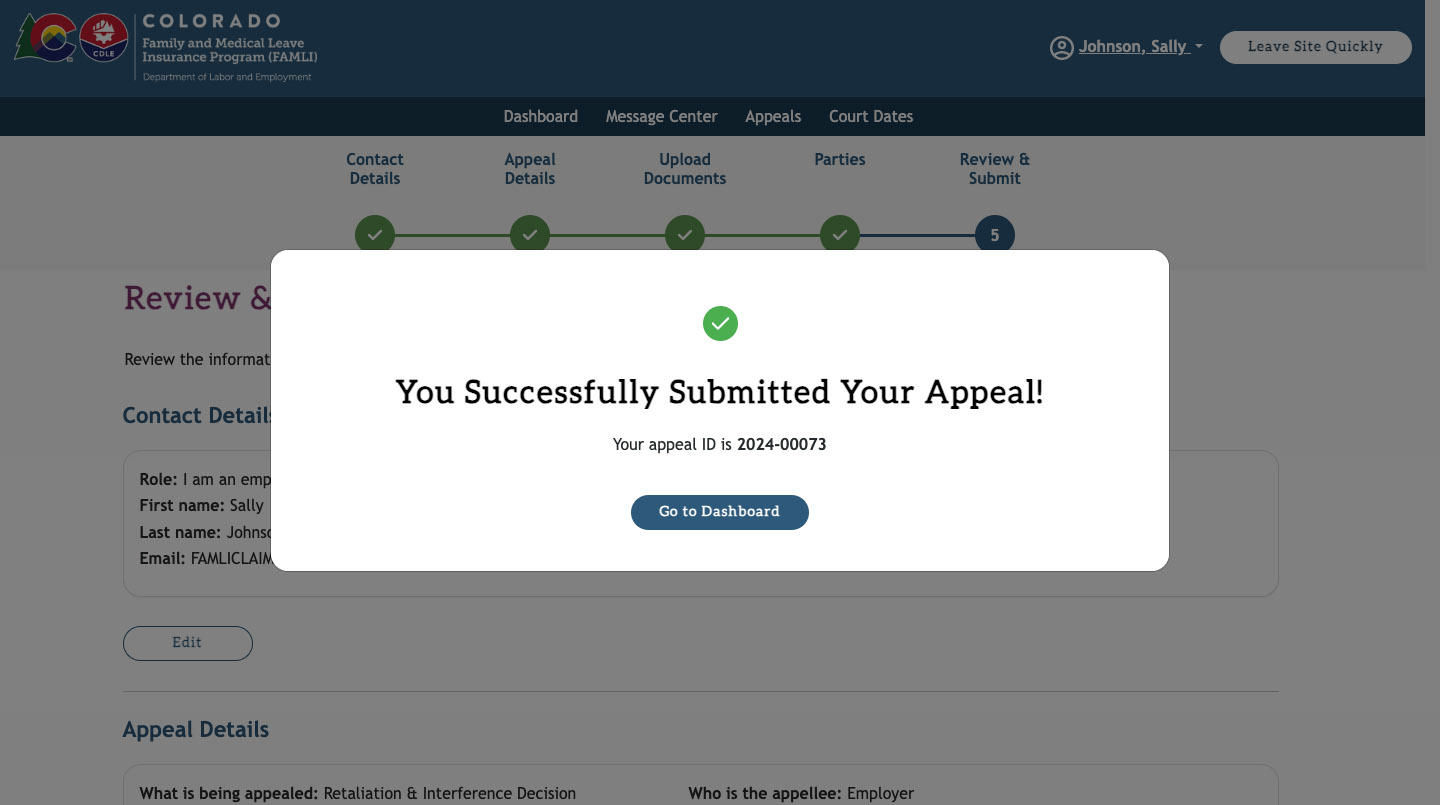
Instructions to review and submit the claim
- This is the final step of the appeal process. Here, you must review the details and submit the appeal.
- On the Review & Submit page, carefully read through the details you entered. If you find a mistake, you can correct it by selecting the Edit button.
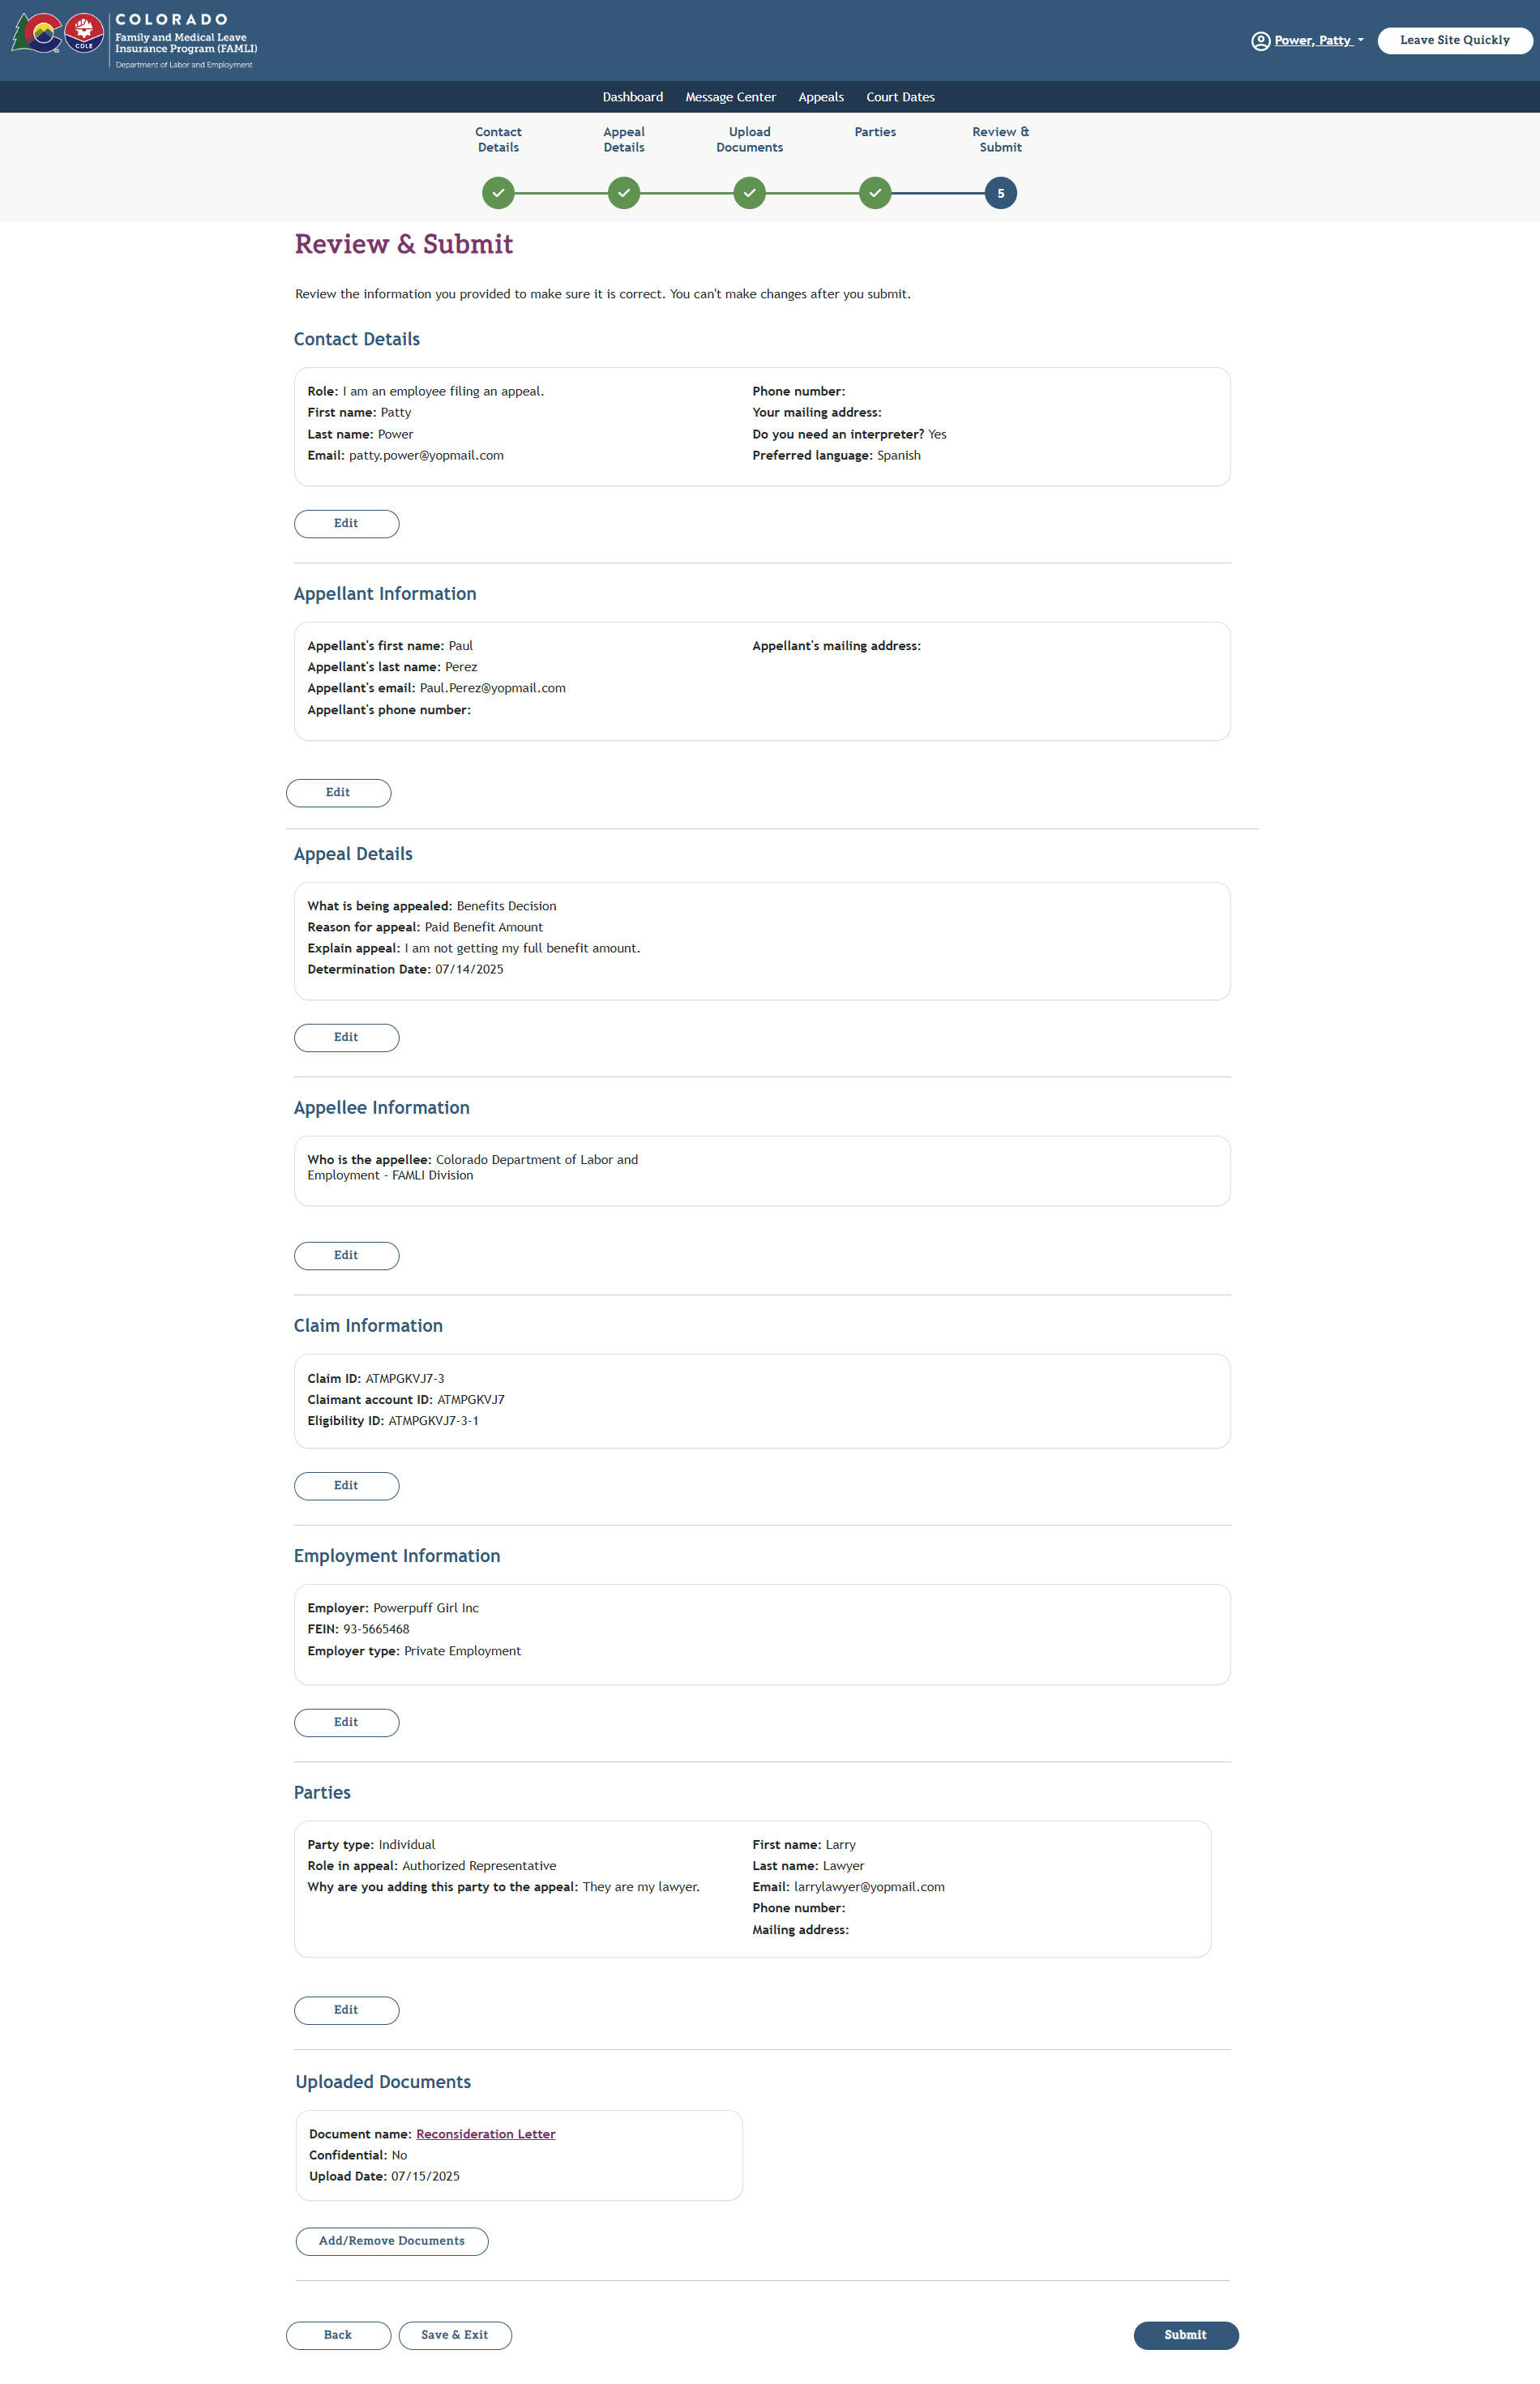
- To submit your appeal, select the Submit button.
- This shows that your appeal was submitted successfully.
You have gone through the entire process of filing an appeal as an employee. This process can differ depending on who is submitting the appeal. In addition to appealing a FAMLI leave decision as an employee, you can also file an appeal as the following:
- You are a representative filing on behalf of an employee
- You are filing on behalf of an employer
- You are filing on behalf of an insurance provider
Instructions for filing as a representative on behalf of an employee
- You will be asked “Which option best describes you?” To begin, please choose the second option: "I am a representative filing an appeal on behalf of an employee".
- On the Contact Details page, select your relationship to the employee and fill in the appellant’s contact information (the claimant you are filing on behalf of is the appellant in this scenario).
- Lastly, you may choose to enter the appellee’s mailing address. This is optional if you entered the appellee’s email address.
- You have the option to add another appellant to your appeal. You will need to add either their mailing address or email address of the additional appellant.
Note: If you add an additional appellant but no longer want to add their information, you must remove the employer by selecting Delete before continuing. You can’t submit a blank form. - Next, you have the option to request an interpreter and select from eight different languages.
- Select the Next button.
Note: The remaining steps of the appeal should be filled out as if you are the claimant.

Instructions for filing on behalf of an employer
- You will be asked “Which option best describes you?” To begin, please choose the third option: "I am filing an appeal on behalf of an employer".
- On the Contact Details page, select your relationship to the employer and fill in the appellant’s contact information (the employer is the appellant in this case).
- Lastly, you may choose to enter the appellee’s mailing address. This is optional if you entered the appellee’s email address.
- You have the option to add another appellant to your appeal. You will need to add either their mailing address or email address of the additional appellant.
Note: If you add an additional appellant but no longer want to add their information, you must remove the employer by selecting Delete before continuing. You can’t submit a blank form. - Next, you have the option to request an interpreter and select from eight different languages.
- Select the Next button.
Note: The remaining steps of the appeal should be filled out as if you are the employer.
Instructions for filing on behalf of an insurance provider
- You will be asked “Which option best describes you?” To begin, please choose the fourth option: "I am filing an appeal on behalf of an insurance provider”.
- On the Contact Details page, select your relationship to the insurance provider and fill in the appellant’s contact information (the appellant is the insurance provider in this case).
- Lastly, you may choose to enter the appellee’s mailing address. This is optional if you entered the appellee’s email address.
- You have the option to add another appellant to your appeal. You will need to add either their mailing address or email address of the additional appellant.
Note: If you add an additional appellant but no longer want to add their information, you must remove the employer by selecting Delete before continuing. You can’t submit a blank form. - Next, you have the option to request an interpreter and select from eight different languages.
- Select the Next button.
Note: The remaining steps of the appeal should be filled out as if you are the insurance provider.
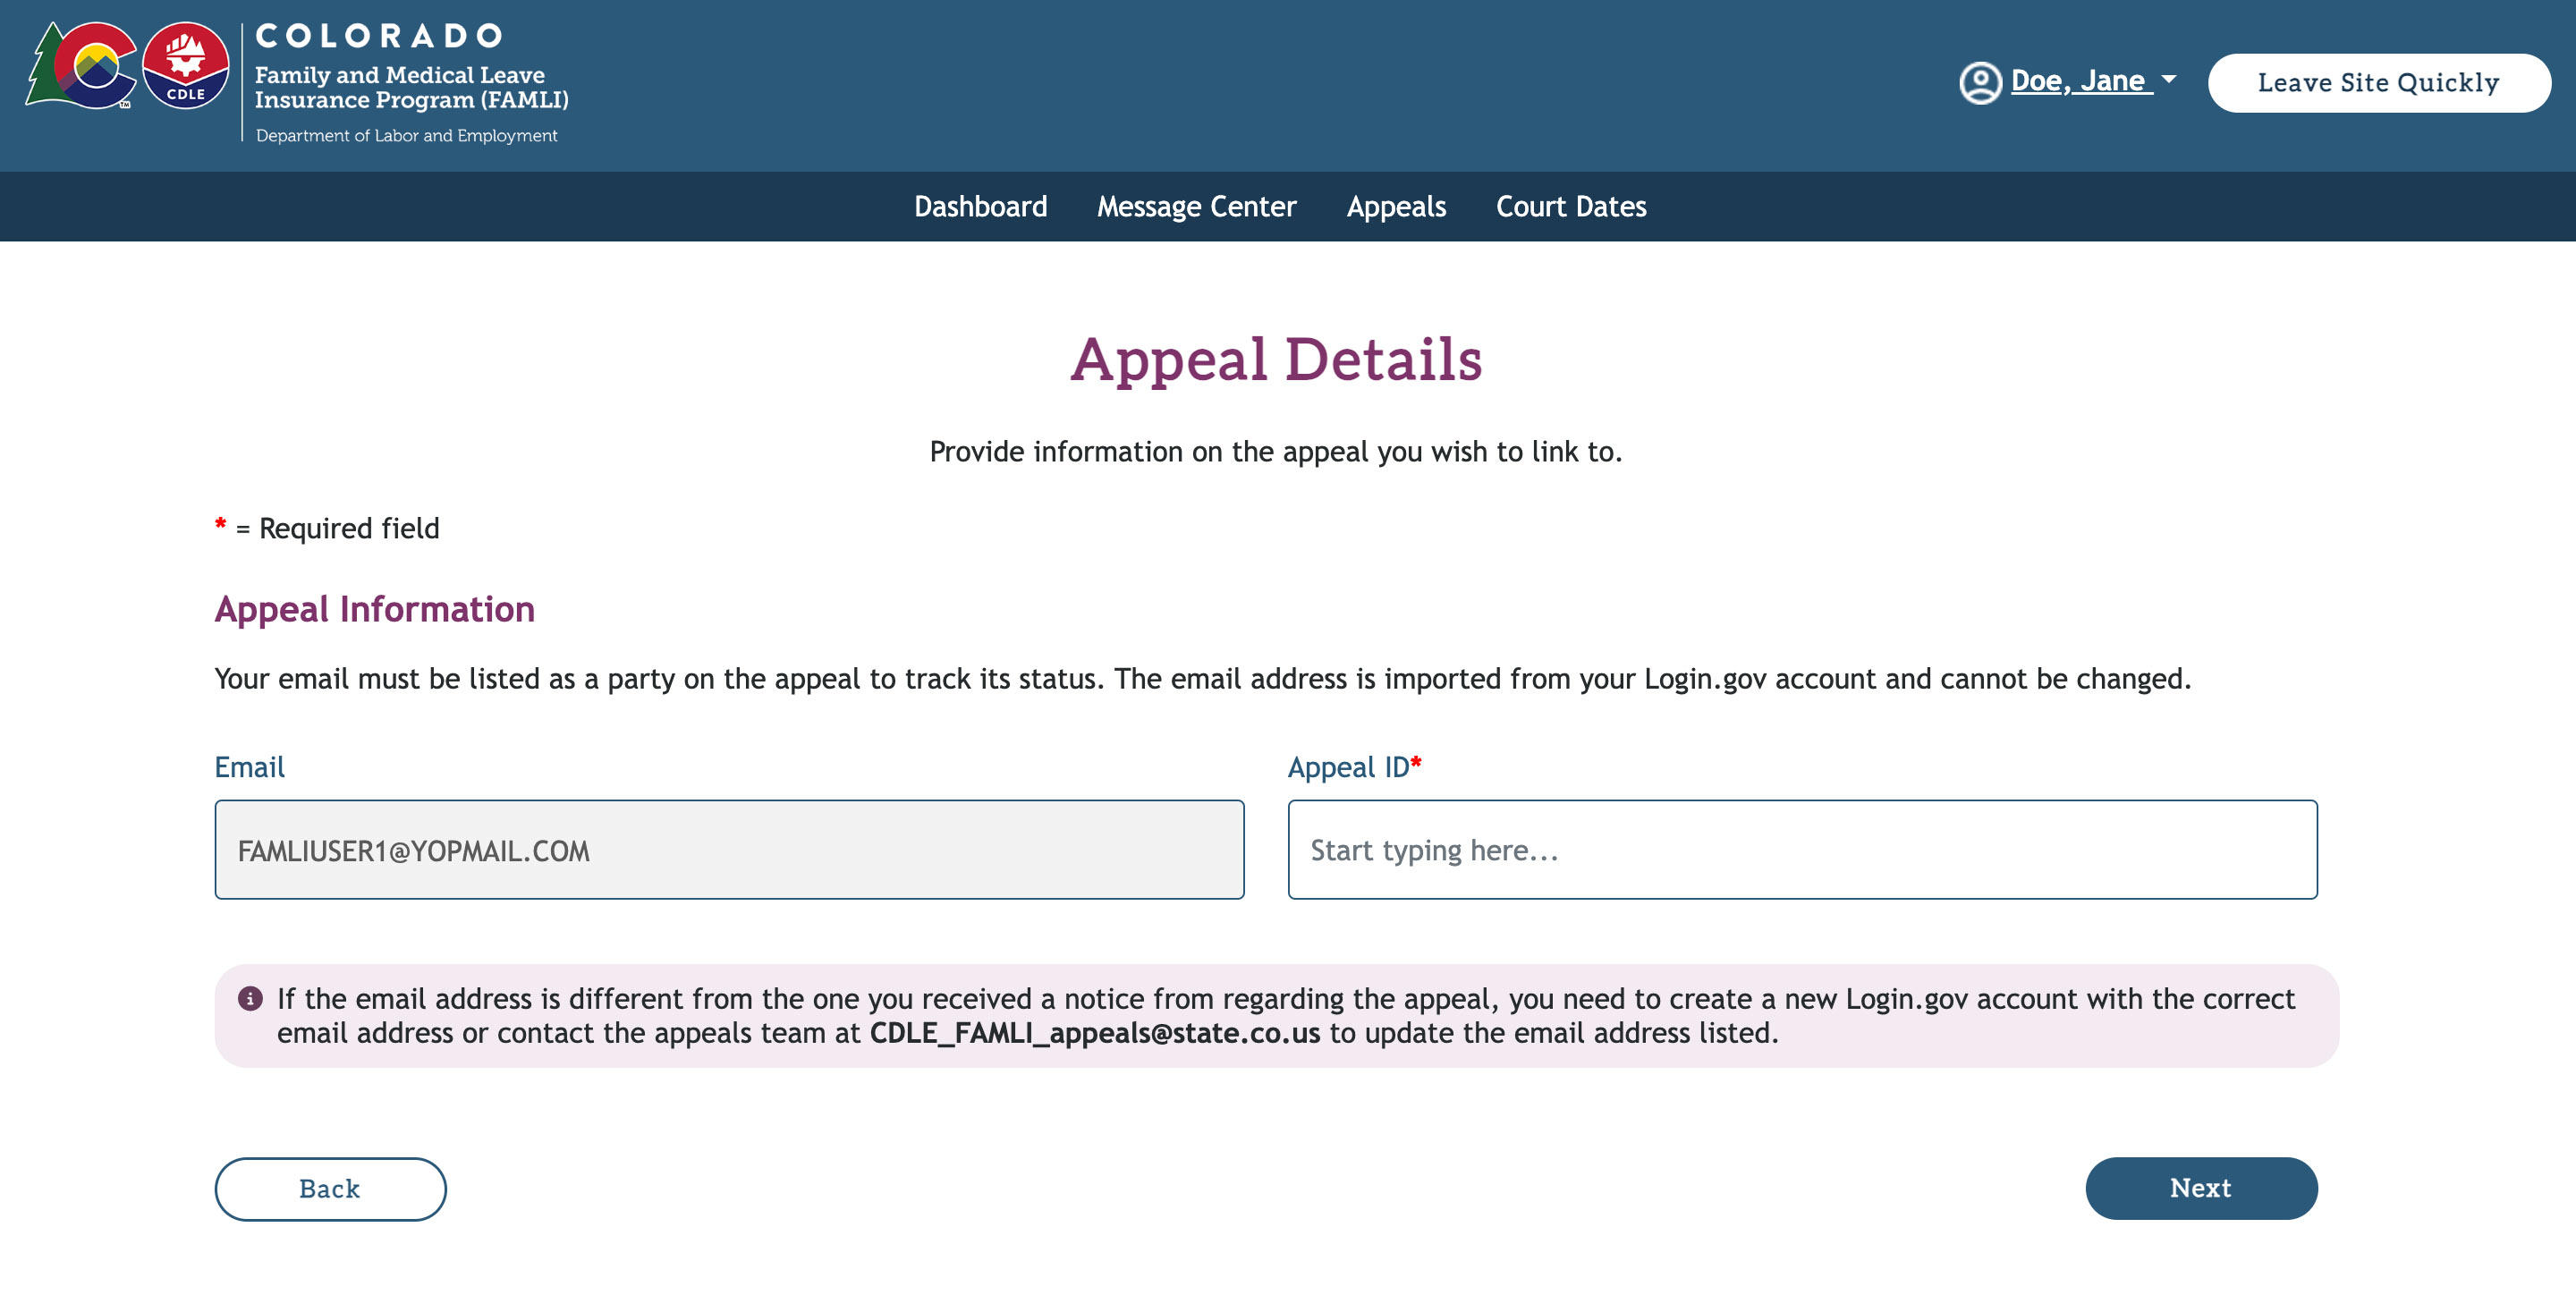
If you have been added as an interested party by a claimant, an employer, an insurance provider, or a legal representative, you can track an appeal's progress.
- Once you create a My FAMLI+ account and log in, select Link to an Appeal on your appeals dashboard.
- You will be asked to provide the Appeal ID, this is required.
Note: The appeal ID can be found in the email you received to let you know that you have been added to an appeal as an interested party.
Now that you created an appeals account, you can log in and access your account from this website. Bookmark the My FAMLI+ Login page to find it quickly in the future.
Instructions to Access Your Appeals Account
- Select the Log In button. You will be taken to the Login.gov page.
- You will be prompted to authenticate your login. This will be the preferred authentication method you set when you registered through Login.gov, or when you connected your My FAMLI+ account to Login.gov.
- Once you’ve successfully logged in, you will be asked if you want to go to the appeals account you just created, file a claim (or visit your existing claimant account), or manage patient claims as a health care provider (or visit your existing health care provider account).

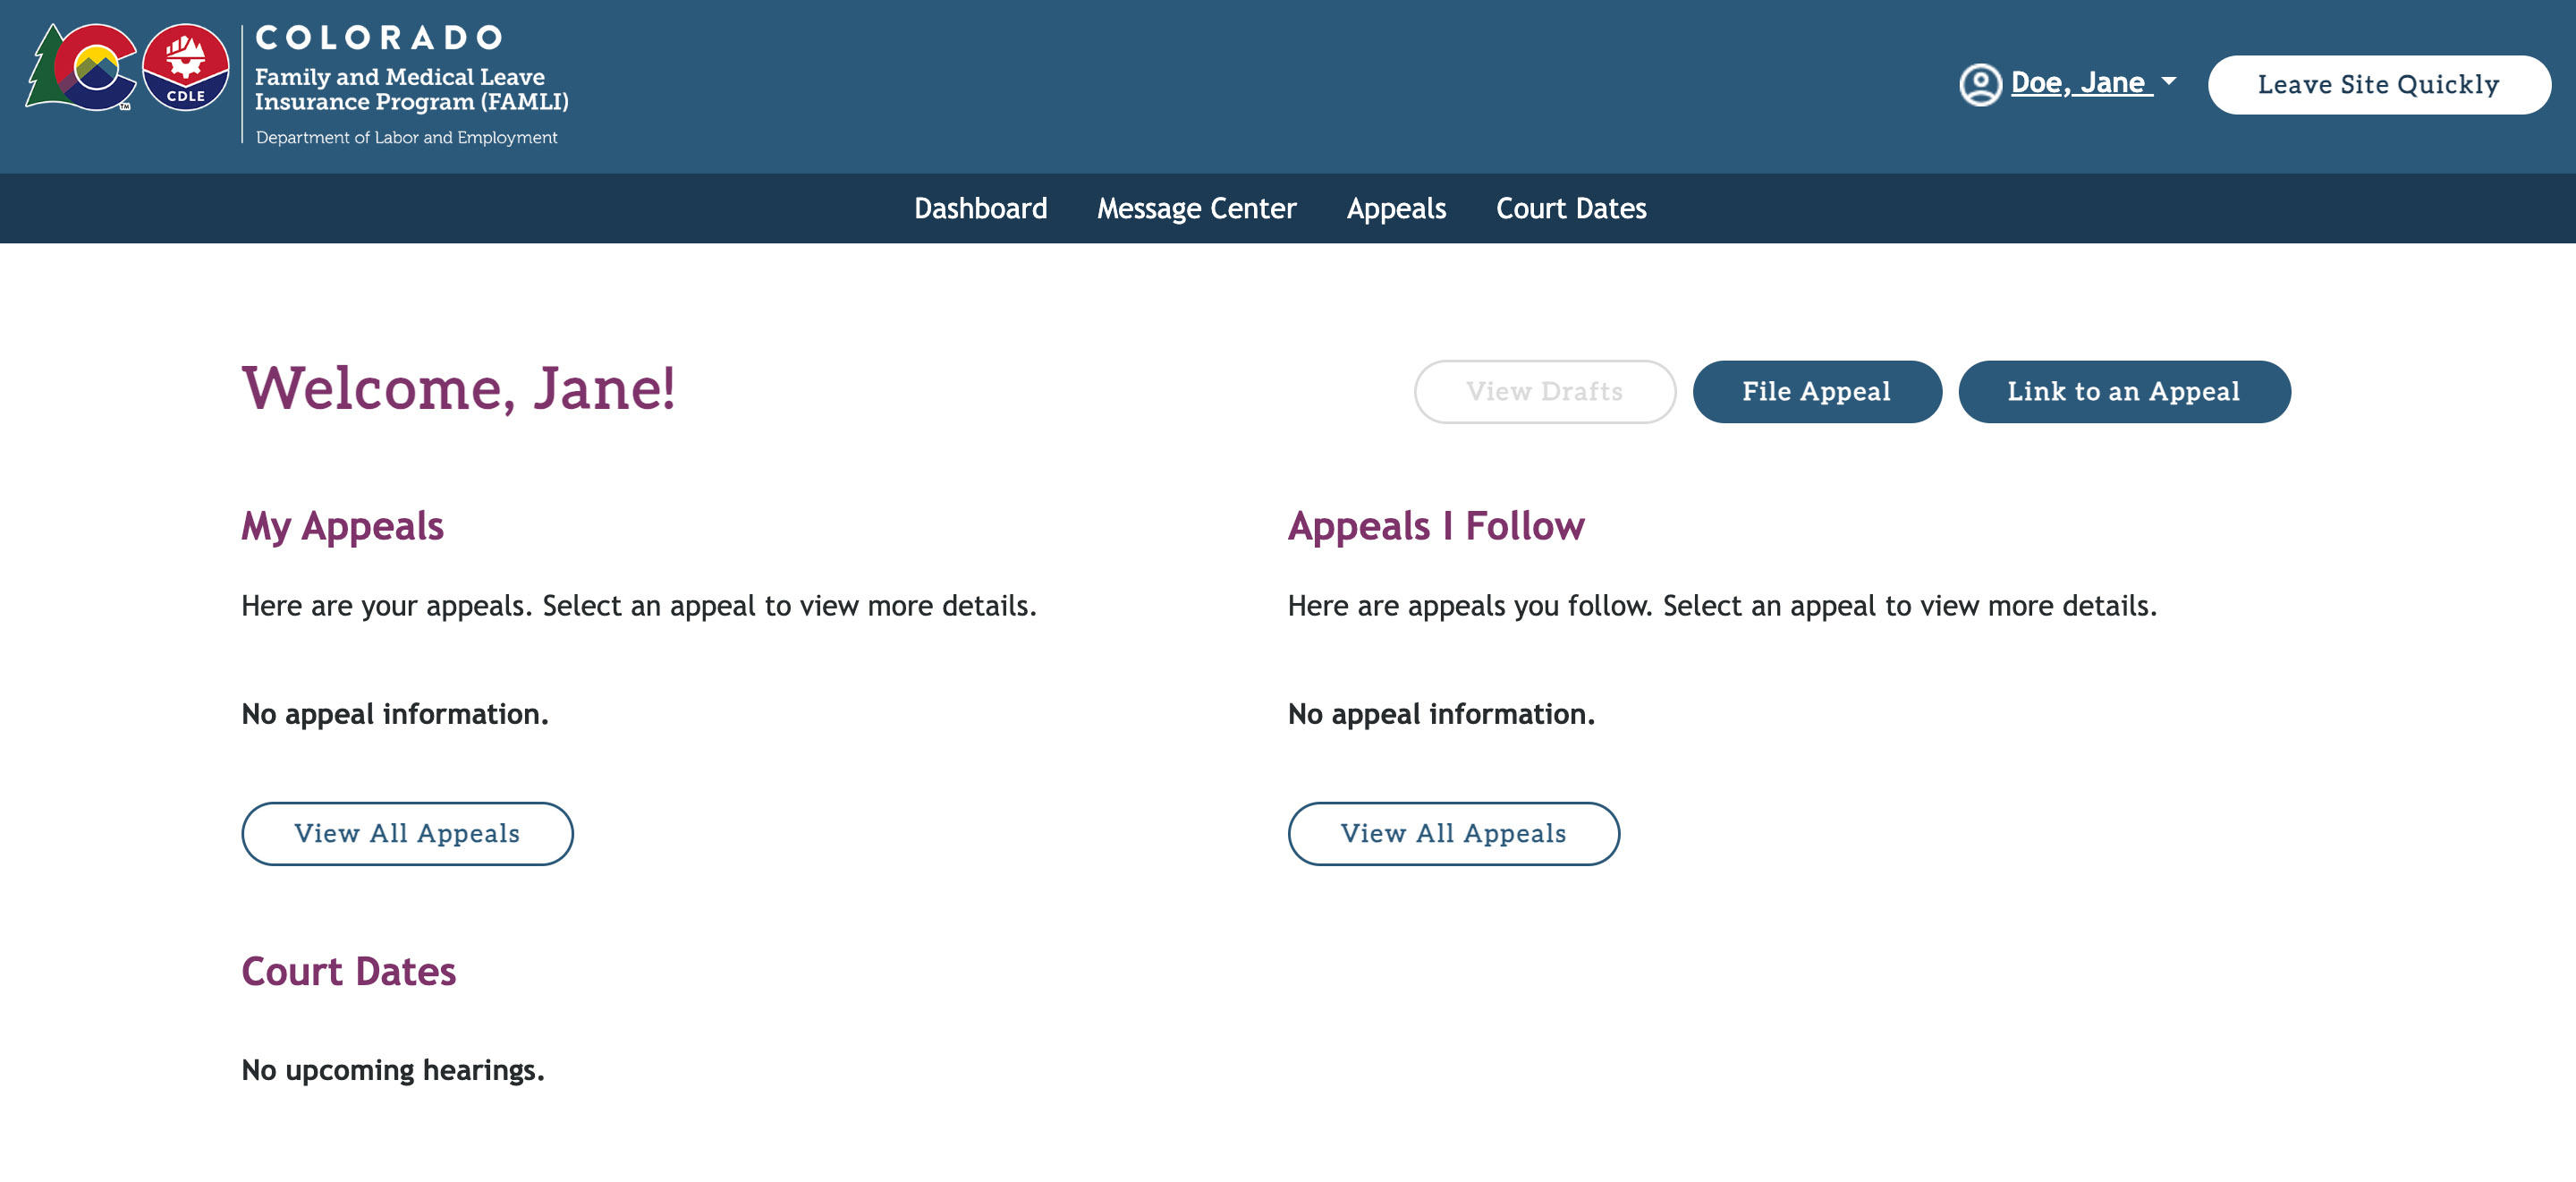
- Selecting Appeals Account will take you to your appeals dashboard. This is where you’ll be able to manage and track existing appeals, link your account to other appeals you are involved in and file new appeals.